The Sales History screen displays actual line-by-line sales activity in detail (as opposed to the A/R history which displays a summary. From the Customer Profile screen, click on the ![]() or press F7. The Charge Detail History screen will be displayed.
or press F7. The Charge Detail History screen will be displayed.

Click on the scroll bar on the bottom to move to the right to see additional information.
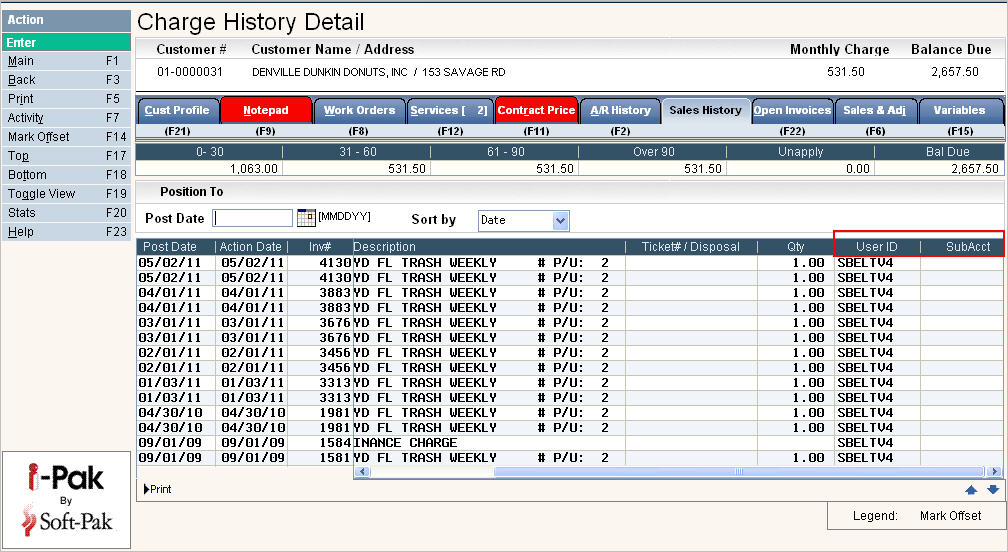
The Sales history screen provides:
A detail review of 'Sales' activity for an account:
Includes any charge (Auto Charge, F/C, WO, S&A, Tax, Fee's, etc.) posted to the account
Items that are 'unbilled' will display an * next to them.
Activity is displayed from newest, to oldest, activity date.
Displays the User ID who posted the transaction.
Displays the Sub account # if this is a Master account and the transaction is from a sub.
Can print a History report
Access to the Activity screen to display on board computing information.
You can use the Position To section of the screen to move the scan to a specific Post Date that you want to see. You can also Sort the Sales History scan by Date (default), Sub Account, or Invoice#. When sorting by Sub Account the screen will change and fields for Sub Account Co/Customer # will appear for you to Position the scan to.

Click or press ![]() , the Print Request Window will be displayed.
, the Print Request Window will be displayed.

You have the choice to print a detail listing or an Invoice Summary. Click on your selection to put a ![]() in the circle and enter the Date Range you want to display on your report. Click or press
in the circle and enter the Date Range you want to display on your report. Click or press ![]() and the system will print your selection.
and the system will print your selection.
Activity Screen
Click or press ![]() and the On Board Activity Screen will be displayed. This is information tracked via on-board computer, keyed into Route Follow-up batches, or held in driver logs.
and the On Board Activity Screen will be displayed. This is information tracked via on-board computer, keyed into Route Follow-up batches, or held in driver logs.
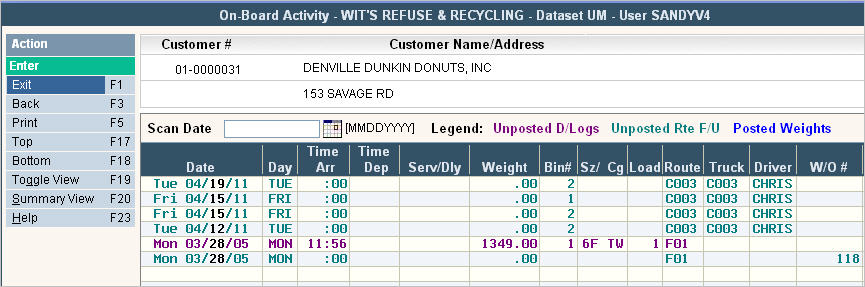
If you click ![]() you can see any Remarks (notes posted without a notepad code) and the Longitude/Latitude information that was captured and uploaded into iPak.
you can see any Remarks (notes posted without a notepad code) and the Longitude/Latitude information that was captured and uploaded into iPak.

If you click ![]() you can see the summary view which lists, by month, what the average weight per pick-up was for each sz/cg listed.
you can see the summary view which lists, by month, what the average weight per pick-up was for each sz/cg listed.
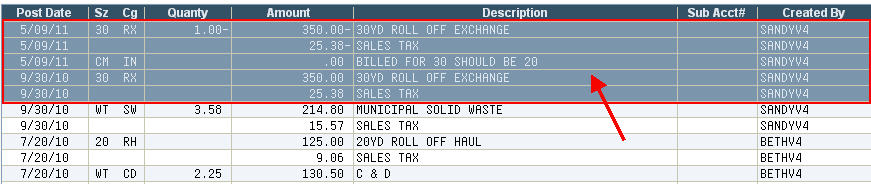
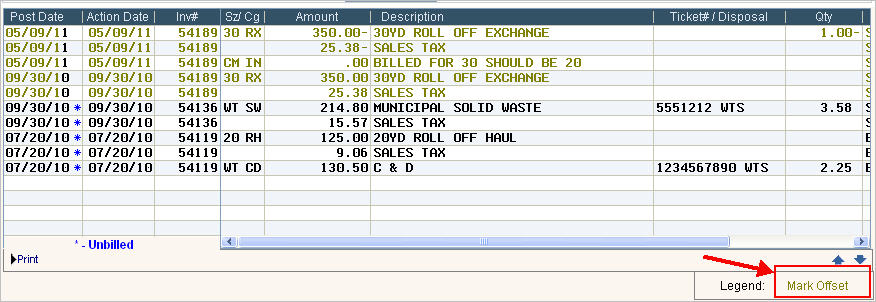
Mark Offset
This feature allows you to select SALE transactions, that have not been paid or printed on a bill, to be "marked" so they don't show up on the customers next bill. For example, you accidentally post an incorrect charge onto a customers account for $350.00. You create an S&A to credit off the $350.00 charge but don't want the customer to see your mistake. As long as the Debit and Credit net $0.00, you can Mark the Offsetting charges against each other.
![]() Only Users with System Admin authority can use this feature.
Only Users with System Admin authority can use this feature.
From the Sales History screen, select ![]() and any SALE records that have not been paid and have not printed on a bill will display for you to select.
and any SALE records that have not been paid and have not printed on a bill will display for you to select.
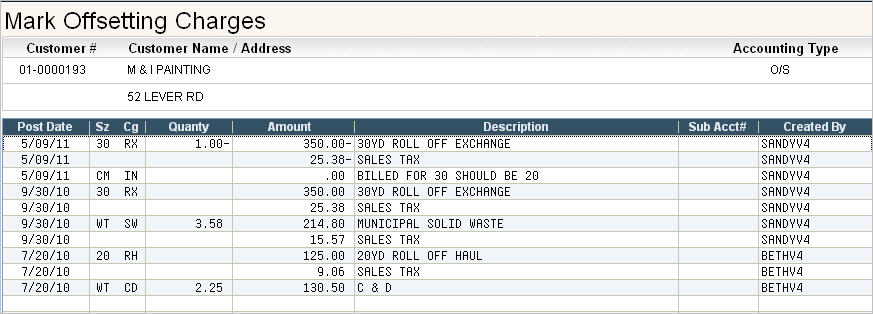
Highlight the records you want to Mark Offset.
To highlight a group of records in a row, hold down your SHIFT key and click on the first and last line.
To highlight records that are not together, hold down your CTRL key and click on each line you want to select.
Click or press ![]() when you've made your selections. Remember that the records must net $0.00. If they don't add up to $0.00, you will get the following message
when you've made your selections. Remember that the records must net $0.00. If they don't add up to $0.00, you will get the following message ![]() and you won't be able to continue with the request. If they do net $0.00, when you press
and you won't be able to continue with the request. If they do net $0.00, when you press ![]() you should get the following message
you should get the following message ![]() . Click or press
. Click or press ![]() and your charges will be Marked Offset. Click or press
and your charges will be Marked Offset. Click or press ![]() to get to the Sales History screen where your Mark Offset records will now be displayed in Gold.
to get to the Sales History screen where your Mark Offset records will now be displayed in Gold.
Stats
From the Sales History screen, select ![]() to see the Customer Sales Statistics screen.
to see the Customer Sales Statistics screen.
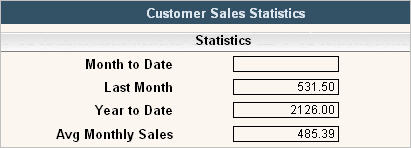
Month to Date Sales are updated in Day End and display the total Sales since the last Month End was ran.
Last Month Sales are updated in Month End and display the total Sales for this customer for the prior month.
Year to Date Sales are updated in Month End and display the total Sales for the Year (Jan-Dec) for this customer.
Avg Monthly Sales are updated in Month End and calculate the Year to Date Sales/ # of months in year.
This information is held in the CFIN file.