The Street Suffix File contains a list of all valid street suffixes that can be used in the system. These are 'pre-loaded' with all the Post Office approved street abbreviations.
To make changes to the Street Suffix File you can either update an existing Suffix/Abbreviation description, or you can add additional suffixes/abbreviations to the file. ![]() Please note that an existing Suffix/Abbreviation can not be changed - only the description can be changed. In order to change a suffix/abbreviation, the new one needs to be created and then the 'old' one can be deleted. The street suffix/abbreviation can either be changed through the customer profile screen or through the Street Suffix master on the Master Files menu.
Please note that an existing Suffix/Abbreviation can not be changed - only the description can be changed. In order to change a suffix/abbreviation, the new one needs to be created and then the 'old' one can be deleted. The street suffix/abbreviation can either be changed through the customer profile screen or through the Street Suffix master on the Master Files menu.
Simply click on the arrow next to the street suffix field (in either the service address section or the billing address section):

This will bring you to the street suffix master - search screen.
From the i-Pak Master menu, select the System Administration option, or click on the ![]() button on the top of the menu.
button on the top of the menu.
From the System Administration menu, select the Master Files menu option.
From the Master Files menu, select the Street Suffix option. The street suffix search screen will be displayed.

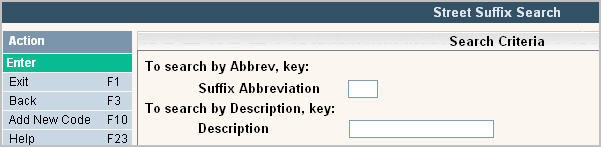
To scan the list of existing abbreviations, type either an abbreviation in the 'search by abbreviation box'  or type a description in the 'search by description box'
 ![]() . You can also type a portion or just a single letter in either search option and press or click
. You can also type a portion or just a single letter in either search option and press or click ![]() to display a list of abbreviations. The Street Suffix Scan screen will then be displayed. To search for a street suffix you can use your Page Up and Page Down keys on your keyboard, or click the blue arrow down
to display a list of abbreviations. The Street Suffix Scan screen will then be displayed. To search for a street suffix you can use your Page Up and Page Down keys on your keyboard, or click the blue arrow down ![]() or blue arrow up
or blue arrow up ![]() on the screen. This will move you through the file until you find the street suffix/abbreviation you are looking for.
on the screen. This will move you through the file until you find the street suffix/abbreviation you are looking for.

Find the suffix/abbreviation that needs to be modified in the scan screen. If you have accessed this file from the Customer Profile screen, position your cursor on the line and either press the RIGHT mouse button ('right click') and choose 'Update' or highlight the line by pressing the LEFT mouse button ONCE ('single click') and choosing ![]() on the bottom of your screen. If you have accessed this file from the Master Files menu, you can simply double click on the abbreviation to modify.
on the bottom of your screen. If you have accessed this file from the Master Files menu, you can simply double click on the abbreviation to modify.
This will put you in the Street Suffix Entry/Update screen.
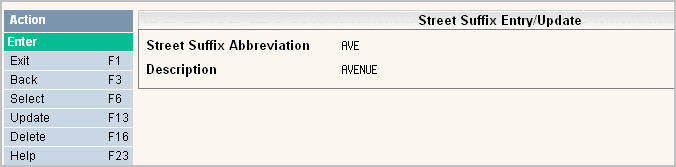
To make changes, click![]() or press shift F1 to enter 'update mode'. Make the necessary changes to the description and click press
or press shift F1 to enter 'update mode'. Make the necessary changes to the description and click press ![]() on the left tool bar. The screen will display
on the left tool bar. The screen will display ![]() on the bottom of the screen. Press Enter or click on the
on the bottom of the screen. Press Enter or click on the ![]() button to confirm your changes.
button to confirm your changes.
To delete an abbreviation: from the scan screen, select the code by double clicking on the line. Once in the Entry/Update screen click or press ![]() . The system will display a confirmation message on the bottom of the screen:
. The system will display a confirmation message on the bottom of the screen:
![]() .
.
![]() There is NO UNDO button, once a code is deleted it is gone. Click or press
There is NO UNDO button, once a code is deleted it is gone. Click or press ![]() to confirm deletion.
to confirm deletion.
Before creating a new suffix/abbreviation, we suggest you verify the abbreviation with the Post Office (www.usps.com) - click here to link to the site.
From the Street Suffix Scan, click on the ![]() button or press F10 on your keyboard. This will put you in the Street Suffix Entry/Update screen with a blank suffix and description box.
button or press F10 on your keyboard. This will put you in the Street Suffix Entry/Update screen with a blank suffix and description box.

Type the abbreviation you want to add in the Street Suffix Abbreviation box, this field is a 4 character field. Type a more detailed description in the Description box and press Enter or click on the ![]() button to accept your entry. The screen will display
button to accept your entry. The screen will display ![]() on the bottom of the screen. Press Enter or click on the
on the bottom of the screen. Press Enter or click on the ![]() button to confirm your changes.
button to confirm your changes.