The Zip Code master contains a list of all valid zip codes (postal codes) and corresponding cites and states (provinces). These are 'pre-loaded' from a 3rd party zip file, but can be changed for your area.
The Zip Code master also contains fields that can automatically be filled in by the system to prevent data entry 'keying' errors and to save entry time. It can also define the format that should be used for when printing addresses and zip/postal codes on bills.
![]() The system will perform the following IF the 'zip code validation' is activated in the Company Master:
The system will perform the following IF the 'zip code validation' is activated in the Company Master:
During customer entry, the user can simply type in the zip code and the system will fill in the city and state OR
The user can type in the city and state and the zip code will automatically be filled in
If the city, state and zip manually entered, the system will validate the city and state to the zip code
If set up in the Zip Code master, the system will also fill in:
Phone 1 area code
Tax body
Price list
Work order default route
To make changes to the file, you can either update an existing zip code or you can add additional zip codes to the file. ![]() Please note many cities have multiple zip codes and many zip codes have multiple valid cities; the system will display a 'pop up selection' window if there are multiple choices for the user. See the example below for the city of San Diego:
Please note many cities have multiple zip codes and many zip codes have multiple valid cities; the system will display a 'pop up selection' window if there are multiple choices for the user. See the example below for the city of San Diego:
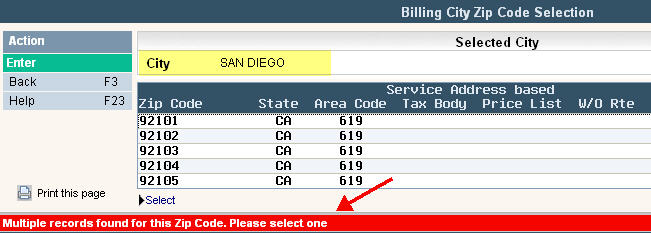
Simply click on the arrow next to the zip code field.

This will bring you to the Zip Code search.
From the i-Pak Master menu, select the System Administration option, or click on the ![]() button on the top of the menu.
button on the top of the menu.
From the System Administration menu, select the Master Files menu option.
From the Master Files menu, select the Zip Code option. The Zip Code search screen will be displayed.
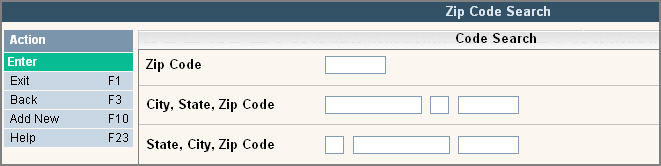
You have multiple options to scan the list of existing Zip Codes.
You can also type a portion or just a single letter in any search option and press or click ![]() to display a list of Zip Codes. The Zip Code Scan screen will then be displayed. To search for a zip code you can use your Page Up and Page Down keys on your keyboard, or click the blue arrow down
to display a list of Zip Codes. The Zip Code Scan screen will then be displayed. To search for a zip code you can use your Page Up and Page Down keys on your keyboard, or click the blue arrow down ![]() or blue arrow up
or blue arrow up ![]() on the screen. This will move you through the file until you find the Zip Code you are looking for.
on the screen. This will move you through the file until you find the Zip Code you are looking for.
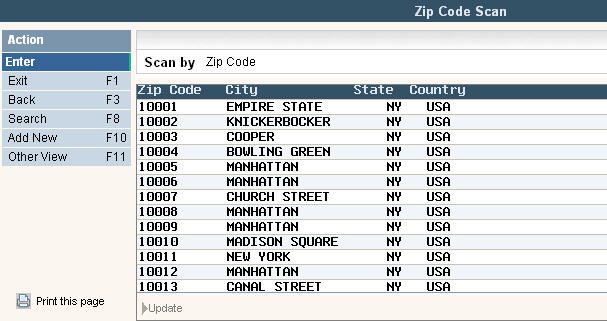
Find the Zip Code that needs to be modified in the scan screen. If you have accessed this file from the Customer Profile screen, position your cursor on the line and either press the RIGHT mouse button ('right click') and choose 'Update' or highlight the line by pressing the LEFT mouse button ONCE ('single click') and choosing ![]() on the bottom of your screen. If you have accessed this file from the Master Files menu, you can simply double click on the abbreviation to modify.
on the bottom of your screen. If you have accessed this file from the Master Files menu, you can simply double click on the abbreviation to modify.
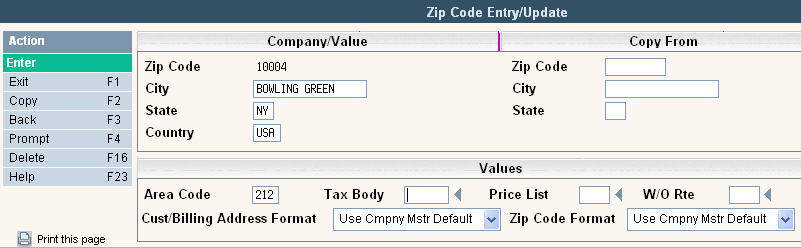
This will put you in the Zip Code Entry/Update screen.
To make changes, click![]() or press shift F1 to enter 'update mode'. Make the necessary changes and click or press
or press shift F1 to enter 'update mode'. Make the necessary changes and click or press ![]() on the left tool bar. The screen will display
on the left tool bar. The screen will display ![]() on the bottom of the screen. Press Enter or click on the
on the bottom of the screen. Press Enter or click on the ![]() button to confirm your changes.
button to confirm your changes.
From the Zip Code Scan, click on the ![]() button or press F10 on your keyboard. This will put you in the Zip Code Entry/Update screen.
button or press F10 on your keyboard. This will put you in the Zip Code Entry/Update screen.
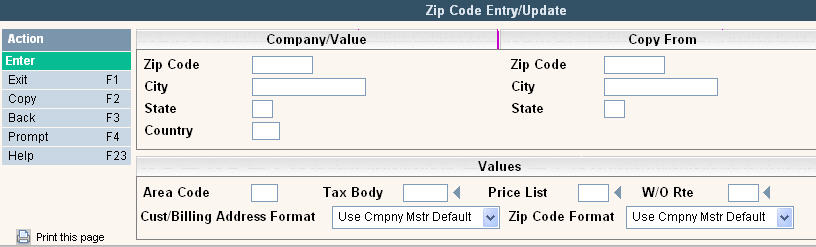
Zip Code - Type the Zip Code you want to add in this field. This is a 9 character field to allow for Zip+4.
City - Type the City that is associated with the Zip Code entry you are creating.
State - Type the State associated with the Zip Code and City.
Country - Type the Country associated with the Zip Code, City and State.
Zip Code Values:
If these values are filled in, then the system will default them into the account when the Zip/City/State Code is used for the service address.
Area Code - This is the Phone 1 area code
Tax Body - The code used to determine taxes on this customer
Price List - The code used to differentiate pricing for this customer
W/O Rte - The default Work Order Route. This is a great tool for Roll-Off since it can default in a Zone Route (generic route you create that's labeled by zone vs actual route or driver) to make the on-line dispatching screen easier to sort by area.
Zip Code Formats:
Cust/Billing Address Format - Certain areas require billing addresses to be mapped out differently than others. For this reason we have designed format options to choose from.
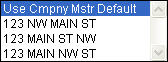
These format options can also be found in the company master, bill/barcode tab. If Use Cmpny Mstr Default is selected, then the company master settings will be used for this zip code record.
![]() Please note that the 2nd directional field, found between the street suffix and Apt/Suite# fields on the customer profile screen, will always be displayed at the end of all the billing address options. For example, if the 2nd directional was S for South, the options above would print like this:
Please note that the 2nd directional field, found between the street suffix and Apt/Suite# fields on the customer profile screen, will always be displayed at the end of all the billing address options. For example, if the 2nd directional was S for South, the options above would print like this:
123 NW MAIN ST S
123 MAIN ST NW S
123 MAIN NW ST S
Zip Code Format - Canada has a different zip code format than the United States, therefore we have created a way to designate which type to use.
![]()
These format options can also be found in the company master, bill/barcode tab. If Use Cmpny Mstr Default is selected, then the company master settings will be used for this zip code record.
Once you have filled out the appropriate fields, click or press ![]() to accept. The system will give you a message
to accept. The system will give you a message ![]() on the bottom of the screen. Press Enter or click on the
on the bottom of the screen. Press Enter or click on the ![]() button to confirm your changes.
button to confirm your changes.