There are different types of messages or notes available to print on Invoices and Statements, depending on your needs.
'Company' related messages - these are company specific and set up in the Message Master. These are messages that will print for all customers within that company. For example, 'Happy Holidays', 'Have a nice spring', 'Please make sure to clear the snow', etc. They can also be 'dunning' messages that will print on statements for specific aging. These messages are printed on the bottom of the detail section of a bill (invoice or statement). Please see the Invoice Sample, Statement Sample or Reminder Statement to see where on the forms these notes print. Please see the Message Master section below for instructions on setting these up.
![]() You can also use the 'Remit to' section of the Company Master for company related messages such as an actual remit to address that might be different from the Company address, phone numbers, etc.
Click here for additional information on setting up 'remit to'. Please see the
Invoice Sample,
Statement Sample or
Reminder Statement to see where on the forms these notes print.
You can also use the 'Remit to' section of the Company Master for company related messages such as an actual remit to address that might be different from the Company address, phone numbers, etc.
Click here for additional information on setting up 'remit to'. Please see the
Invoice Sample,
Statement Sample or
Reminder Statement to see where on the forms these notes print.
'Cycle' related messages - these are the same as the Company related messages, but are also specific to a Billing Cycle. For example, you may want different messages for residential customers than for roll off. These messages are also set up in the Message Master.
'Customer' specific notes - these are notes specific to a particular customer only. For example, a blanket purchase order number, a note that 'we will accept money orders only', Reminder-please put customer # on check, your service day will be changing, etc. These types of notes are set up on the customer's account in the Notepad, and require the use of special Note print types listed below. Please see the Invoice Sample, Statement Sample or Reminder Statement to see where on the forms these notes print.
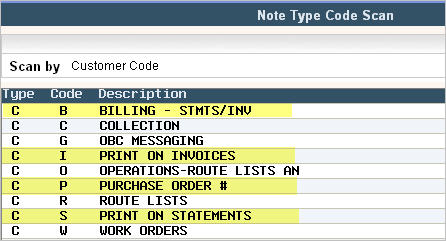
Any notepad code set up with a customer print code of B (billing), I (invoices), P (PO#) or S (Statement) will print on the billing forms.
To access the Message Master, you must have the appropriate security to update Master Files. From the Billing Processes Menu select the Message Master option #19, OR from the System Administration menu, selection Master Files option #11 then Message Master option #10. The Message Master search screen will be displayed.
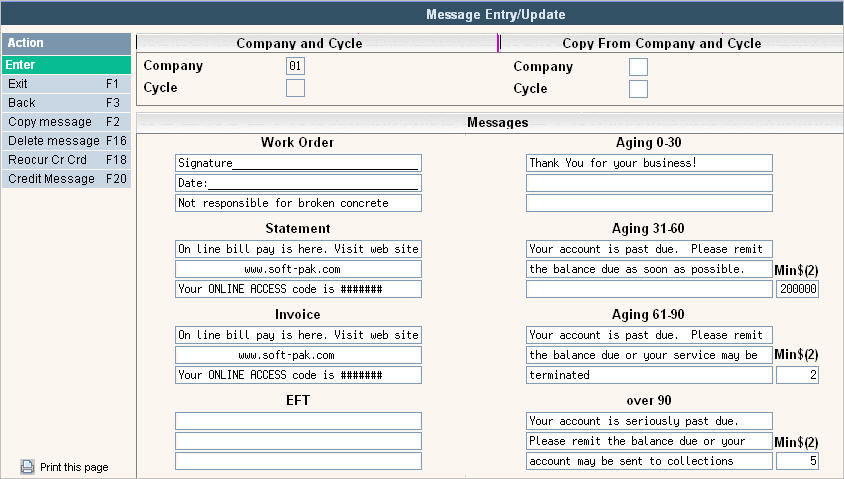
In the Code Entry field, type the company id or company id & cycle code for the message you want to create. Click on the ![]() and a blank Message Entry/Update screen will be displayed.
and a blank Message Entry/Update screen will be displayed.
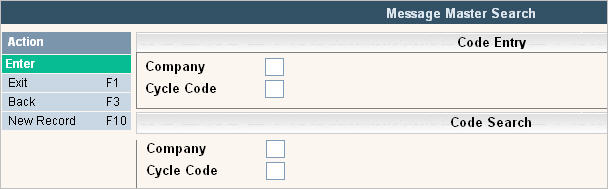
In the Code Search field, type a company or a company & cycle to search for and press ![]() . The Message scan screen will be displayed.
. The Message scan screen will be displayed.
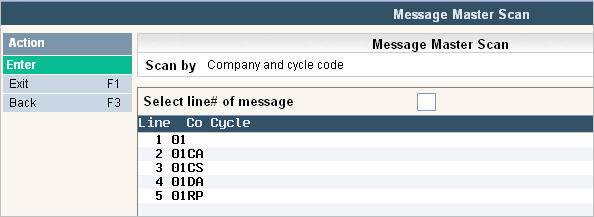
Select the message for the company or company/cycle you want to update by double clicking or typing corresponding line number in the ![]() field and press
field and press ![]() .The Message Entry/Update screen will be displayed.
.The Message Entry/Update screen will be displayed.
In the Message Parameters
Update the line item that corresponds to the type of form you want a message on and type in your message. The message will appear exactly as you type it - the first box will be on top and the second box will print underneath the first box. There are 40 characters for each box.
Aging Message for Statements
These are also know as 'dunning messages'. For each aging 'bucket' you can have a different message print out. So if the customer has a balance in the over 90 bucket they will get one message, but a customer who is 'current' will get a different message.
For each aging bucket, enter a message that would pertain to that type of balance (and what the minimum balance is). This way you are not sending a 'over 90' message to someone who may have only $1 in the 90 day column.
Examples:
Thank you for your prompt payments (for 0-30)
Your account is past due, please remit payment (for 31-60)
Your account is SERIOUSLY past due, please call us to avoid service delays (for 61-90)
Your account has been turned over to collections (over 90)
Once you have your messages typed in press ![]() to accept. You'll get the following message:
to accept. You'll get the following message:![]() . Press
. Press ![]() to accept. You will return to the Message Master Search screen. Click
to accept. You will return to the Message Master Search screen. Click ![]() to go back to the search screen or
to go back to the search screen or ![]() to exit and return to the menu.
to exit and return to the menu.