Refundable deposits are deposits received that do NOT affect accounts receivable – they are not ‘pre pays’ or ‘cod payments’ or payments for roll carts. They are similar to security deposits and may be refunded or applied to a customers balance at a future point in time (i.e. when they cancel, if there is damage to a cart/container, or if the skip without paying).
These deposits can be made either on the customer’s account directly (interactively via A/R History) or in a batch if you have multiple deposits to post at one time.
Getting Started
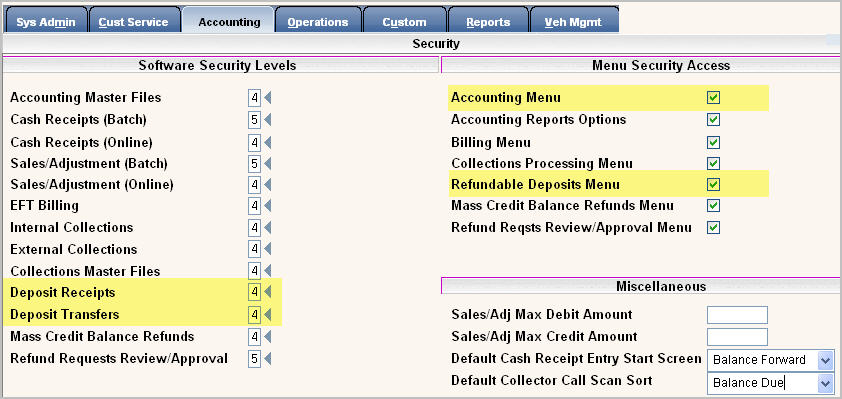
User Security
From the i-Pak Master Menu, go to System Administration. Selection option #1 User Security and select the Accounting Tab.
Deposit Receipts: This is where you post the initial Deposit to the account.

Deposit Transfers: This is where you apply the existing Deposit to the customers A/R.
Company Master
There are several ‘automatic’ codes that the system will use during the Refundable Deposits procedures that are stored in the Company Master and will need to be setup.
From the i-Pak Master menu, select System Administration. Go the Master Files menu and select option #1 Company Master and go to the Accounting Tab.

Allow Refundable Deposits: Will you be using Refundable Deposits in this company? If yes, the remaining fields in this section will be required.
Deposit Receipt G/L Code: Enter the abbreviated G/L code that the deposits for this company should be posted to.
Deposit Receipt Note Code: Enter the Note Pad code that you want to be entered whenever a deposit is received on an account.
Deposit to A/R Xfer Note Code: What note code do you want to use to record when an Amount is being transferred from the Deposit to A/R?
S&A Sz/Cg Code: What size/charge code do you want to use to create and post a Sales Adjustment for the $ Amount that is being transferred from the Deposit to A/R.
A/R to Deposit Xfer Note Code: What note code do you want to use to record when an Amount is being transferred from A/R to the Deposit?
S&A Sz/Cg Code: What size/charge code do you want to use to create and post a Sales Adjustment for the $ Amount that is being transferred from A/R to the Deposit.
![]() After setting up the Company Master information, you will need to verify that the codes entered (Note codes, G/L codes, and Size/Charge codes) exist in the Master Files. If they do not exist, create them before processing any Deposit Receipt or Transfer batches.
After setting up the Company Master information, you will need to verify that the codes entered (Note codes, G/L codes, and Size/Charge codes) exist in the Master Files. If they do not exist, create them before processing any Deposit Receipt or Transfer batches.
How it Works
Refundable Deposits - Batch Entry
From the i-Pak Master Menu, go to the Accounting Menu and select option # 11 Refundable Deposits Menu.
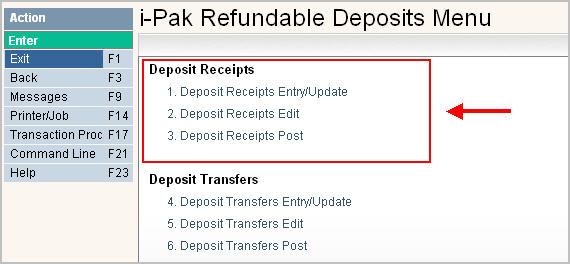
Deposit Receipts Entry/Update
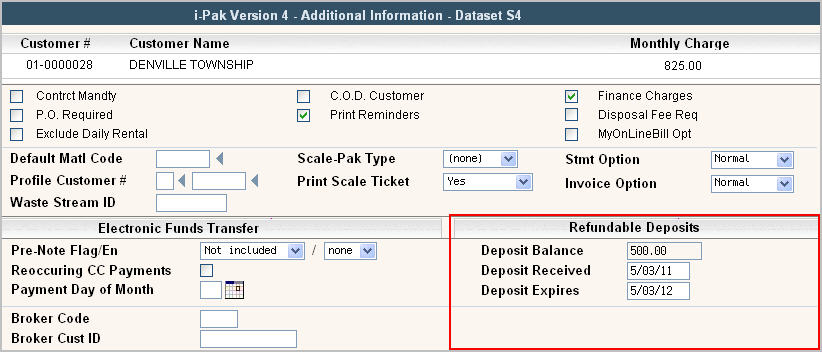
These steps will post deposits to the deposit general ledger account indicated in the company master and to the company bank account. The amounts will NOT affect accounts receivable but a history line will show on the customer’s A/R History tab to indicate a deposit was received. In addition, on the Additional Info tab of the Customer Profile, the system will display the Deposit Balance, the Deposit Received, and the Deposit Expiration date.
Deposit Receipts Entry/Update
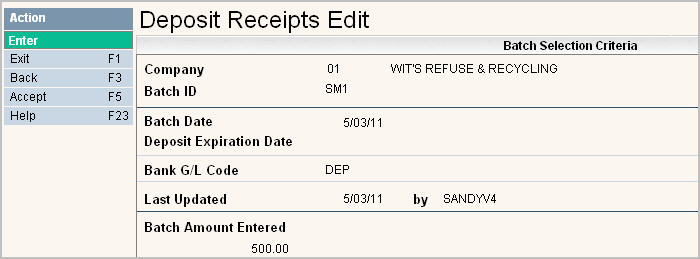
To create the batch: selection option # 1 Deposit Receipts Entry/Update, the batch entry header screen will be displayed.
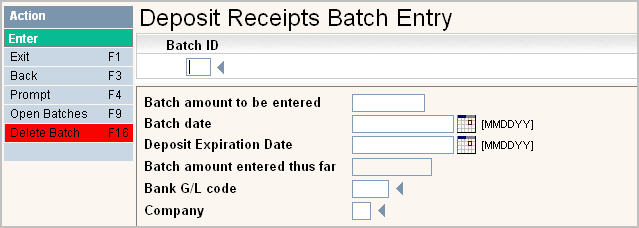
Batch ID: Enter up to a 3 character (alphanumeric) batch ID to identify this batch as unique.
Batch amount to be entered: Enter the total of the deposits (the total on the ‘tape) that will be entered in to the batch. This amount can be entered after the individual items have been entered, but should MATCH a calculator tape for the batch.
Batch date: The date of the batch – typically the same date the batch is deposited in to the bank.
Deposit Expiration Date: If needed, enter the date the deposits will expire on the customers’ accounts.
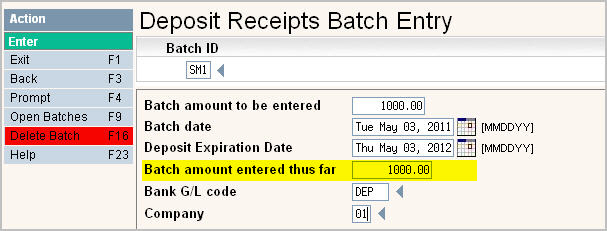
Batch amount entered thus far: The system will display the amount of the batch once the first individual deposit is entered in to the batch.
Bank G/L code: The abbreviated general ledger code for the bank account (the debit side of the transaction).
Company: Enter the company id for the customers in the batch.
Once all the batch ‘header’ fields have been filled in, press ![]() to accept and continue to the Customer Deposit Receipts Entry.
to accept and continue to the Customer Deposit Receipts Entry.
![]() Each Batch can hold up to 9999 detail records.
Each Batch can hold up to 9999 detail records.
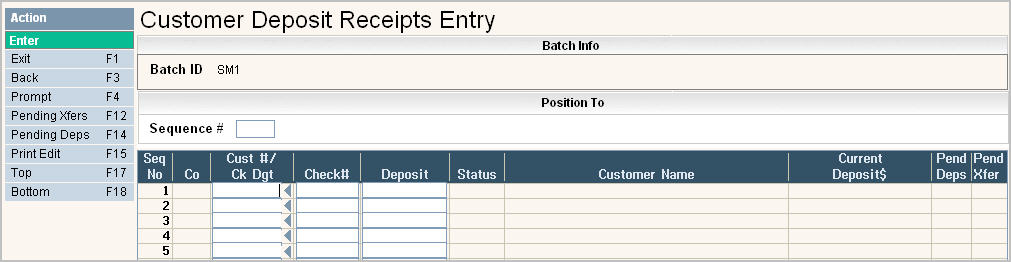
Seq No: A sequential number assigned to each line item to use when accessing a particular line number in the batch.
Co: The company ID field – if the company ID was entered on the header screen, this field will be protected. If using multiple company cash receipts then you will need to enter the Company ID on each line.
Cust#/Ck Dgt: Enter the customer account number including check digit.
Check#: Enter the check number for the deposit amount. If the deposit is cash, you can enter either the word ‘CASH’ or leave the field blank.
Deposit: Enter the amount of the deposit. If the amount is a whole dollar amount, simply enter the number. If less than a whole dollar amount with a decimal point and applicable change.
Status: If the customer has an L or D (locked or delinquent) action code on their account, it will display in the Status column so you know they are a past due customer. The field cannot be updated from this screen.
Customer Name: Display only – the customer's Billing name based on the customer number entered.
Current Deposit$: Display only – if the customer has a current deposit that has already been posted, that amount will be displayed.
Pend Deps: Display only - if the customer has any pending deposits you will see a Y in this field. If you highlight the line and select ![]() you will be able to see the pending deposits that currently exist for this customer.
you will be able to see the pending deposits that currently exist for this customer.

Pend Xfer: Display only - if the customer has any pending transfers you will see a Y in this field. If you highlight the line and select ![]() you will be able to see the pending transfers that currently exist for this customer.
you will be able to see the pending transfers that currently exist for this customer.

Press enter after each line item to save your entry. When completed with the batch of deposits, click F1 Exit to return to the batch header screen. The system will display the amount you have entered in your batch.
Press ![]() to return to the i-Pak Refundable Deposits Menu.
to return to the i-Pak Refundable Deposits Menu.
Deposit Receipts Edit
To print an edit listing of the batch so that it can be reviewed for accuracy, select option # 2 – Deposit Receipts Edit Listing. The batch selection screen will display.
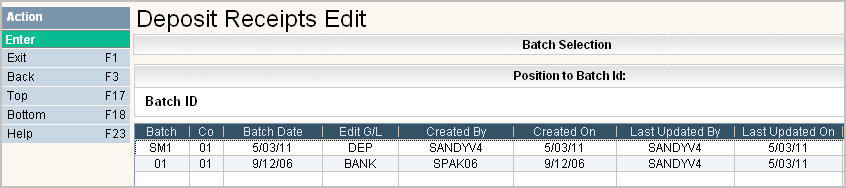
Select the batch by double clicking on the line. The Batch Selection Criteria screen will be displayed for you to verify the batch information.
If the batch displayed is the one you want to print, click on ![]() to accept and continue. If errors exist in the batch, the following message will be displayed at the bottom of your screen:
to accept and continue. If errors exist in the batch, the following message will be displayed at the bottom of your screen:
![]()
If no errors exist, the following screen will be displayed:
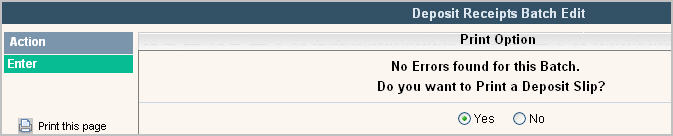
You need to answer ![]() Yes or
Yes or ![]() No to whether you want to Print a Deposit Slip. If yes, then two reports will be generated in your spool file.
No to whether you want to Print a Deposit Slip. If yes, then two reports will be generated in your spool file.
The first is AC0451P1 = Deposit Receipts Edit Report.
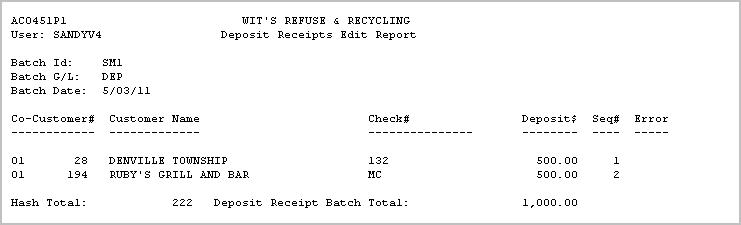
This is the same report that prints if an error exists. The error will display under the Error column so that you know what needs to be fixed in the batch before it can be posted.
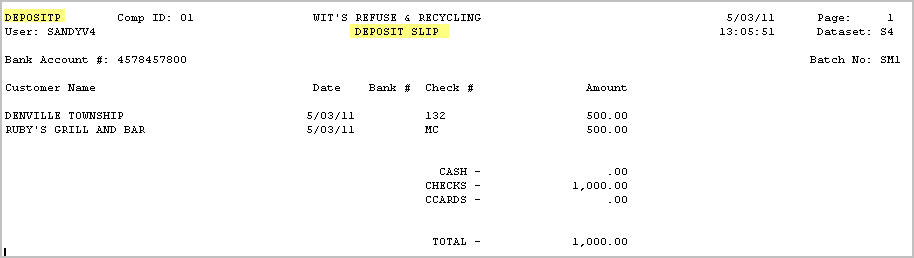
The second report is DEPOSITP = Deposit Slip
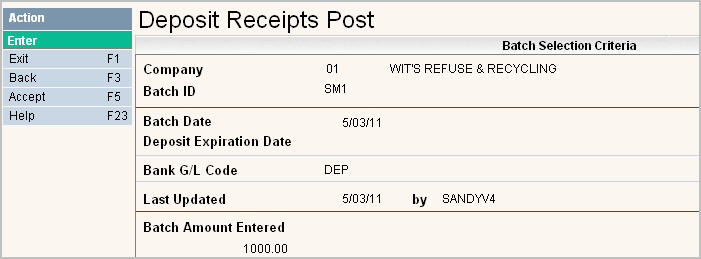
Deposit Receipts Post
Once you have verified that your batch is accurate and complete, your next step is to post it to the customers account.
To post the deposit batch, select option # 3 – Deposit Receipts Post. The batch selection screen will be displayed.

Select the batch by double clicking on the line. The Batch Selection Criteria screen will be displayed for you to verify the batch information.
If the batch displayed is the one you want to print, click on ![]() to accept and continue. If no errors exist in the batch, the system will ask if you want to post deposit receipts. Once you answer Y and press enter – there is no UNDO button – the deposits will be posted.
to accept and continue. If no errors exist in the batch, the system will ask if you want to post deposit receipts. Once you answer Y and press enter – there is no UNDO button – the deposits will be posted.
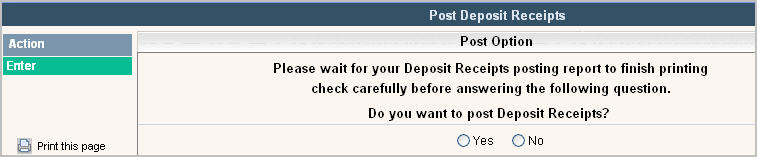
Select either Yes or No by clicking on the corresponding button. Press enter to continue and you will get a message your batch has been submitted, and deposits will be posted.

The deposits will be displayed on the customers account on the A/R History tab and the Additional Info tab.
A/R History
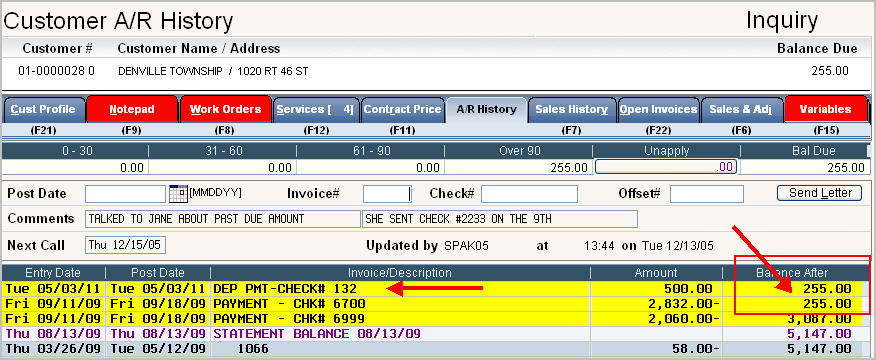
Notice that the customer’s balance has NOT been affected.
Additional Info Tab