The Account Class Master files allow the user to create account classes specific to their own business environment that group together similar cycles. This field is a required field in the Cycle Master; therefore the Account Class Master MUST be set up prior to the Cycle Master.
From the i-Pak Master menu, select the System Administration option, or click on the ![]() button on the top of the menu.
button on the top of the menu.
From the System Administration menu, select the Master Files menu option.
From the Master Files menu, select Account Class Master option. Either the Accounting Class search screen or scan screen will be displayed depending on the settings in the system master record. We will begin with the search screen.

To search, use either the code search or description search. You can type in just a company id and press enter and the system will display the accounting class codes. Select the one you want to view by double clicking on the line item.

To make changes select the code you want to update by double clicking on the line item. Make any necessary changes and click or press ![]() to accept. The system will give you a message
to accept. The system will give you a message ![]() . Click or press
. Click or press ![]() to accept the changes or F9 to update the file and return to the Accounting Class Scan screen.
to accept the changes or F9 to update the file and return to the Accounting Class Scan screen.
To delete a code: from the Accounting Class Scan screen select the code by double clicking on the line. Once in the Entry/Update screen click or press ![]() . The system will display a confirmation message on the bottom of the screen:
. The system will display a confirmation message on the bottom of the screen: ![]() .
.
![]() There is NO UNDO button, once a code is deleted it is gone. Click or press
There is NO UNDO button, once a code is deleted it is gone. Click or press ![]() to confirm deletion.
to confirm deletion.
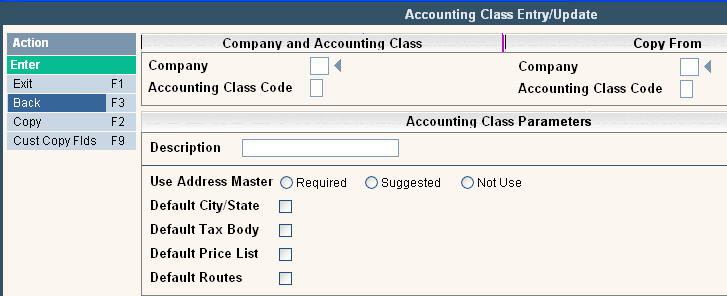
To add a new code click or press ![]() and the Accounting Class Entry/Update screen will be displayed.
and the Accounting Class Entry/Update screen will be displayed.

In the Company field, enter the Company ID.
In the Accounting Class Code field, type in the new code.
In the Description box, type in a description for your new code.
Use Address Master: For any account that is marked with this accounting class, do you want to REQUIRE (or force) the use of the Address Master, SUGGEST (give message but don't force), or Not Use the Address Master. Click on the radial button that fits your criteria.
If you selected either REQUIRED or SUGGESTED, then you can choose to default in the following information from the address master into the customer profile when a new account is set up. Check ![]() YES for those you want to default.
YES for those you want to default.
Default City/State:
Default Tax Body:
Default Price List:
Default Routes:
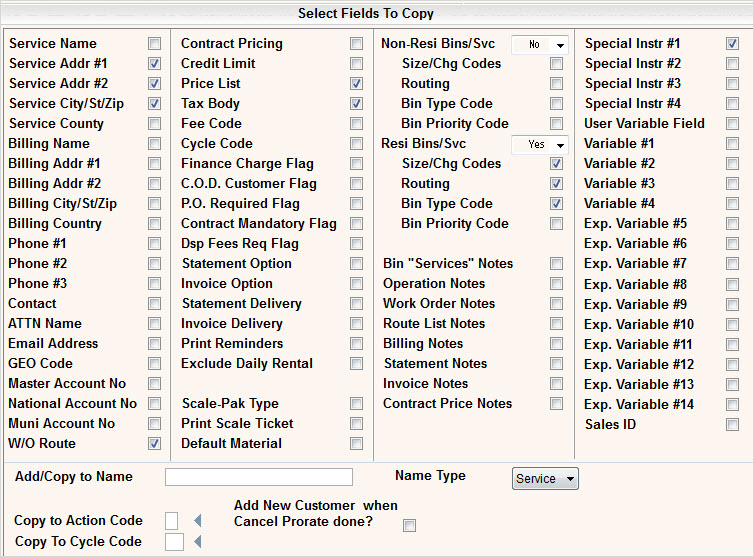
Cust Copy Flds ![]() : this section stores the options for which fields get copied when creating a new account using the 'N' action code or the
: this section stores the options for which fields get copied when creating a new account using the 'N' action code or the ![]() . This must be filled in when creating a new account class. Please see below:
. This must be filled in when creating a new account class. Please see below:

Most of the selections above are for specific fields found on the customer profile, additional information tab or variables tab of the customer. Some selections, such as Contract Pricing and Non-Resi or Resi Bins/Svc, provide the option of copying a whole screen of data. The Contract Price Notes and Bin "Services" Notes refer to the notepad that is specifically designed for that screen. The other notes listed are in categories based on "Customer Print Codes" defined in the Note Pad master.
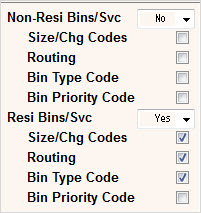
Non-Resi Bins/Svc and Resi Bins/Svc

![]()
In the Services screen, each record has a field for RES = Y or N. If that field is N, then the Non-Resi Bins/Svc flags will be used to determine what gets copied and when. If that field is Y, then the Resi Bins/Svc flags will be used. There are 3 options of when to copy the Bins/Services from one account to another. They are:
No = Don't ever copy the Bins/Services from one account to another.
Yes = Always copy the Bins/Services when using the N action Code, the ![]() or when creating a new customer from a cancel proration.
or when creating a new customer from a cancel proration.
Prorate = Only copy the Bins/Services when creating a new customer from a cancel proration.
When copying the services, you also have the option of copying or not copying the Size/Chg Codes, Routing and/or Bin Type Code.
![]() Since you can't have routing without a size/charge code, if routes are copied but charge codes are not copied:
Since you can't have routing without a size/charge code, if routes are copied but charge codes are not copied:
When using the action code N or ![]() to create a new account the users are taken to the services screen and forced to enter charge codes.
to create a new account the users are taken to the services screen and forced to enter charge codes.
When a new account is created from day end batch prorations, the programs will automatically copy the charge codes.
Add New Customer when Cancel Prorate done? This feature allows you to automatically create a new account when cancelling an existing account. This will only be done if there are no other active accounts listed at this same address. The idea behind this is to create a VACANT account so your staff and drivers know that you don't have the new homeowners information yet. When the trash is set out at this address, your driver can alert you to contact the new resident and start billing them for service.
If doing the cancel proration online (prorate now = yes), the new customer will be created as soon as the F5 to accept has been pressed. If doing the cancel proration in batch (dayend), the new customer will be created when the proration is actually processed in DayEnd on the Effective Date. The customer is automatically created behind the scenes, you will not be brought to the profile display to make any changes as you are when an action code of "N" or ![]() is used.
is used.
Add/Copy to Name: This ties in with the option above. When creating a new account, what name do you want to default into the new account? We suggest RESIDENT, VACANT or TENANT. If this field is blank, we will copy the service and billing names of the account that is being cancelled if they are set to copy above. If they are not set to be copied and this field is blank, we will default in the name RESIDENT.
Name Type: Do you want the 'Add/Copy to Name' to default into the Service Name, Billing Name or Both?
Copy to Action Code: Enter the Action Code you want defaulted in when automatically creating a new account. If no action code is needed, then leave the field blank.
![]() Action codes print on route lists. If setting up your system to automatically create new accounts, you could set up an action code of I for Need Information. This will print on the route lists to remind your driver that you need information on the new homeowner whenever they move in.
Action codes print on route lists. If setting up your system to automatically create new accounts, you could set up an action code of I for Need Information. This will print on the route lists to remind your driver that you need information on the new homeowner whenever they move in.
Copy to Cycle Code: Enter the new Cycle Code that you want the account to have once it's created. If no cycle code is entered, then the cycle code of the account you are copying from (or doing a cancel proration on) is used.
![]() If you enter an N action code or use
If you enter an N action code or use ![]() on a customer that has a cancel proration set up on their profile screen (not yet posted), the new account that is created will automatically be populated with the reversing start proration in their profile.
on a customer that has a cancel proration set up on their profile screen (not yet posted), the new account that is created will automatically be populated with the reversing start proration in their profile.
Once you have filled out the appropriate fields, click or press ![]() to accept. The system will give you a message
to accept. The system will give you a message ![]() . Click or press
. Click or press ![]() to accept the changes and return to the Master Files menu.
to accept the changes and return to the Master Files menu.