 button on the top of the menu.
The Action code field can be used for many different purposes. There are 'standard' codes in the system that are reserved to perform certain functions (see below) these need to be set up. You can also create new action codes for reporting purposes, for printing on route lists, and to make the account stand out on a scan screen. In addition, you can create action codes that are 'Start' and 'Stop' types which control the printing of a note on the Route Lists.
From the i-Pak Master menu,
select the System Administration
option, or click on the  button on the top of the menu.
From the System Administration menu, select the Master Files menu option.
From the Master Files menu, select the Action Code option. The Action Code Search screen will be displayed.

To search, use either the code search or description search. You can type in just a company id and press enter and the system will display the action codes. Select the one you want to view by double clicking on the line item.

To make changes select the code
you want to update by double clicking on the line item. Make any necessary
changes and click or press  to accept. The system will give
you a message
  . Click or press
  to accept
the changes and return to the Action Code Scan screen.
To delete a code: from the Action
Code Scan screen select the code by double clicking on the line. Once
in the Entry/Update screen click or press  . The system will
display a confirmation message on the bottom of the screen:
 .
.
 There is NO UNDO button, once a code is deleted it is
gone. Click or press
  to
confirm deletion.
To add a new code click or press
 and the Action Code Entry/Update screen will be displayed.

Type in the Company ID for the new code in the Company field.
In the Action Code field, type in the new code.
 To copy from an existing code, in the Copy From fields
enter the Company ID and Action Code to copy from. Click or press
  and the 'from' codes fields will be filled in. Make any changes
necessary and click or press
  to accept your entry.
In the Description box, type in a description for your new code.
The Action Code Type works in conjunction with the Number of Days Effective and can control the printing of the Action Code description on the route list:
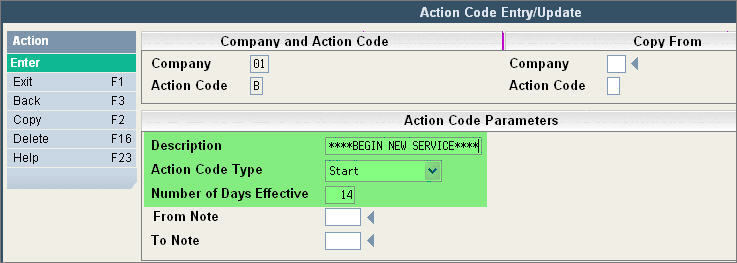
Start type - if an action code is set up as a Type = Start, the action code description will print on the route list for the number of effective days after the Customer's Start date. Then during Day End, when the number of effective days has been reached, the action code will automatically be removed.

In the Example above the action code of B is for 'Begin New Service', the Description '****BEGIN NEW SERVICE**** will show on the Route List for 14 days AFTER the Customer's Start Date on the Customer Profile screen. When Day End runs, the action code will then be removed from the customer's account.
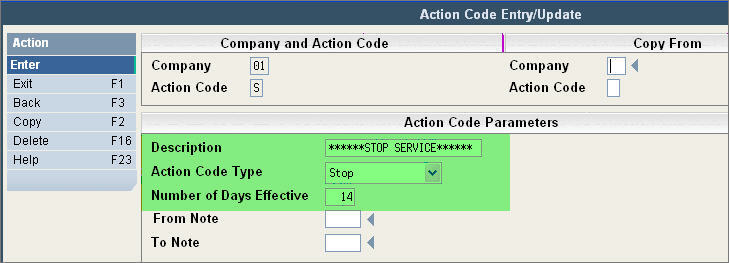
Stop type - if an action code is set up as a Type = Stop, a customer will continue to print on the Route List with the Action code description until the number of effective days after the Customer's Stop Date has been reached. Then during Day End, when the number of effective days has been reached, the action code will automatically be removed.

In the Example above the action code of S is for 'Stop Service', the Description '*****STOP SERVICE***** will show on the Route List for 14 days AFTER the Customer's Stop Date on the Customer Profile screen. When Day End runs, the action code will then be removed from the customer's account.
Number of Days Effective - used with the action code type field, the number of days the action code description will show on a route sheet after the start or stop date (depending on the action code type).
From Note - enter a note code the system will use to create a note in the customer's account whenever the action code is changed 'from' this particular code. If left blank, no note will be created.
For example: to have the system automatically create a note if the action code of 'L' (locked) is removed, you might have a note code of 'FROML' which would look like this:

To Note - enter a note code the system will use whenever the action code is changed 'to' this particular code. If left blank, no note will be created.
Once you have filled out the appropriate fields,
click or press  to accept. The system will give you a message
 . Click or press
  to accept the changes
and return to the Action Code scan.
|
D |
Delinquent - will turn red and the customer will be displayed as Red on the search screens. Printing on Route List can also be controlled through the Route List selections. Will also show in the Cash Receipts program and a separate list of payments received for 'D' accounts will be printed. |
|
L |
Locked - will turn red and the customer will be displayed as Red on the search screens. Printing on Route List can also be controlled through the Route List selections. Will also prevent Work Orders from being Created. Will also show in the Cash Receipts program and a separate list of payments received for 'L' accounts will be printed. |
|
N |
Used to copy an EXISTING customer profile in to a brand NEW account. Very useful in creating new locations for Roll Off customers, for new contracts for several sites (school, restaurant chain, etc). Depending on the cycle of the customer, certain fields will be blanked out or copied to the new account (such as service address) based on the 'Copy Template' in the Account Class Master. |