The purpose of this master file is to determine what to name any of the outsource files that are created during the Collections process. You do not need to set up this master file if you are sending letters internally. This is only necessary if you are outsourcing your collections letters.
From the i-Pak Collections File Maintenance menu, select Outsource File ID. Either the Outsource File ID search screen or scan screen will be displayed depending on the settings in the system master record. We will begin with the search screen.

To search, you must first select the Type of File ID. Your options are:![]()
Once you have selected a File ID Type, you can press enter to see All File ID's within that type, or you can narrow down your results by searching on the File ID or File Description. When you press enter the system will display the Collections File ID Scan screen. Select the one you want to view by double clicking on the line item.

To make changes select the one you want to update by double clicking on the line item. Once you have made any changes click or press ![]() to accept. The system will display the message:
to accept. The system will display the message: ![]() .
.
Click or press ![]() to accept the changes and return to the Collection File ID Scan screen.
to accept the changes and return to the Collection File ID Scan screen.
To delete a code from the Collection File ID Scan screen select the code by double clicking on the line. Once in the Entry/Update screen click or press ![]() and then click or press
and then click or press ![]() .
.
The system will display a confirmation message on the bottom of the screen: ![]() .
.
![]() There is NO UNDO button, once a code is deleted it is gone. Click or press
There is NO UNDO button, once a code is deleted it is gone. Click or press ![]() to confirm deletion.
to confirm deletion.
To add a new code click or press ![]() and the Collection File ID Entry/Update screen will be displayed.
and the Collection File ID Entry/Update screen will be displayed.

In the Type field enter the type of File ID you are creating the entry for. Options are: ![]()
In the File ID field enter a short ID or Description for each file that you are going to create. This Outsource File ID is what will get entered into the Collection Letter Setup Master record.
![]() Since the format of an Internal Collection Letter Outsource File is different than that of a Collection Agency Outsource File, the Internal File Id's and the External File Id's must be different. For example, if there is an Internal Type File Id of “RESI” , there cannot be an External Type File Id of “RESI”. If you attempt to do this, then the system will give you the error message
Since the format of an Internal Collection Letter Outsource File is different than that of a Collection Agency Outsource File, the Internal File Id's and the External File Id's must be different. For example, if there is an Internal Type File Id of “RESI” , there cannot be an External Type File Id of “RESI”. If you attempt to do this, then the system will give you the error message ![]() and wont allow you to proceed.
and wont allow you to proceed.
In the File Description field enter a detailed description of the File ID you are creating.
Once you have filled out the appropriate fields, click or press ![]() to accept. The system will display the message:
to accept. The system will display the message:
![]() . Click or press
. Click or press ![]() to accept the changes and return to the Collections File ID Scan screen.
to accept the changes and return to the Collections File ID Scan screen.
Once the Collections File ID's are entered, you can use them in the Collection Letter Master Setup.
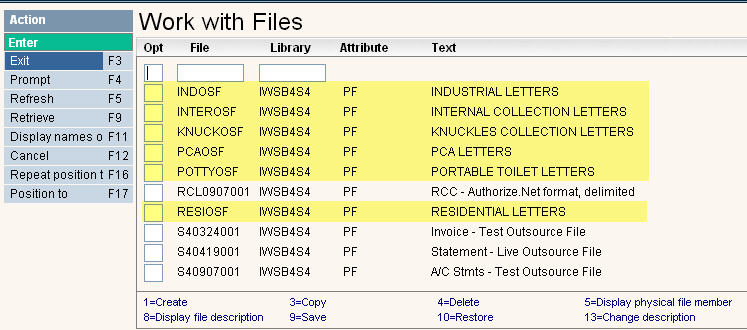
![]() When a File Id is added to this master, the program will automatically create a new physical file in the IWSB4xx (where xx = dataset) library. The name of the file will be FILEID+OSF. For example, if you add a File Id of RESI then a physical file will be created called RESIOSF. You can see this by going to the billing menu and selecting
When a File Id is added to this master, the program will automatically create a new physical file in the IWSB4xx (where xx = dataset) library. The name of the file will be FILEID+OSF. For example, if you add a File Id of RESI then a physical file will be created called RESIOSF. You can see this by going to the billing menu and selecting ![]() .
.
![]() Do not send these files to your outsource company as they should always be empty. They get copied to new file names (FILEID + SEQ# = RESI0001, RESI0002, etc.) when collection letters are generated and those are the files that you will be sending.
Do not send these files to your outsource company as they should always be empty. They get copied to new file names (FILEID + SEQ# = RESI0001, RESI0002, etc.) when collection letters are generated and those are the files that you will be sending.
