Disposal Site codes are used to track disposal information for different facilities to use in Disposal Reconciliation and LEED reporting. Codes are used in Route Costing, Driver's Logs and Work Orders to automatically calculate disposal costs.
From the System Administration menu, select the Master Files menu option.
From the Master Files menu, select the Operations Master Files menu (this can also be access from the Operations menu).
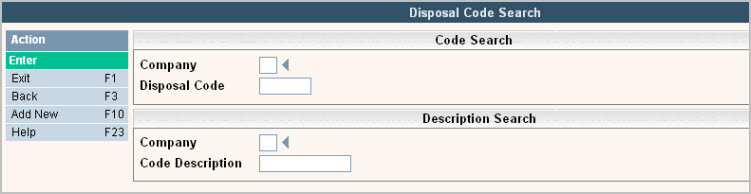
From the Operations Master Files menu, select the Disposal Site option. The Disposal Code Search or scan screen will be displayed depending on the settings in the system master record. We will begin with the search screen.
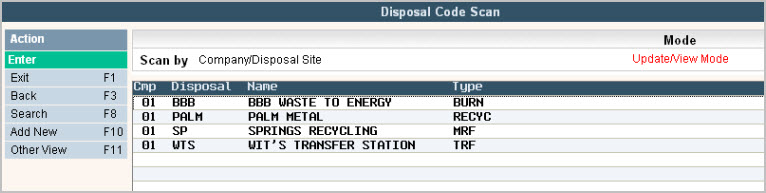
To search, use either the Code search or Description search. You can type in just a company id and press enter and the system will display the Landfill Code Scan screen. Select the one you want to view by double clicking on the line item.
UPDATE:
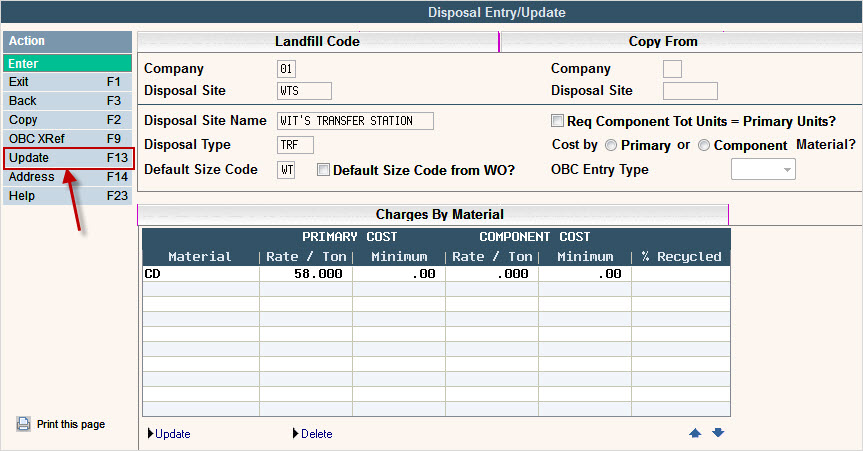
To make changes select the code you want to update by double clicking on the line item, this will display the code in 'Inquiry' mode. In order to make any changes to the information, you must go in to 'update' mode by clicking ![]() or pressing F13 (shift + F1).
or pressing F13 (shift + F1).
ADD:
To add a new code click or press ![]() and the Disposal Entry/Update screen will be displayed.
and the Disposal Entry/Update screen will be displayed.
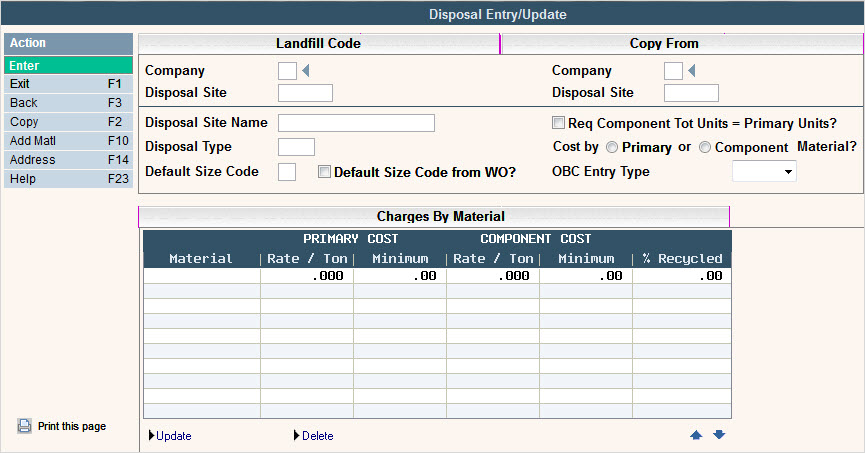
In the Company field enter your company ID.
In the Disposal field, enter the id for the Disposal Facility (up to 8 characters). This can be a code for a transfer station, landfill, MRF, etc.
In the Disposal Name enter a full description or name for the Landfill Code.
In the Disposal Type field enter an abbreviation for the type of disposal facility this code represents (such as TRF for transfer station, MRF for material recycling facility, LF for landfill, etc.)
Default Size Code - This field is used with Scale-Pak in the generation of the sz/cg codes that are added to the scale ticket.
![]() Default Size Code from WO? - This field is also used within Scale-Pak. If this is checked, then the programs will pull the Size portion of the size and charge code from the first line of the work order instead of defaulting a specific size from the previous field.
Default Size Code from WO? - This field is also used within Scale-Pak. If this is checked, then the programs will pull the Size portion of the size and charge code from the first line of the work order instead of defaulting a specific size from the previous field.
![]() Req Component Tot Units = Primary Units? This option is used for LEED reporting. Do you want to require your component total units entered to equal the primary units entered? If Yes, then the total units entered for all the components (sub-materials) must equal the total units from the primary unit entry. This only happens if the component (sub-material) is marked as a percentage method material. If you select NO, or the material is a yardage method material, then the totals will not have to match the primary units entered.
Req Component Tot Units = Primary Units? This option is used for LEED reporting. Do you want to require your component total units entered to equal the primary units entered? If Yes, then the total units entered for all the components (sub-materials) must equal the total units from the primary unit entry. This only happens if the component (sub-material) is marked as a percentage method material. If you select NO, or the material is a yardage method material, then the totals will not have to match the primary units entered.
Cost by ![]() Primary or
Primary or ![]() Component Material? This option is also used for LEED reporting. This flag determines if we will be calculating the cost on the Component (sub-material) or if it will only be calculated for the Primary line.
Component Material? This option is also used for LEED reporting. This flag determines if we will be calculating the cost on the Component (sub-material) or if it will only be calculated for the Primary line.
OBC Entry Type - This field is used in Mobile-Pak. Valid options are: Percent, Yard or Weight. Please contact the Sales Department for more information on Mobile-Pak.
![]()
To add a new material for this disposal facility click or press ![]() from the Disposal Entry/Update screen.
from the Disposal Entry/Update screen.
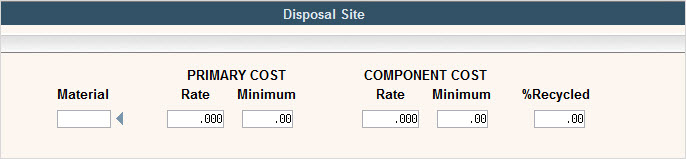
Material - enter the Material code for the materials your company brings to this disposal facility. Press F4 in the field to display a list of choices for the Materials.
Primary Cost
Rate/Ton - enter the Rate per unit for each corresponding material. For example - $70.000 per ton. You must enter the decimal point in this field. Remember this is YOUR COMPANY'S COST to dispose of the material at the facility, it will be used to calculate disposal cost in route costing and drivers log. Also used as the Primary Cost for LEED reporting.
Minimum - if the disposal facility charges a minimum amount, enter that in this field. Enter the amount with a decimal point.
Component Cost - The Rate and Minimum under the Component Cost have the same definitions as above. These only need to be entered if you are using LEED reporting and select to track the cost by Component (sub-material).
% Recycled - This field displays under the Charges by Material section only if your Company Master is set to base the % Recycled on Disposal Site rather than on Material Code alone. The information keyed into this field is used to update the Disposal Reconciliation File (LFRC) when the records are posted there.
To add an Address for this disposal facility click or press ![]() from the Disposal Entry/Update screen. If using Medical or Special Waste and printing manifests, this is where you would enter the Disposal Site address that would print on your documents.
from the Disposal Entry/Update screen. If using Medical or Special Waste and printing manifests, this is where you would enter the Disposal Site address that would print on your documents.
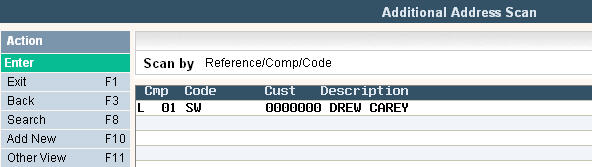
This will bring up the Additional Address Scan screen. Select the one you want to view by double clicking on the line item.
To add a new code click or press ![]() and the Additional Address Entry/Update screen will be displayed.
and the Additional Address Entry/Update screen will be displayed.
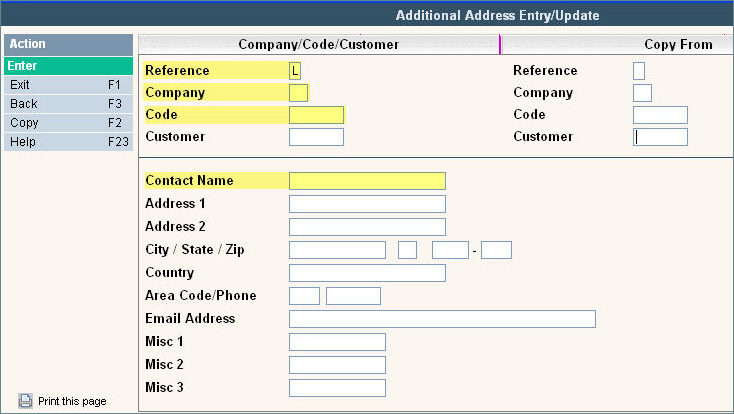
The yellow highlighted fields are the only required ones to set up an address.
The Reference field should automatically be populated with an L (because this was formerly the Landfill Master) to show what master file the address is being used for.
In the Company field enter your company ID.
In the Code field enter the code that helps you identify what this address record is for.
The Customer field is currently not used in i-pak.
In the Contact Name field enter the contact for that Disposal Facility.
In the following fields, enter any address or contact information you have that you need to print on the manifests.
Misc 1,2,3 are currently not used in i-pak.
Once you have filled out the appropriate fields, click or press ![]() to accept.
to accept.
The system will give you a message ![]() . Click or press
. Click or press ![]() to accept the changes and return to the Disposal Scan screen.
to accept the changes and return to the Disposal Scan screen.
DELETE:
To delete a code: from the Disposal Code Scan screen select the code to update by double clicking on the line.
Once in the Entry/Update screen click or press ![]() . The system will display a confirmation message on the bottom of the screen:
. The system will display a confirmation message on the bottom of the screen: ![]() .
.
![]() There is NO UNDO button, once a code is deleted it is gone.
There is NO UNDO button, once a code is deleted it is gone.
Click or press ![]() to confirm deletion.
to confirm deletion.