Vehicle ID's are used primarily in Route Costing and Driver's Logs to define vehicle capacity and costs associated with operating the vehicle. All vehicles that are operational or could be operational in your company should be entered in this file. In addition, the Vehicle can be set up as a default in the Route Master to improve data entry efficiency. Typically the Vehicle ID's correspond to the numbers painted on the vehicle.
The vehicle master can also be used as a visual aid in work orders and On-line Dispatching.
From the System Administration menu, select the Master Files menu option.
From the Master Files menu, select the Operations Master Files menu (this can also be access from the Operations menu).
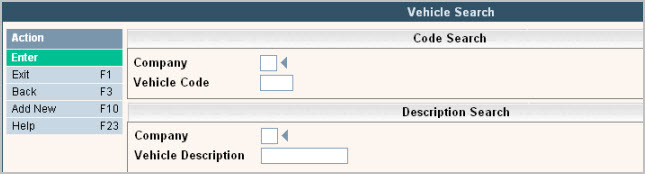
From the Operations Master Files menu, select the Vehicle Master option. The Vehicle Search or scan screen will be displayed depending on the settings in the system master record. We will begin with the search screen.
To search, use either the Code search or Description search. You can type in just a company id and press enter and the system will display the Vehicle Scan screen. Select the one you want to view by double clicking on the line item.
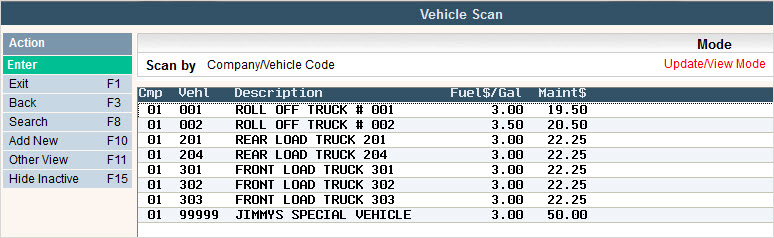
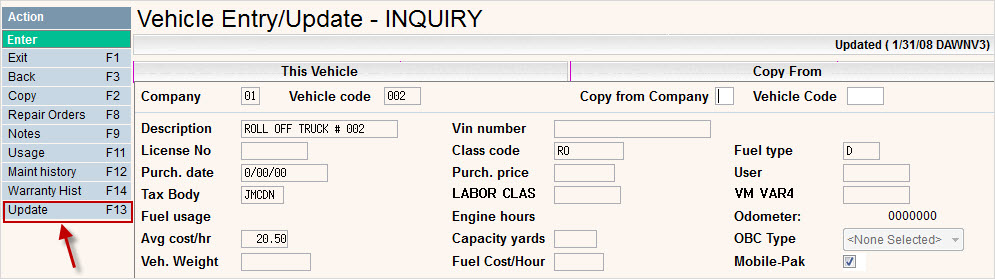
To make changes select the code you want to update by double clicking on the line item, this will display the code in 'Inquiry' mode. In order to make any changes to the information, you must go in to 'update' mode by clicking ![]() or pressing F13 (shift + F1).
or pressing F13 (shift + F1).
![]() Additional options and fields are available and will be displayed if you have purchased the Vehicle Management module. Please contact Support Services for additional information.
Additional options and fields are available and will be displayed if you have purchased the Vehicle Management module. Please contact Support Services for additional information.
Once you have made any changes click or press ![]() to accept. The system will give you a message
to accept. The system will give you a message ![]() . Click or press
. Click or press ![]() to accept the changes and return to the Vehicle scan screen.
to accept the changes and return to the Vehicle scan screen.
To make a code inactive so a user cannot accidentally select it: once in the Entry/Update screen, click or press ![]() to inactivate (this is a 'toggle' button so you would use the same action to activate a code that has been inactive). The system will run a series of edits to verify that the code is no longer in use and can be 'inactivated'; it will then display a 'confirmation' message:
to inactivate (this is a 'toggle' button so you would use the same action to activate a code that has been inactive). The system will run a series of edits to verify that the code is no longer in use and can be 'inactivated'; it will then display a 'confirmation' message: ![]()
Press F15 (shift F3) again to confirm.
![]() You cannot inactivate or delete a vehicle if any of the following conditions apply:
You cannot inactivate or delete a vehicle if any of the following conditions apply:
To delete a code: from the Vehicle Scan screen select the code to update by double clicking on the line.
Once in the Entry/Update screen click or press ![]() . The system will display a confirmation message on the bottom of the screen:
. The system will display a confirmation message on the bottom of the screen: ![]() .
.
![]() There is NO UNDO button, once a code is deleted it is gone. Click or press
There is NO UNDO button, once a code is deleted it is gone. Click or press ![]() to confirm deletion.
to confirm deletion.
To add a new code click or press ![]() and the Vehicle Entry/Update screen will be displayed.
and the Vehicle Entry/Update screen will be displayed.
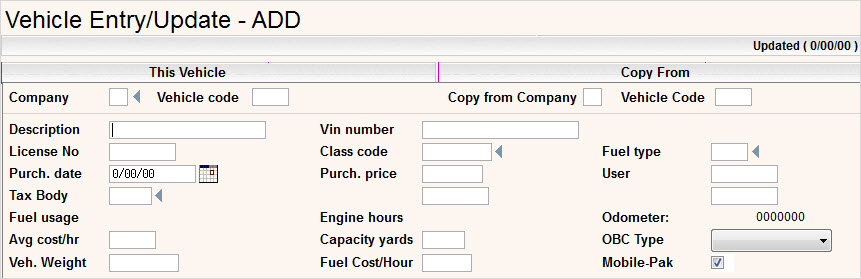
In the Company field enter your company ID.
In the Vehicle field, enter the id for the Vehicle (up to 5 characters) - typically this is the same id as the number painted on the side of the truck.
In the Description enter the description of the Vehicle.
![]() The Company, Vehicle and Description are the only required fields you need to enter in order to create a vehicle. The fields explained below are optional, but used within our standard i-Pak productivity reporting. If using productivity, these must be filled in to get accurate costing numbers. The fields not explained are used within our Vehicle management or OBC modules. Please contact our sales department if you would like to know more information about these modules and how they can help your company.
The Company, Vehicle and Description are the only required fields you need to enter in order to create a vehicle. The fields explained below are optional, but used within our standard i-Pak productivity reporting. If using productivity, these must be filled in to get accurate costing numbers. The fields not explained are used within our Vehicle management or OBC modules. Please contact our sales department if you would like to know more information about these modules and how they can help your company.
Fuel Type - The Fuel Type field has a master file selection built behind it. You will need to click on the prompt in order to access the Fuel Type master and set it up. This master file is only accessible via the vehicle master unless Vehicle Management is installed.
When you click on the ![]() you will be brought into the Fuel/Oil Scan screen. Click on
you will be brought into the Fuel/Oil Scan screen. Click on ![]() to create a Fuel Type record.
to create a Fuel Type record.
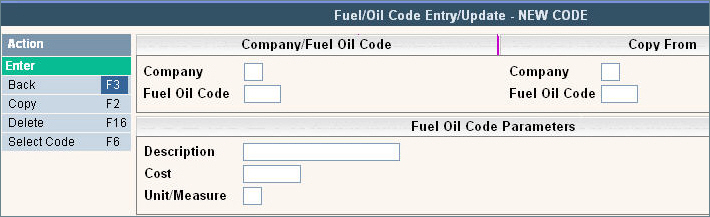
In the Company field enter your company ID.
In the Fuel Oil Code field, enter a code that represents the type of Fuel that your vehicles will be using.
In the Description enter a full description of the Fuel Type you are entering.
In the Cost field, enter the cost of fuel for the vehicle (this can be an average amount for the month, year, etc). This amount is used in the calculation of fuel costs in Productivity Reporting, Route Costing and Driver's Log. Enter the number with a decimal point.
In the Unit/Measure field, enter the unit of measure that this fuel is measured in. For example, enter GL for gallons.
Once you have entered the Fuel Type Master record, hit enter to accept and you will then be able to select that Fuel Type in the Vehicle Master.
Avg cost/hour - enter the cost to maintain the vehicle per engine hour. This amount is used in the calculation of vehicle costs (time the vehicle was used on the Route x average cost per hour) in Productivity Reporting, Route Costing and Driver's Log. Enter the number with a decimal point and decimal positions.
Capacity Yards - enter the capacity of the vehicle in average net yards. Enter the number with a decimal point. This field is used in Productivity Reports. For a Roll Off vehicle, leave this field blank since it depends on the box they are carrying.
Fuel Cost/Hour - This is a support activated field. If you want to track Fuel Cost per Hour instead of per gallon, then contact support to activate and this field will be displayed. The fuel cost on the productivity reports will then be calculated as Route Hours multiplied by fuel cost per hour. There will also be a note at the bottom of the productivity reports showing the costing is being calculated this way.
![]() If this field is activated, then the search screen will show Fuel$/Hr instead of Fuel$/Gal.
If this field is activated, then the search screen will show Fuel$/Hr instead of Fuel$/Gal.
Once you have filled out the appropriate fields, click or press ![]() to accept.
to accept.
The system will give you a message ![]() . Click or press
. Click or press ![]() to accept the changes and return to the Vehicle Scan screen.
to accept the changes and return to the Vehicle Scan screen.