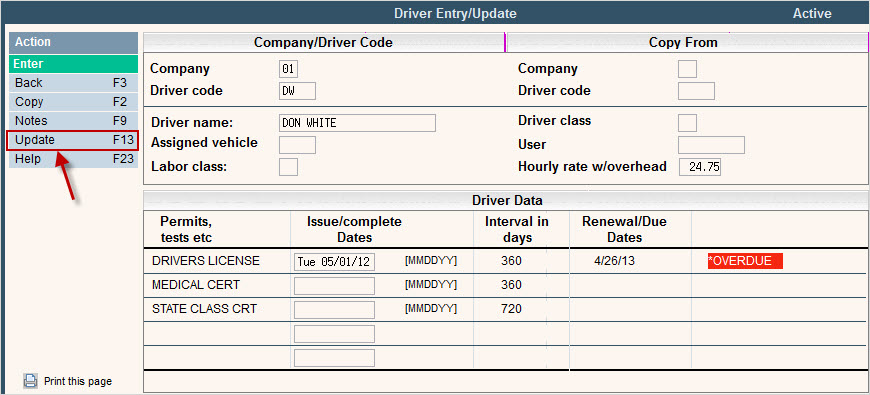
Driver ID's are used in Route Costing and Driver Logs to define driver and helper costs associated with providing services or operating a route. All drivers, helpers or supervisors that may operate a vehicle or assist with a route in your company should be entered in this file.
From the System Administration menu, select the Master Files menu option.
From the Master Files menu, select the Operations Master Files menu (this can also be access from the Operations menu).
From the Operations Master Files menu, select the Driver Master option. The Driver Search or scan screen will be displayed depending on the settings in the system master record. We will begin with the search screen.

To search, use either the Code search or Description search. You can type in just a company id and press enter and the system will display the Driver Scan screen. Select the one you want to view by double clicking on the line item.

![]() Users searching on the driver master with "display cost" on the Operations Tab in User Security marked NO will not see the HOUR$ column on this screen.
Users searching on the driver master with "display cost" on the Operations Tab in User Security marked NO will not see the HOUR$ column on this screen.
Additional options and fields are available and will be displayed if you have purchased the Vehicle Management module. Please contact Support Services for additional information. The screen shot below shows the Driver Master if Vehicle Management is installed.

To make changes select the code you want to update by double clicking on the line item, this will display the code in 'Inquiry' mode. In order to make any changes to the information, you must go in to 'update' mode by clicking ![]() or pressing F13 (shift + F1).
or pressing F13 (shift + F1).

To make a code inactive so a user cannot accidentally select it: once in the Entry/Update screen, click or press ![]() to inactivate (this is a 'toggle' button so you would use the same action to activate a code that has been inactive). The system will run a series of edits to verify that the code is no longer in use and can be 'inactivated'; it will then display a 'confirmation' message:
to inactivate (this is a 'toggle' button so you would use the same action to activate a code that has been inactive). The system will run a series of edits to verify that the code is no longer in use and can be 'inactivated'; it will then display a 'confirmation' message: ![]() .
.
Press F15 (shift F3) again to confirm.
To delete a code click or press ![]() . The system will display a confirmation message on the bottom of the screen:
. The system will display a confirmation message on the bottom of the screen:
![]()
![]() There is NO UNDO button, once a code is deleted it is gone. Click or press
There is NO UNDO button, once a code is deleted it is gone. Click or press ![]() to confirm deletion.
to confirm deletion.
To add a new code: from the Driver search or scan screen, click or press ![]() and the Driver Entry/Update screen will be displayed.
and the Driver Entry/Update screen will be displayed.

Company: enter your company ID.
![]() Driver Master Files can be shared across companies if you have your Company Master set up for Master File Sharing on Drivers. If this is set up, then you only need to enter the Driver code into the "master" company.
Driver Master Files can be shared across companies if you have your Company Master set up for Master File Sharing on Drivers. If this is set up, then you only need to enter the Driver code into the "master" company.
Driver: Enter a code that identifies this driver. The code can be up to 5 bytes long. It is best to make the code easy for users to remember, like using the drivers initials.
Name: enter the full name of the Driver.
Hourly Rate: This amount is used when calculating productivity. It is suggested that you enter a 'padded' rate that includes benefits (insurance, uniforms, etc.) and make this field a fixed rate based on the type of driver verses the actual pay each driver receives.
![]() To prevent users from viewing the hourly rate when accessing the Driver Master, their i-Pak User Security can be set to 'display cost=N'.
To prevent users from viewing the hourly rate when accessing the Driver Master, their i-Pak User Security can be set to 'display cost=N'.
Driver Class: if you would like to classify your drivers you can enter a user defined code. This field is free-form text and does not have a table to select from.
Once you have filled out the appropriate fields, click or press ![]() to accept.
to accept.
The system will give you a message ![]() .
.
Click or press ![]() to accept the changes and return to the Driver Scan screen.
to accept the changes and return to the Driver Scan screen.