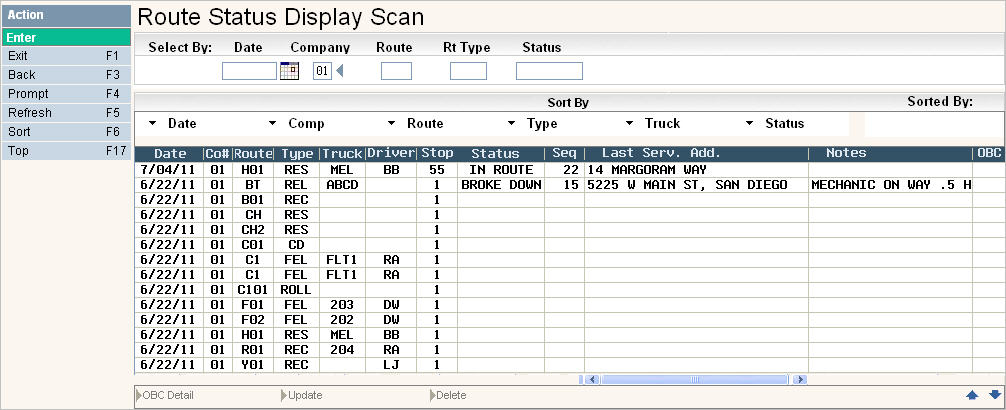
The Route Status Display Screen allows users to track information such as 'In Route', 'Broke Down', Traffic Dly', etc. as well as what sequence # and/or address the driver has last serviced. The Route Status Display can be updated manually or via OBC interface.
When generating Route Lists, from the Operations Menu, there is an option to ![]() . If you click Yes
. If you click Yes ![]() , then a record for that Date, Co#, Route, Vehicle (Truck) and Driver will be added to this Route Status Display screen.
, then a record for that Date, Co#, Route, Vehicle (Truck) and Driver will be added to this Route Status Display screen.
Select By:
You have the option to limit the screen to display records based on a selection criteria. Your selection options are by Date, Co#, Route, Route Type and/or Status. Enter data into these fields to limit the display to your selection criteria and press ![]() to update your screen.
to update your screen.
Sort By:
You can also change the sort criteria for the screen display. Your sort options are by Date, Company, Route, Route Type, Truck (Vehicle) and/or Status. Just click on the field you wish to sort by and the screen will adjust to display in the new sort order. The top of the screen will also display which option you chose to sort by in green.
![]()
Display Fields:
Each record is created with the Date, Company, Route, Route Type, Truck (Vehicle), Driver and # of Stops that are recorded from the Route List. The Truck (Vehicle) and Driver come from the default values entered into the Route Master. The Status, Sequence, Last Service Address and Notes can be updated manually by highlighting the record and clicking on ![]() at the bottom of the display. The following screen will appear.
at the bottom of the display. The following screen will appear.
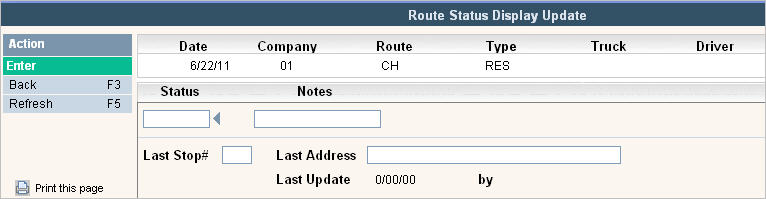
You can either enter a Status code, or use the prompt ![]() arrow to see a list of codes to choose from. You can enter any notes, the Last Stop # (sequence #) and/or Last Address the driver successfully completed. The system will mark the record with the Date and User ID of who updated the record. When all of the information has been entered, press
arrow to see a list of codes to choose from. You can enter any notes, the Last Stop # (sequence #) and/or Last Address the driver successfully completed. The system will mark the record with the Date and User ID of who updated the record. When all of the information has been entered, press ![]() to update the Route Status Display screen with your changes. Click
to update the Route Status Display screen with your changes. Click ![]() to remove any change and start over or
to remove any change and start over or ![]() to go back to the original screen without adding any updates.
to go back to the original screen without adding any updates.
This information can also be updated via OBC Interface. The final field on the Route Status Display is OBC. This field will either display as YES or blank. This field is only used with an OBC Interface and tells whether the route information has been SENT to the OBC or not.
Delete a Record:
To Delete a record on the Route Status Display screen, highlight the record and click ![]() on the bottom of the screen. The Status field will be updated with the info
on the bottom of the screen. The Status field will be updated with the info ![]() . When you exit out of the screen and come back in, that record will be gone. If you hit
. When you exit out of the screen and come back in, that record will be gone. If you hit ![]() by accident, you can select
by accident, you can select ![]() and it will not be deleted.
and it will not be deleted.