
From the i-Pak Operations Menu, select Print Daily Route Lists option #11. If you have previously set up Route List Templates, then the template screen will be displayed.
Double Click on an existing Template to use the pre-selected defaults.
If this is a unique Route List (special one time selection for supervisor or temp driver, etc.), select ![]() and the Route List Selection screen will be displayed.
and the Route List Selection screen will be displayed.
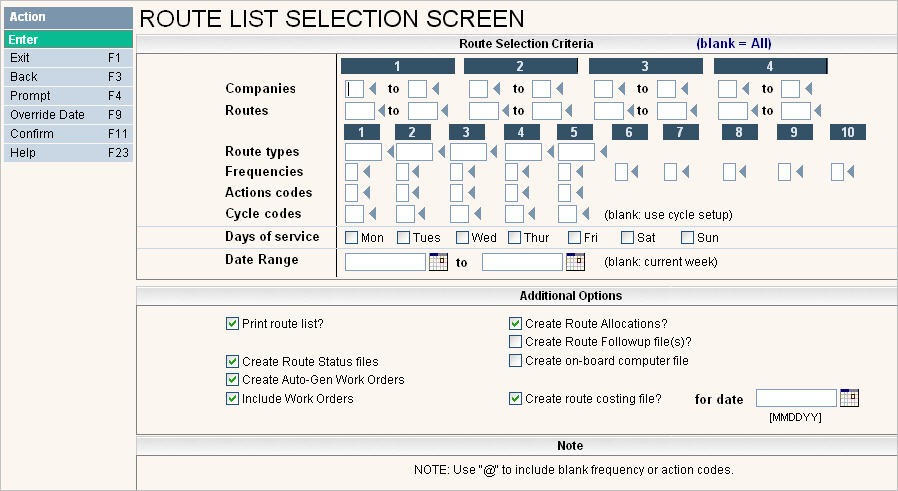
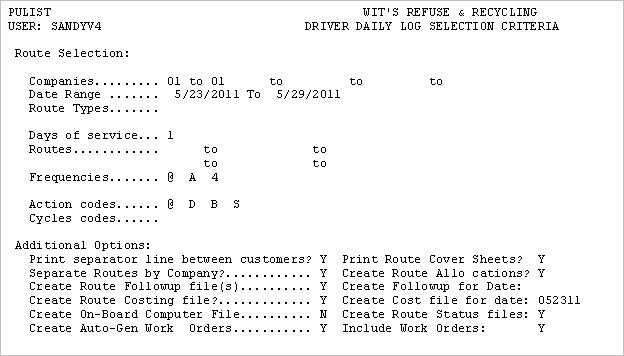
Fill in the screen with your selections for printing the routes. You can select multiple days and multiple routes. They will always be separated by Day first then Route within Day.
|
Companies (range) |
Enter the company id for the route. If the route is the same in multiple companies, you can enter a range of companies. If the route crosses company lines, you can leave these fields blank. |
|
Route |
Enter a specific Route or range of roues, or leave blank for all routes. Click on the |
|
Route types |
Enter the route type code for the routes if you want to print one 'type' of route (such as FEL trash or residential recycling, etc). Leave blank for All route types. |
|
Frequencies |
Enter the frequencies to be included - leave blank for all. Click on the Please see note below. |
|
Action codes |
Enter the Action codes to be included - leave blank for all. Click on the Please see note below. |
|
Cycle codes |
Enter the cycle code to be included. Leave blank for all routed cycles. |
|
Days of Service |
Select a particular day or days, or leave blank for all days to be printed. |
|
Date Range |
Selecting a date range will allow you to generate "Auto Gen WO's" for more than one week at a time. We do not suggest that you run route lists for more than one week since the scheduled stops/lifts can change regularly. If left blank, the current date will be used. |

![]() What does the above note mean - this Note refers to the frequency and action codes. Since leaving these fields blank would include ALL the codes, there needs to be a way to select customers with a blank frequency (picked up at least 1x week) or a blank action code (not locked). So, the @ tells the system to include customer's that have a blank frequency or action code.
What does the above note mean - this Note refers to the frequency and action codes. Since leaving these fields blank would include ALL the codes, there needs to be a way to select customers with a blank frequency (picked up at least 1x week) or a blank action code (not locked). So, the @ tells the system to include customer's that have a blank frequency or action code.
Additional Options
|
Print Route List? |
Do you want an actual list to print? Since you can use this option to send data to an OBC or generate automatic work orders, we give you the option of selecting N if needed. The default on this screen is Yes. |
|
Create Route Allocations? |
Do you want the RALL = Route Allocations File to be updated with this run? The Route Allocation file gives a breakdown of how many stops/lifts are in each tax body and can allocate landfill amounts accordingly to each tax body for that route and day. The default is Yes but support can change it to default to NO if that works better for your environment. |
|
Create Route Follow Up Files? |
Do you want the Route Follow Up files to be created? Route Follow Up files hold a record for each customer on the route for that route and day. It's a one stop place to enter bin weights, notes, S&A's for extra yards, and toggle work orders if listed on the route list. The default is No. |
|
Create Route Status Files? |
Do you want Route Status Files to be created? Route Status files are mostly used with OBC interfaces, but can be used without them as well. They allow you to store information on the drivers status on the route so CSR's can easily view the route and tell customers whether they've reached their area or not, or whether the driver has been delayed due to weather, an accident, etc. The default is Yes. |
|
Create On-Board Computer File |
Do you want to create an OBC file with this Route List. This option will only display if you are using an OBC interface and have access to create an OBC file. The default is Yes if OBC is installed and No if it's not. |
|
Create Auto Gen Work Orders? |
If this route selection includes routes where work orders will be generated, do you want to create them? The default is Yes, but we allow for No in case you want to run a special listing only, or this is a 2nd run and you don't want to get duplicate work orders created. |
|
Include Work Orders |
Do you want to print work orders, that are scheduled for this route and day, to print at the top of the route list? The default for this flag comes from the RFS = PULIST, i-Pak Values #48. If that value is blank or NO, then we default NO. If that value is YES then we default Yes. |
|
Create route costing file for date |
If using Route costing, do you want a route costing file created? If YES, then what date should be used? The default answer for this field comes from the System "Master "Build Route costing File" on route list screen. |
When you are done filling in the selections on the first page, click or press ![]() and a "Print Options" window will be displayed for you to make selections on.
and a "Print Options" window will be displayed for you to make selections on.
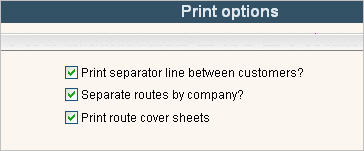
Additional Options - Page 2
| Print separator line between customers? | Do you want a separator line to print between each customer on the route list? Sometimes this helps the driver to read the route lists a little easier. If you are not sure, print a sample of each and ask your drivers which one is easier to read. |
| Separate routes by company? | If your routes cross company lines, do you want the route lists to be separated by company number? |
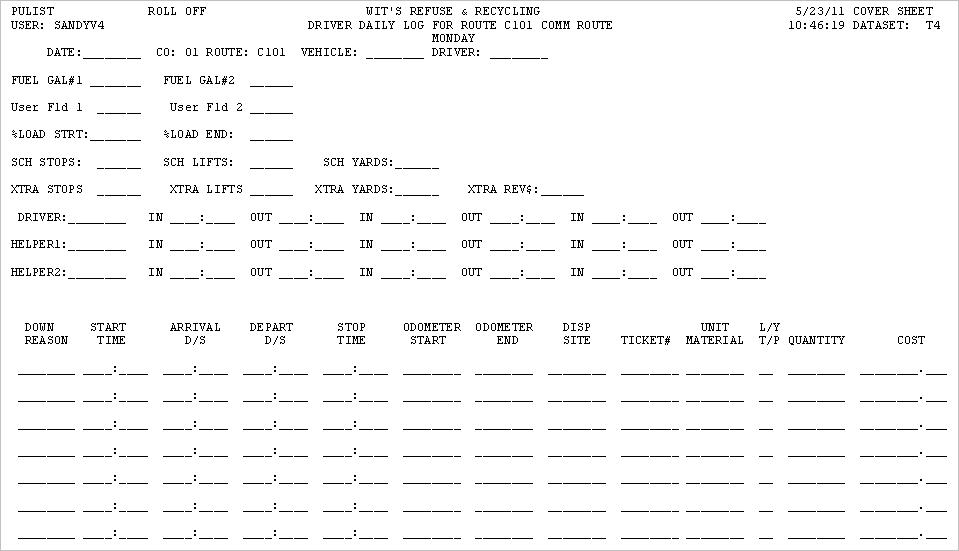
| Print route cover sheets? | Do you want to print a route cover sheet to give to the driver so he can fill out his times, odometer and landfill information for route costing? |
Once your selection screens are filled in, click or press ![]() to accept and the following message will be displayed on the bottom of the screen:
to accept and the following message will be displayed on the bottom of the screen: ![]() . Click or press
. Click or press ![]() and the routes will be submitted to run.
and the routes will be submitted to run.
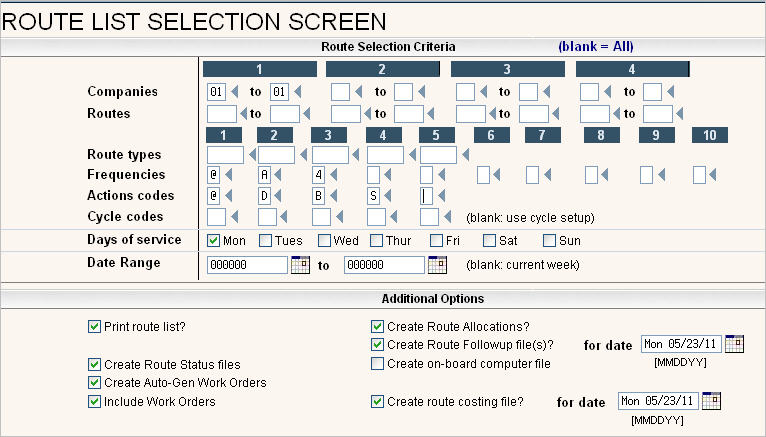
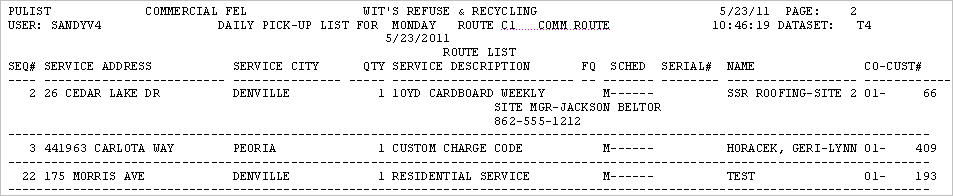
In the example above, we want to print all routes for Monday.
The frequency codes are @ for customer's with a blank frequency, A for customers picked up every other week on the A week, and 4 for once a month customers picked up the forth week of the month (the frequency codes are set up specific to your environment).
The action codes are @ for customers with a blank action code, D for customers who are delinquent but still serviced, S for customers whose service is about to Stop and B for customers whose service is about to start (action codes are also set up specific to your environment.
Route Selections - this option is turned on in RFS for PULIST, i-Pak values # 21. This is an easy way to verify that the selections were correct for the weekly route lists.
Override Date
This option was created for times, such as holidays, when you are running route lists on a day that it different than the normal scheduled day. By selecting the ![]() option, you can run Mondays route list and have it attach Tuesdays DATE. This is important for anyone using the OBC modules, or creating files that are DATE specific. This is a temporary day/date change for this run only. It will not effect the day of service that is set up on the customers account.
option, you can run Mondays route list and have it attach Tuesdays DATE. This is important for anyone using the OBC modules, or creating files that are DATE specific. This is a temporary day/date change for this run only. It will not effect the day of service that is set up on the customers account.
How it works: Monday is Memorial Day and you do not service customers on that holiday but you will need to service them on Tuesday instead. First, you enter all of the Route Selection Criteria as if Monday was NOT a holiday and you were running route lists as normal. When you are done making your route selections, click on ![]() and the screen below will appear.
and the screen below will appear.

Click ![]() the New Route Day (Tues in our example).
the New Route Day (Tues in our example).
Enter the New Route Date you want attached to the route list. So if Monday, Memorial Day, is May 30, 2011, you would enter 5/31/11 or use the calendar to pull in the date for Tuesday.
Select ![]() and you will be brought back into the Route List Selection Screen with the message
and you will be brought back into the Route List Selection Screen with the message ![]() .
.
Select ![]() to proceed with Route Lists as normal.
to proceed with Route Lists as normal.