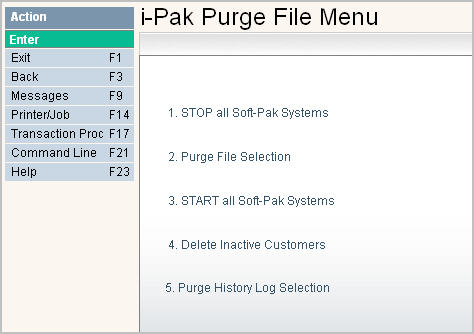
The purge files option allows the user to select data files for purging. This is an important feature when disk space becomes an issue and data must be archived to save disk space. The system will only allow records that are at least one year old or older to be purged.
The actual purging of data may be accomplished interactively or be processed during Day End procedures. If the choice is made to do the purge immediately (interactive), all users MUST BE off the system.
From the System Administration Menu, select the Purge Files Menu option and the purge files menu will be displayed.

There are 3 purging options available: 1. Purging standard data files and 2. Purging history log files which are both purged based on a date (where all records prior to that date will be purged) and 3. Deleting inactive customers which is based on a stopped date, a last activity date, company and cycle selections.
In order to purge the standard files and history log files, the system needs to be dedicated and 'stopped'. No users can be on the system. The delete inactive customers process is run in batch. A dedicated system is not required so users can remain working on the system while this is running.
To begin purging files or purging history log files immediately, you will need to 'STOP' the system first. Select the 'STOP all Soft-Pak systems' option - this will stop the system and force ALL users off the system. In addition, it will prevent any new users from signing on.
![]() This step is NOT necessary if you are going to set up your purge to run with Day End. This is only required if you are going to process the purge immediately (Now).
This step is NOT necessary if you are going to set up your purge to run with Day End. This is only required if you are going to process the purge immediately (Now).
Select the option 'Stop all Soft-Pak systems'. The following confirmation screen will be displayed:

Press F11 or click ![]() to confirm and stop the system, or press F3
to confirm and stop the system, or press F3 ![]() or F1
or F1![]() to exit and cancel. Once the system has been stopped, continue to purge files or purge history files.
to exit and cancel. Once the system has been stopped, continue to purge files or purge history files.
Select the Purge File Selection option #2. The Purge File selection screen will be displayed.
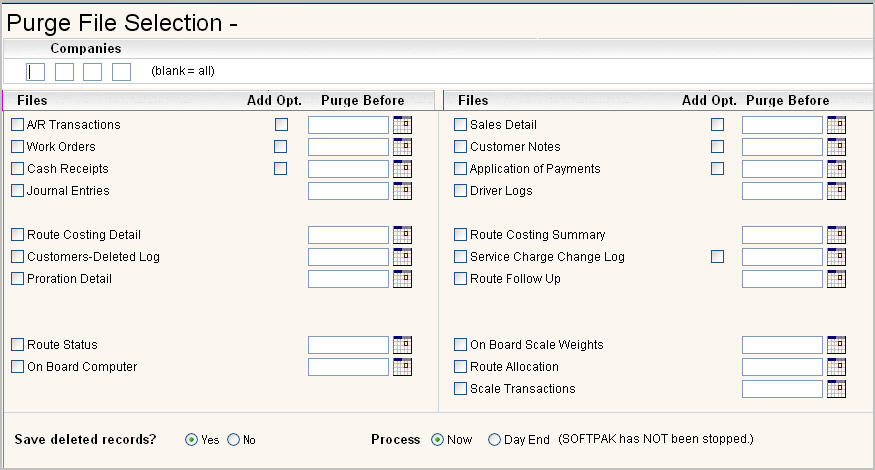
Companies - enter the Company id's you want to purge, leave blank for all.
File Selection - for each file you want to purge, select the file by answering yes (![]() ) - leave blank to exclude the file. Click here to see a list of the actual file names being purged and what file the data will be copied to if "Save deleted records?" is Yes.
) - leave blank to exclude the file. Click here to see a list of the actual file names being purged and what file the data will be copied to if "Save deleted records?" is Yes.
Add Opt. - some of the files have additional options available, which will allow you to further narrow down your purge selection by cycle as well as company and date. Click on the ![]() if you wish to make selections by cycle. Leave blank to select all cycles.
if you wish to make selections by cycle. Leave blank to select all cycles.
Purge Before - in this field enter the date for records to purge dated BEFORE this date.
Save deleted records? - do you want to perform a back up before running a Purge. If selecting to run the purge with Day End, make sure your Day End is set to run a back up first.
![]() We STRONGLY recommend that you answer yes
We STRONGLY recommend that you answer yes ![]() to save deleted records. The system will prompt you to enter a fresh tape to backup the files.
to save deleted records. The system will prompt you to enter a fresh tape to backup the files.
Process - do you want to run the procedure Now or Day End (select by clicking on the option to put a ![]() in the circle).
in the circle).
Click or press ![]() and
and ![]() to continue. At this point any files you
to continue. At this point any files you ![]() yes to for Add Opt. will bring up a company and cycle selection screen for you to update. Enter any Cycles that you wish to EXCLUDE from the purge process.
yes to for Add Opt. will bring up a company and cycle selection screen for you to update. Enter any Cycles that you wish to EXCLUDE from the purge process.

Click or press ![]() and
and ![]() to continue.
to continue.
Once the purge has completed, you will need to start the system to allow users to sign back on (unless it runs in day end. Day end will automatically Start all Soft-Pak Systems for you).
Select the option 'Start all Soft-Pak systems'. The following confirmation screen will be displayed:

Press F11 or click ![]() to confirm and start the system, or press F3
to confirm and start the system, or press F3![]() or F1
or F1![]() to exit and cancel.
to exit and cancel.
This option exists in order to help clear your system of unwanted customer records that you no longer service.
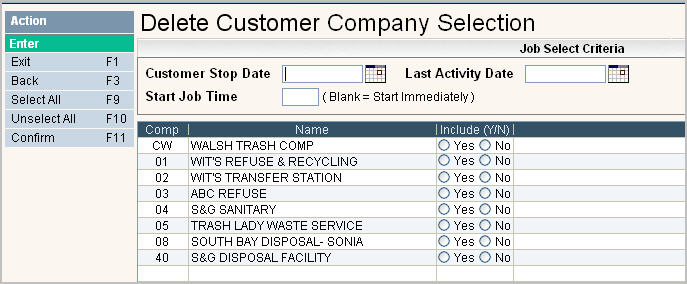
Enter a Customer Stop Date and Last Activity Date that you want the system to use to determine which customers to remove. Both fields are required. Only customers with a stop date, zero balance, no current charges or current payments and no activity since last activity date entered will be deleted.
Enter a Start Job Time, such as 22:00 for 11pm or leave blank to start immediately. This does NOT require a dedicated system to run, so your users may remain on the system while this is processing.
Select which Companies to Include.
Press ![]() to continue to the Delete Customer Cycle Selection screen.
to continue to the Delete Customer Cycle Selection screen.
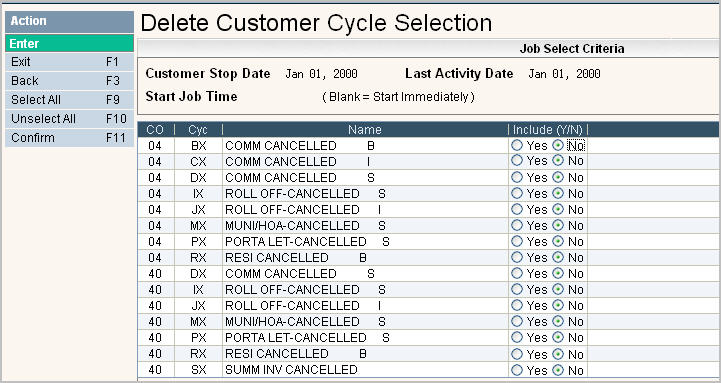
Select which Cycles to Include
Press ![]() to continue and process the Purge to Delete Inactive Customers.
to continue and process the Purge to Delete Inactive Customers.
Many of the files in i-Pak have Log files created which track changes made to the data within the files. This information can be very useful in understand who is making what changes. Since users are making changes to your database all day, these files may need to be purged on a regular basis.
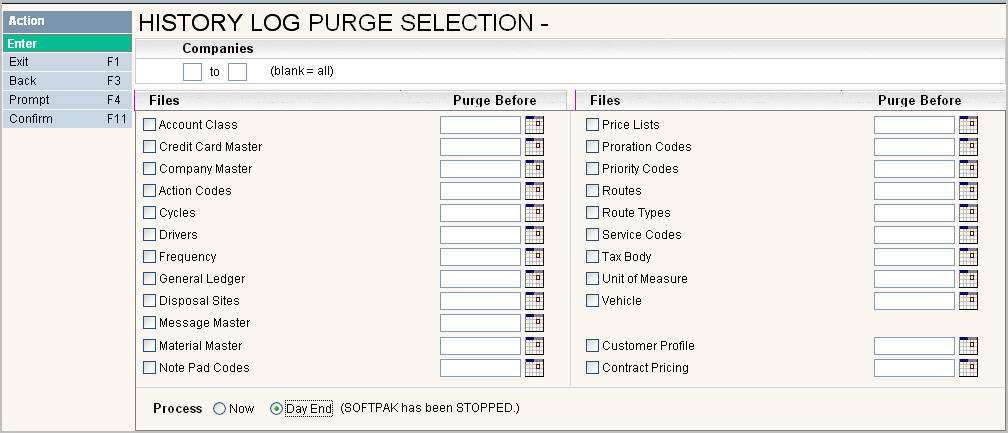
Enter the Companies you wish to include in the purge or leave blank for all.
Select ![]() which log Files you wish to include in the purge or leave blank for all.
which log Files you wish to include in the purge or leave blank for all.
Purge Before - enter the date to purge records. Records dated BEFORE this date will be included.
Process - select whether to process the purge Now (immediately) or include in you Day End.
Press ![]() to continue and process the History Log Purge.
to continue and process the History Log Purge.