Reoccurring Credit Card (RCC) - is a process that sends a file to your credit card vendor to deduct payments from customer's accounts (instead of them sending you a check). This feature is similar to the electronic funds transfer except it uses a customer's credit card information rather than banking (checking/savings) information. Please contact the Sales Department at 1-888-763-8725 if you are interested in activating this feature at your site.
Set up your Company Master - with the Credit Card Batch User ID. From the main menu, select System Administration, then select the Master Files Menu. From there, go into option #1 Company Code and select the company you wish to use RCC processing on. Click on the Accounting Tab and go to the Credit Cards section at the bottom.

Set up Customers for RCC processing in the Customer Profile on the Additional Information tab.

Reoccurring CC Payments - this field must be checked ![]() yes in order for the customer to be included in the RCC process.
yes in order for the customer to be included in the RCC process.
![]() Please Note: A customer can either be a reoccurring credit card (RCC) customer or EFT customer, but they cannot be set up as both.
Please Note: A customer can either be a reoccurring credit card (RCC) customer or EFT customer, but they cannot be set up as both.
Payment Day of Month - This field is not currently being used in the RCC process.
Set up Customers credit card information in the Customer Profile on the Additional Information tab under ![]() .
.

The system will automatically populate the card name and address. The card type, credit card # and expiration date must be filled in by the user.
The Valid Cards display based on entries set up in the Credit Card Master File.
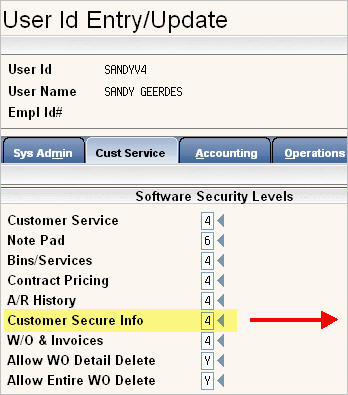
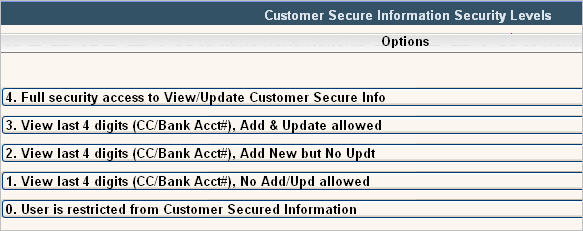
![]() Users must have access to the secure information file, in User Security, to update a customers Secure Info screen.
Users must have access to the secure information file, in User Security, to update a customers Secure Info screen.


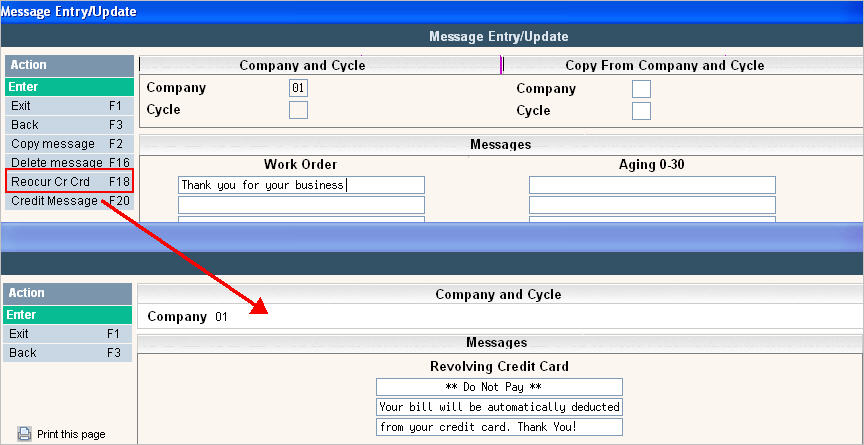
Set Up the Message Master to automatically put a message on statements and invoices so the customer does not remit payment.

How it works
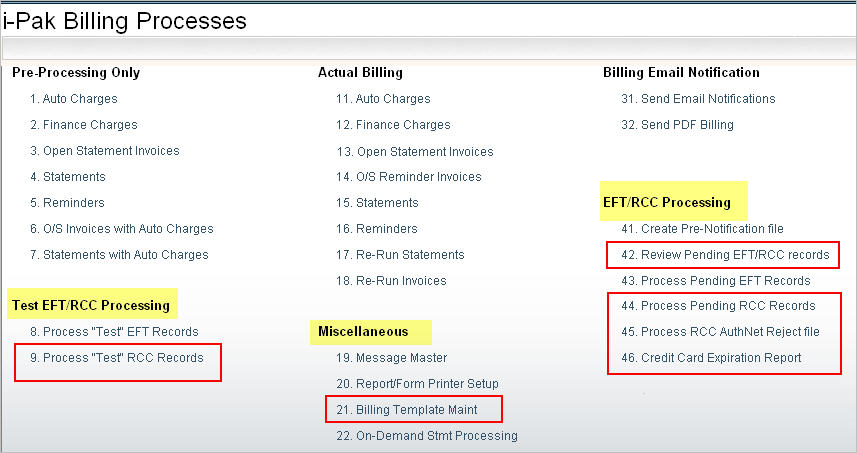
All of the RCC processing options can be found on the BILLING menu.

During Billing
During the Open Statement Invoice and Statement run a file (BKCC) is updated with possible RCC transactions. These pending transactions can be reviewed and remain encrypted on the server until they are processed.
Review Pending RCC records
From the Billing menu, select option # 42 to Review Pending EFT/RCC records and the following screen will be displayed:

Select by
The top portion of the screen allows you to limit the records displayed. You can choose any of the following:
Sent Flag - Enter Y to only see records that have been sent or leave blank to see All records.
Co - Enter a Company # to limit the records to a single company. Leave blank to see All records.
Cycle - Enter a cycle id to limit the records to a single cycle. Leave blank to see All records.
Type - Enter either EFT to limit to EFT records or RCC to limit to RCC records only. Leave blank to see All records.
Statement Date - Enter a Statement or O/S Invoice Run Date or leave blank to see All records.
The detailed portion of this screen shows the customers included in the file along with their C--Cust#, Cycle, Name, record type (EFT or RCC transaction), Entry Class, Statement/Invoice date, payment day of month, balance due (or invoice total if it's from an Invoice), and if this record has been sent, the date and the user who sent it.
![]() Notes:
Notes:
Credit Card Expiration Date Report
This step is not mandatory, but highly recommended to be done prior to sending a file to your Credit Card Vendor. Select Credit Card Expiration Report from the Billing menu and the Report on Credit Card Expiration Dates screen will be displayed.


Press ![]() to continue and the report titled AC0540P should be in your scan.
to continue and the report titled AC0540P should be in your scan.

You will need to contact these customers and update their secure information screen with new credit card information or else remove them from the Review Pending EFT/RCC records file.
Process Pending RCC Records
If this is your first time processing RCC transactions or if you have made any major changes (like changing your financial institution, etc.) you should do a 'Test' run first. The options are the same as for Live RCC Processing, but no actual updates occur and no $'s are included in the file.
From the Billing Menu, select Process Pending RCC Records (for a 'test' run, select Process "Test" RCC Records option). A continue window will be displayed.

Click on Yes to put a ![]() in the circle to continue, or No to cancel. If you have previously processed RCC transactions and created a Template, you can enter the Template name here. The Template selections will be filled in on the following Company selection screen automatically. Click the
in the circle to continue, or No to cancel. If you have previously processed RCC transactions and created a Template, you can enter the Template name here. The Template selections will be filled in on the following Company selection screen automatically. Click the ![]() to display your choices for Template names.
to display your choices for Template names.
Click or press ![]() to continue. The Company Selection screen will be displayed.
to continue. The Company Selection screen will be displayed.

In the Through Date field, fill in the date you want to process pending RCC transactions through. This refers back to the Payment Day of Month found on the Customers Additional Info tab and will include any pending RCC records with a date through and including this date. So if a customer has a date of 6/15/11 and a pending RCC transaction, they will be included in the file sent to the credit card agency. If a customer has a date of 6/30/11 and a pending RCC transaction, they will NOT be included in this file since the through date is 6/27/11. Type in the date as a number (the / are not needed), or click the Calendar icon ![]() to select the date.
to select the date.
Click on Yes to put a ![]() in the circle to include the company, or No to not include the company. You can click on
in the circle to include the company, or No to not include the company. You can click on ![]() to put a
to put a ![]() in the Yes column for all companies or
in the Yes column for all companies or ![]() to put a
to put a ![]() in the No column for all companies.
in the No column for all companies.
Click the ![]() button or press F5 to accept and continue.
button or press F5 to accept and continue.
This process will:
Process RCC AuthNet Reject File
If you use Authorize.Net and they create a file of 'rejected' customer credit card payments, this feature will handle processing these rejections. This step should be done prior to posting the Cash Receipt batches that were created with the step of Process Pending RCC Records.
Setup:
Two codes are required and must be set up in all companies that will be using this process.
1. Note Code Master: RCCRJ = recurring credit card rejection
2. Charge Code Master: size=blank, chg = 'RJ', description = recurring credit card rejection. This should point to the appropriate GL code for adjusting credit card payments.
How it works:
Receiving the File from Authorize.Net
On the Authorize.net site, you must click search by batch, click on the day you sent the file, search unsettled by batch, status = declined, click to show max# of results per page, and then pick download to file - use tab delimited. When the document opens on your screen, you then save as CCREJECT.TXT to your PC & then follow our upload process.


Once you have received the file from your financial institution (via email, etc), upload the file to your iSeries server.
Use FTP to upload the file to library IWSE4xx (where xx=your data set)
The file should be called – ‘CCREJECT’
Processing the File
Go to the Billing Menu and select Process RCC AuthNet Reject File
The process will run uninterrupted.
The file will be renamed as CCRMMDDNNN (where MMDD = month and day and NNN is a sequence # from 000-999) in library IWSB4xx (where xx=your data set).
You can display the files in your billing library by clicking on the ![]() button on the left side of the screen.
button on the left side of the screen.
The following processes are completed in this step:
o The system checks if a Cash Receipt record is still in an unposted batch. If so, it deletes the record from the Batch. If the Cash Receipt batch has been posted, then it will create a sales & adjustment batch to reverse the payments that were already posted using charge code ‘RJ’.
o A note batch will be created using note code ‘RCCRJ’.
o The RCC flag will be removed from the customer (on the additional info tab) so they will not be included in the next recurring credit card file.
o A file will be created with the file name=RCJMMDDNNN in the IWSB4xx library (where xx=data set). This file can be downloaded to excel and used as a mail merge source to send form letters to the rejected customers.
Miscellaneous Notes: