On Line Sales & Adjustments are entered through the Customer's account in Customer Service. This way of entering Sales & Adjustments is better if you have one or a few charges for an account, or if you want them applied right away so you can then reprint an invoice. If you have A LOT of Sales & Adjustments to enter, you may want to use the Batch function on the Accounting Menu as that would be more efficient.
You may need some information handy before you enter the adjustment; such as the Invoice number to apply the adjustment to, the correct amount less any taxes (if you charge tax in your area, taxes are automatically added to the amount so you'll want to 'back out' the tax), the 'from and to' customer # for misapplied payments, etc.)
![]() You may also want to view the customer's Open Invoice screen before applying any credits to the invoice. If an invoice has already been paid and closed, a credit amount against the invoice will result in a Credit Invoice. Credit invoices do NOT get automatically used against new invoices, so this will result in open invoices that will age. It is much CLEANER and more EFFICIENT if invoices are already closed, to let the credit go toward the next invoice generated.
You may also want to view the customer's Open Invoice screen before applying any credits to the invoice. If an invoice has already been paid and closed, a credit amount against the invoice will result in a Credit Invoice. Credit invoices do NOT get automatically used against new invoices, so this will result in open invoices that will age. It is much CLEANER and more EFFICIENT if invoices are already closed, to let the credit go toward the next invoice generated.
Access the Customer's account through Customer Service.
From the Customer Profile screen, click on the Sales Adjustment tab or press F6.
In the ![]() field type in the size and charge code that relates to the adjustment being entered. To display a list of choices for the Sz/Cg field, click on the
field type in the size and charge code that relates to the adjustment being entered. To display a list of choices for the Sz/Cg field, click on the ![]() . A listing of the Charge Code master will be displayed. Select the code you want by double clicking on the line.
. A listing of the Charge Code master will be displayed. Select the code you want by double clicking on the line.
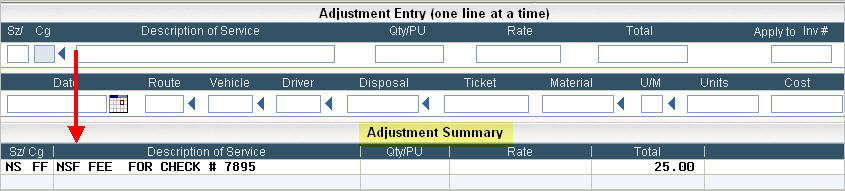
In the ![]() field, type in a detailed description of the adjustment. The customer will see this on a bill, so be as detailed as possible. In addition, if any audits are done on your system, you'll want to have as much information available as to why the adjustment was done. If the default description for the charge code should be used, leave this field blank and the description will be filled in when you press Enter, or if you select the Charge code from the drop down list.
field, type in a detailed description of the adjustment. The customer will see this on a bill, so be as detailed as possible. In addition, if any audits are done on your system, you'll want to have as much information available as to why the adjustment was done. If the default description for the charge code should be used, leave this field blank and the description will be filled in when you press Enter, or if you select the Charge code from the drop down list.
If applicable, enter a quantity in the ![]() field, if a quantity does not apply, simply leave blank. If the number is not a whole number, you must enter the decimal point. If it is a whole number, you can just enter the number without a decimal or decimal positions. For example a quantity of 1 1/2 is entered as 1.5, a quantity of 5 can be entered as 5 or as 5.00 - either way is fine.
field, if a quantity does not apply, simply leave blank. If the number is not a whole number, you must enter the decimal point. If it is a whole number, you can just enter the number without a decimal or decimal positions. For example a quantity of 1 1/2 is entered as 1.5, a quantity of 5 can be entered as 5 or as 5.00 - either way is fine.
![]() If the charge code is a 'rate' type of charge code, the quantity is multiplied by the rate to calculate the total. The amount of the charge is dependant on the quantity and the price 'per' or 'for each' quantity. Examples are: disposal ($65 per ton), tires ($5.00 each), per yard extra charges ($8.00 per yard), etc.
If the charge code is a 'rate' type of charge code, the quantity is multiplied by the rate to calculate the total. The amount of the charge is dependant on the quantity and the price 'per' or 'for each' quantity. Examples are: disposal ($65 per ton), tires ($5.00 each), per yard extra charges ($8.00 per yard), etc.
![]() If the charge code is a 'flat' type of charge code, you may enter a quantity, but it will not affect the total. Examples are: haul charges ($350.00 for a 30 yard), NSF fees ($25), adjustments used to 'back out' a check, adjustments to transfer a check, etc.
If the charge code is a 'flat' type of charge code, you may enter a quantity, but it will not affect the total. Examples are: haul charges ($350.00 for a 30 yard), NSF fees ($25), adjustments used to 'back out' a check, adjustments to transfer a check, etc.
If using a Rate charge code, enter the 'per' amount in the ![]() field. If the amount is not a whole number, enter the decimal point. If it is a whole number, simply enter the number without a decimal or decimal positions. For example, a charge of $65 per ton can be entered as 65 or 65. or 65.00, a charge of $2.25 per tire should be entered as 2.25. The Rate field is carried out to 3 decimal positions, so a charge of $1.254 can be entered as 1.254. If the charge code has a 'default or standard' price set up in the Charge Code master, the rate will be filled in automatically - you do not need to key the price. However, if the price is different than the default or if there is not a 'default or standard' price set up, you will need to key in the price. If contract pricing is set up for this Customer, the price will automatically default in and cannot be overridden.
field. If the amount is not a whole number, enter the decimal point. If it is a whole number, simply enter the number without a decimal or decimal positions. For example, a charge of $65 per ton can be entered as 65 or 65. or 65.00, a charge of $2.25 per tire should be entered as 2.25. The Rate field is carried out to 3 decimal positions, so a charge of $1.254 can be entered as 1.254. If the charge code has a 'default or standard' price set up in the Charge Code master, the rate will be filled in automatically - you do not need to key the price. However, if the price is different than the default or if there is not a 'default or standard' price set up, you will need to key in the price. If contract pricing is set up for this Customer, the price will automatically default in and cannot be overridden.
If using a Flat charge code, skip the Rate field and go to the ![]() field and enter the amount. If a Rate charge code was used, the total will be calculated automatically. If the charge code is set up with a 'default or standard' price, this field will be filled in automatically, but can be overridden. If contract pricing is set up for the Customer for this charge code, the price will automatically default in and cannot be overridden.
field and enter the amount. If a Rate charge code was used, the total will be calculated automatically. If the charge code is set up with a 'default or standard' price, this field will be filled in automatically, but can be overridden. If contract pricing is set up for the Customer for this charge code, the price will automatically default in and cannot be overridden.
If you are entering an adjustment against a particular Invoice, enter the Invoice number in the ![]() field. If you do not have an invoice to adjust, or if you want the adjustment to show on the next bill, leave this field blank.
field. If you do not have an invoice to adjust, or if you want the adjustment to show on the next bill, leave this field blank.
The ![]() for the adjustment will default to the current date, however, if you want to reference a prior or future date, enter that date in the field. Dates can be entered as numbers and do not require the '/'. In addition, the
for the adjustment will default to the current date, however, if you want to reference a prior or future date, enter that date in the field. Dates can be entered as numbers and do not require the '/'. In addition, the ![]() field can be used to display a calendar and you can pick the date by double clicking on the date.
field can be used to display a calendar and you can pick the date by double clicking on the date.
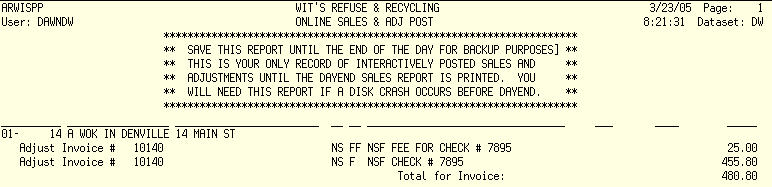
In the example below, I have entered a NSF fee (insufficient funds fee) for a 'bounced' check. I'm applying it to invoice 10140 because I am also going to add back the check to that invoice (since check # 7895 was used to pay invoice 10140). I will then reprint Invoice 10140 and mail it to the customer. The reprinted invoice will show the original charge and the adjustments - click here to see.

The following fields referencing routing and disposal information and are not required, but may help in reporting revenue at a later time. If they do not need to be entered, press Enter at this time. The adjustment will then show in the Adjustment Summary screen. You can then enter an additional adjustment for that customer.
![]() You must press Enter and see the adjustment in the Adjustment Summary section, otherwise the system has not yet accepted it and it will not be posted.
You must press Enter and see the adjustment in the Adjustment Summary section, otherwise the system has not yet accepted it and it will not be posted.
![]() - this is for a Route ID. Extra pickups from a route sheet can be referenced to that specific route. Click on the
- this is for a Route ID. Extra pickups from a route sheet can be referenced to that specific route. Click on the ![]() to display a listing of the Route Master for your choices.
to display a listing of the Route Master for your choices.
![]() - this is the Vehicle (truck ID) field. Extra pickups can also be referenced to a specific vehicle that was used for the pick up. In addition, some disposal facilities include the Vehicle ID on their dump bills, so this field can be used for Landfill Reconciliation as well. Click on the
- this is the Vehicle (truck ID) field. Extra pickups can also be referenced to a specific vehicle that was used for the pick up. In addition, some disposal facilities include the Vehicle ID on their dump bills, so this field can be used for Landfill Reconciliation as well. Click on the ![]() to display a listing of the Vehicle Master for your choices.
to display a listing of the Vehicle Master for your choices.
![]() - this is the Driver ID. Extra pickups can also be referenced to a specific driver that was used for the pick up. Click on the
- this is the Driver ID. Extra pickups can also be referenced to a specific driver that was used for the pick up. Click on the ![]() to display a listing of the Driver Master records for your choices.
to display a listing of the Driver Master records for your choices.
![]() - this is the Landfill or Dump facility ID. When capturing disposal information, you can enter the facility ID for later reporting. Click on the
- this is the Landfill or Dump facility ID. When capturing disposal information, you can enter the facility ID for later reporting. Click on the ![]() to display a listing of the Landfill Master for your choices.
to display a listing of the Landfill Master for your choices.
![]() - this is for the Landfill or Dump facility Ticket number. This is a 7 digit field and is helpful when trying to reconcile dump bills.
- this is for the Landfill or Dump facility Ticket number. This is a 7 digit field and is helpful when trying to reconcile dump bills.
![]() - this is for the Material that was disposed. This is also helpful when reconciling a dump bills. Click the
- this is for the Material that was disposed. This is also helpful when reconciling a dump bills. Click the ![]() to display a listing of the Material Master for your choices.
to display a listing of the Material Master for your choices.
![]() - this is for the Units of Measure - TN (tons), YD (yards), EA (each), etc. Click on the
- this is for the Units of Measure - TN (tons), YD (yards), EA (each), etc. Click on the ![]() to display a listing of the Unit of Measure Master for your choices.
to display a listing of the Unit of Measure Master for your choices.
![]() - this is for the number of units. Typically this is the same amount as the Qty field; however, they may be different. This field is for the units (quantity) that is on the disposal ticket. Your dump facility may charge you by the yard, but you charge the customer by the ton or visa versa. The decimal point must be keyed in for numbers that are not whole numbers.
- this is for the number of units. Typically this is the same amount as the Qty field; however, they may be different. This field is for the units (quantity) that is on the disposal ticket. Your dump facility may charge you by the yard, but you charge the customer by the ton or visa versa. The decimal point must be keyed in for numbers that are not whole numbers.
![]() - this field is the COST to your company and has nothing to do with what you may or may not charge the customer. Enter the amount from the ticket in this field. You must enter the amount with a decimal point.
- this field is the COST to your company and has nothing to do with what you may or may not charge the customer. Enter the amount from the ticket in this field. You must enter the amount with a decimal point.
Once this information is keyed in press Enter to accept your entry, the adjustment will then show in the Adjustment Summary Section. You can then enter an additional adjustment for that customer.
![]() You must press Enter and see the adjustment in the Adjustment Summary section, otherwise the system has not yet accepted it and it will not be posted.
You must press Enter and see the adjustment in the Adjustment Summary section, otherwise the system has not yet accepted it and it will not be posted.
You can key an unlimited amount of adjustments on this one screen for the particular customer. In my example below, I have entered 2 adjustments for this customer.

When you are done entering the adjustments, review them on the screen for accuracy.
To make changes, simple double click on the adjustment to bring it back up in the Adjustment Entry area. Go to the field you want to change, and make the appropriate changes. Press Enter to accept.
To delete a line, simply SINGLE click on the line in the adjustment summary area to highlight the line.

Then either click on the ![]() on the bottom of the screen, or RIGHT click on the line and select delete. The system will display a confirmation screen.
on the bottom of the screen, or RIGHT click on the line and select delete. The system will display a confirmation screen.
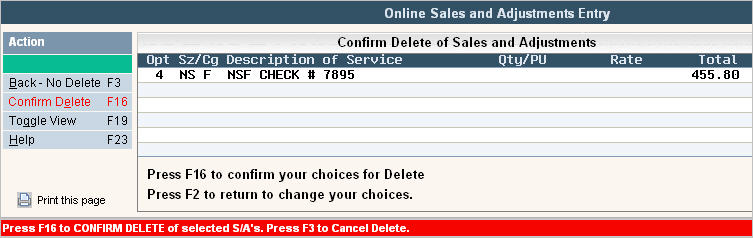
Press the ![]() button or F16 (shift F4) to confirm the deletion.
button or F16 (shift F4) to confirm the deletion.
To delete all the lines, you can use the ![]() button and follow with the confirmation above.
button and follow with the confirmation above.
When the adjustments are ready to post, simply click the ![]() button or F5. Once the adjustments have been posted, you will get a message on the bottom of the screen:
button or F5. Once the adjustments have been posted, you will get a message on the bottom of the screen:
![]() .
.
In addition, a report will print out listing the adjustments posted. Keep this print out in a folder as back up 'just in case'. (We suggest until a Day End is run just in case recovery is needed). If there is any additional paperwork for the adjustment (like a credit approval form, etc), you may want to attach the print out to the paperwork for filing purpose.