On-Line Dispatching is a display of all open work orders that match the criteria on the selection screen (date, range of dates, routes, etc.). Dispatching can be used to organize and assign work orders to drivers for the day, create Driver Log files for productivity statistics, and quickly view how many loads are scheduled for a particular day.
Accessing On-Line Dispatching:
From the i-Pak Master Menu, select option #1 – Customer Service (CUS)
From the Customer Service Search Menu, select Dispatching (F12) from the left toolbar.
-- OR --
From the i-Pak Master Menu, select option #5 – Operations (OPR)
From the Operations Menu, select option # 1- Dispatch Work Orders.
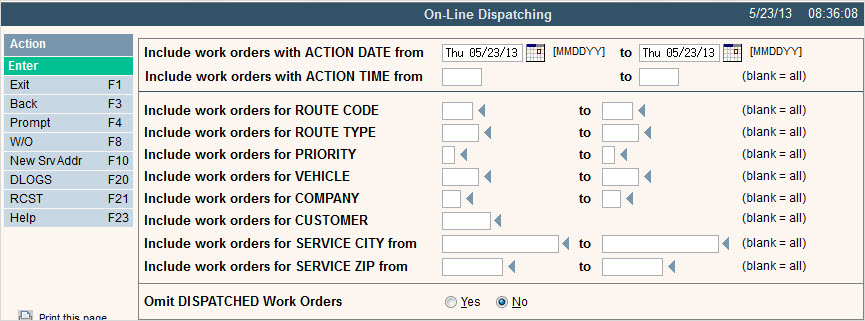
The On Line Dispatching selection (Work Order search) screen will be displayed:

Type in the criteria to select specific work orders – your selection can be very broad or it can be very specific depending on how many fields are used to select the work orders. Click or press ![]() to display selected work orders. The On Line Dispatching – Open Work Orders screen will be displayed.
to display selected work orders. The On Line Dispatching – Open Work Orders screen will be displayed.

This screen takes the place of a handwritten sheet, calendar board or notes. You can use this screen to assign routes to 'unassigned' jobs, radio out tasks to drivers, view work for a certain day, days or week, etc. This screen can be sorted several different ways: Date, Dispatched/Un-dispatched, Time, Priority, Route, Vehicle, Description, or City. This screen can also be used to print a 'log sheet' of all work orders for a particular driver (in addition to printed work orders).
On line dispatching can be used to keep track of what jobs are currently being done, already completed, and waiting to be schedule - all these tasks can be controlled through the use of the Action Time, Priority and Route codes.
You can make date, time, priority, route or vehicle changes right on the screen or double click on the Work Order line to go into the work order for additional update options.
To Dispatch the Work Order and assign the job to a driver, change the route from blank or generic to the actual route that will do the job. You can also fill in the vehicle and driver at this point (or they can be defaulted in from the Route Master). Once all pertinent information has been entered in, ‘dispatch’ the work order by highlighting the line and clicking on ![]() or use your mouse and right click and select Dsptch Tgl.
or use your mouse and right click and select Dsptch Tgl.
Once the work order has been dispatched, a 'D' will appear in the D column next to the date, and the color of the line will change to teal. That indicates that the job has been 'dispatched' out to a driver.
![]()
In addition, the Action Date, Route, Vehicle and Driver fields will no longer be accessible and a Driver’s log entry for that date, route, vehicle and driver is created. If a log already exists with the same key, the work order will be added to the log. See the Productivity Section for additional information.
![]() If you selected to Omit Dispatched Work Orders on the selection screen, then the work order will immediately be removed from the scan when it is dispatched.
If you selected to Omit Dispatched Work Orders on the selection screen, then the work order will immediately be removed from the scan when it is dispatched.
A 'dispatched' work order can not be changed. If changes are required, the work order must first be 'un-dispatched', make the changes needed, then 're-dispatch' the work order.
To Undispatch the work order, highlight the line and click on ![]() or use your mouse and right click and select Dsptch Tgl.
or use your mouse and right click and select Dsptch Tgl.
Use the Time field to sequence work orders in the order they should be done. This is typically done after the work orders are assigned to a Route but before they are dispatched. When the work orders are printed in batch, they can print in that order.
![]() The time field does not have to be an actual time (though it does have to be numeric). In our example, we have used the numbers 1 - 5 to assign the work orders to a sequence. Only numbers 1-59 can be used for sequencing.
The time field does not have to be an actual time (though it does have to be numeric). In our example, we have used the numbers 1 - 5 to assign the work orders to a sequence. Only numbers 1-59 can be used for sequencing.

By clicking on the Column Heading TIME, I was able to re-sort the screen by time and view my work orders in my new sort sequence.
![]() Whatever field is used for sorting will be displayed in TEAL and the header will show "Currently Sorted By:" the field which is the primary sort. The default is by DATE, then Route (with blanks at the top). You can sort by the following columns: Date, D (dispatched), Time, Pty (priority), Route, Vehicle, Description (of the Sz/Cg), Service City, and W/O# (work order #).
Whatever field is used for sorting will be displayed in TEAL and the header will show "Currently Sorted By:" the field which is the primary sort. The default is by DATE, then Route (with blanks at the top). You can sort by the following columns: Date, D (dispatched), Time, Pty (priority), Route, Vehicle, Description (of the Sz/Cg), Service City, and W/O# (work order #).
Once all the work orders have been sequenced and dispatched, the Work Orders are printed for the drivers: Print Work Orders in Batch, or Print Work Order Logs in Batch. The Driver then fills out a Driver Information sheet providing detailed information for each work order and general information for the day.
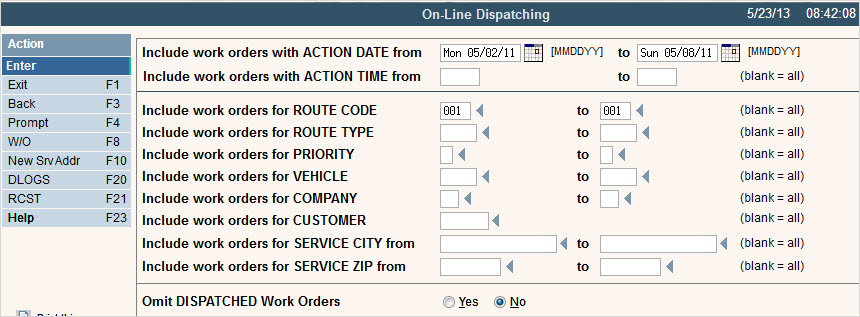
You can also print, a log of work orders assigned to a driver interactively. Use the Work Order search screen and select one specific route.

This will display work orders for route 001 only.

Click or press ![]() to print a work order log for the displayed work orders. The following message should appear at the bottom of your screen:
to print a work order log for the displayed work orders. The following message should appear at the bottom of your screen: ![]() .
.
Interface the work orders to MapPoint. Click on the ![]() button and the system will send the work order Service Addresses to MapPoint. MapPoint will then plot them on a Map. See the MapPoint Interface for additional information.
button and the system will send the work order Service Addresses to MapPoint. MapPoint will then plot them on a Map. See the MapPoint Interface for additional information.
Action/Function Key options
![]() will take you out of the on-line dispatching screen and back to the Customer Search screen (if selected from Customer Service) or the Operations Menu (if selected from Operations-Dispatching).
will take you out of the on-line dispatching screen and back to the Customer Search screen (if selected from Customer Service) or the Operations Menu (if selected from Operations-Dispatching).
![]() will take you back one screen.
will take you back one screen.
![]() Anywhere you see the
Anywhere you see the ![]() , the field should have a master file built behind it. By selecting the arrow, or the prompt action, or hitting F4 while in the field, you should be brought into the associated master file from which you can make a selection.
, the field should have a master file built behind it. By selecting the arrow, or the prompt action, or hitting F4 while in the field, you should be brought into the associated master file from which you can make a selection.
![]() This option will refresh your screen back to the way it was since the last time you hit your
This option will refresh your screen back to the way it was since the last time you hit your![]() key. It will remove any updates you've made to routes, vehicles, etc. since that time. Please be careful with using this option as it may remove data that you intended to keep.
key. It will remove any updates you've made to routes, vehicles, etc. since that time. Please be careful with using this option as it may remove data that you intended to keep.
![]() This option is another way to select to sort your on-line dispatching screen by a certain field. The default sort is by DATE, then Route (with blanks at the top). You can sort by the following columns: Date, D (dispatched), Time, Pty (priority), Route, Vehicle, Description (of the Sz/Cg), Service City, and W/O# (work order #). You can sort by clicking on the column heading or by placing your cursor in one of the sortable fields and selecting Sort or hitting your F6 function key.
This option is another way to select to sort your on-line dispatching screen by a certain field. The default sort is by DATE, then Route (with blanks at the top). You can sort by the following columns: Date, D (dispatched), Time, Pty (priority), Route, Vehicle, Description (of the Sz/Cg), Service City, and W/O# (work order #). You can sort by clicking on the column heading or by placing your cursor in one of the sortable fields and selecting Sort or hitting your F6 function key.
![]() By selecting the Msgs F9 option, you will be brought into the i-Pak Messages screen. This is where we hold various user specific messages, such as Variable Report information, File information or Mobile-Pak messages sent from the driver to the dispatcher.
By selecting the Msgs F9 option, you will be brought into the i-Pak Messages screen. This is where we hold various user specific messages, such as Variable Report information, File information or Mobile-Pak messages sent from the driver to the dispatcher.
![]() When you select the Position to Work Order option, a window will be displayed asking you the wo# you wish to position to.
When you select the Position to Work Order option, a window will be displayed asking you the wo# you wish to position to.
![]()
Enter the appropriate work order number and press ![]() . The on-line dispatching screen will then be sorted by W/O# and the work order # that you entered will be displayed at the top.
. The on-line dispatching screen will then be sorted by W/O# and the work order # that you entered will be displayed at the top.
![]() will take you to the Top of the on-line dispatching screen (first record).
will take you to the Top of the on-line dispatching screen (first record).
![]() will take you to the Bottom of the on-line dispatching screen (last record).
will take you to the Bottom of the on-line dispatching screen (last record).
![]() used with OBC interfaces to send messages to Vehicles.
used with OBC interfaces to send messages to Vehicles.
![]() will take you into the Drivers Log Scan.
will take you into the Drivers Log Scan.
![]() will take you into the Route Log Scan.
will take you into the Route Log Scan.
Work Order Specific Functions
![]()
When you click on a line to select (or highlight) several options become available at the bottom of your screen.
![]() You can access a work order by double clicking on the line, or highlighting the line and clicking on the W/O option at the bottom, or using your mouse to right click the line and select W/O, or by highlighting the line and selecting alt+W (your alt key + W).
You can access a work order by double clicking on the line, or highlighting the line and clicking on the W/O option at the bottom, or using your mouse to right click the line and select W/O, or by highlighting the line and selecting alt+W (your alt key + W).
![]() You can access a work orders route history by highlighting a line and clicking on the Rte Hist option at the bottom. This option will display any route changes that have occurred on this work order. Any time a route is updated, either from the work order or on-line dispatching, a record will be added showing the FROM Route Code, the TO Route Code, the Action Date for both the From & To, the date the route code was changed, the time the route code was changed, User Id that made the change, and the Program Id where the change was made (from Work Order entry/update or from On-Line Dispatching).
You can access a work orders route history by highlighting a line and clicking on the Rte Hist option at the bottom. This option will display any route changes that have occurred on this work order. Any time a route is updated, either from the work order or on-line dispatching, a record will be added showing the FROM Route Code, the TO Route Code, the Action Date for both the From & To, the date the route code was changed, the time the route code was changed, User Id that made the change, and the Program Id where the change was made (from Work Order entry/update or from On-Line Dispatching).

![]() When a line is selected, you can click on Profile (or alt+P) to access the customers profile screen.
When a line is selected, you can click on Profile (or alt+P) to access the customers profile screen.
![]() When a line is selected, you can click on Services (or alt+S) to access the customers services screen.
When a line is selected, you can click on Services (or alt+S) to access the customers services screen.
![]() When a line is selected, you can click on Prt W/O (or alt+P) to print the work order.
When a line is selected, you can click on Prt W/O (or alt+P) to print the work order.
![]() When a line is selected, you can click on Dsptch Tgl (or alt+D) to dispatch or undispatch the work order.
When a line is selected, you can click on Dsptch Tgl (or alt+D) to dispatch or undispatch the work order.
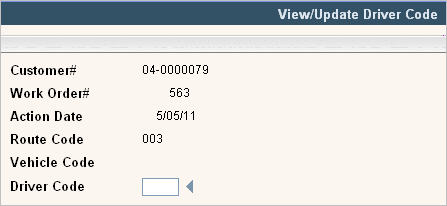
![]() This option will bring up an additional screen in which the dispatcher can easily update the driver code.
This option will bring up an additional screen in which the dispatcher can easily update the driver code.

If the driver code has previously been filled in (defaulted in from the Route Master or manually entered by a user), then it will display in the Driver Code field but can be overridden. If the work order has been dispatched, this information will be display only and cannot be updated.
![]() There is a support activated option that will allow you to display the Driver field directly on the dispatching screen. If this is active, then the Upd Drvr option will not be displayed at the bottom. When activated, the Original Route field is no longer displayed.
There is a support activated option that will allow you to display the Driver field directly on the dispatching screen. If this is active, then the Upd Drvr option will not be displayed at the bottom. When activated, the Original Route field is no longer displayed.
![]()
![]() When a line is selected, you can click on Inv Tgl (or alt+I) to Invoice toggle or untoggle the work order.
When a line is selected, you can click on Inv Tgl (or alt+I) to Invoice toggle or untoggle the work order.
Work Order Color Legend
![]()
The lines in the on-line dispatching screen may change to a different color based on things that happen on this screen or elsewhere in the system. The legend at the bottom will identify why a record is being displayed in a different color.