The Fuel/Fee Surcharge Master was designed to give a flexible and easy way to assist you in generating additional fee's (such as a fuel surcharges, administrative fees, permit fee's) on all transactions involving the use of charge codes (such as Sales & Adjustments, Work Orders, Auto Charges, Prorations, and Scale Tickets).
It can also be used to group customers together that have special reporting needs since the fee codes are recorded in all transactions (sales and receipts), therefore you can report information such as Total Sales, Gross Receipts, Total number and types of containers by fee code, etc.
The Fuel/Fee Surcharge Master File is composed of 2 parts. A Fee Code, which is entered on each Customer Profile, and a Fee Class, which is entered in the Charge Code Master. The generation of the 'Fee' takes place when these 2 components are combined. (This works just like our tax body master).
![]() It is a good idea to plan out or draw a chart of fee possibilities that will help make the entry of the Fee Codes and Classes easier.
It is a good idea to plan out or draw a chart of fee possibilities that will help make the entry of the Fee Codes and Classes easier.
![]() Before a combined Fee Code/Class record can be created, the 2 master components MUST be created.
Before a combined Fee Code/Class record can be created, the 2 master components MUST be created.
Creating the Fee Codes and Fee Classes
From the System Administration menu, select Master Files.
From the Master Files menu, select Fuel/Fee Surcharge. Either the Fuel/Fee Surcharge search screen or scan screen will be displayed, depending on the settings in the system master record. We will begin with the search screen.
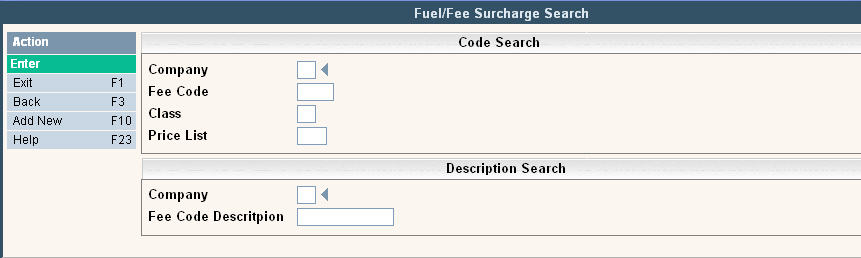
To search, use either the code search or description search. You can type in just a company id and press enter and the system will display the Fuel/Fee Surcharge Scan screen.
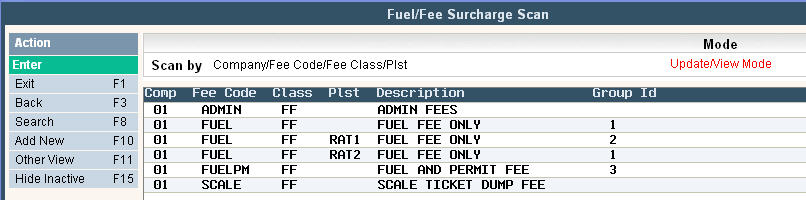
To make changes select the one you want to update by double clicking on the line item. Click or press ![]() to make necessary changes.
to make necessary changes.
Once you have made any changes click or press ![]() to accept. The system will display the following message:
to accept. The system will display the following message: ![]() . Click or press
. Click or press ![]() to accept the changes and return to the Fuel/Fee Surcharge Scan screen.
to accept the changes and return to the Fuel/Fee Surcharge Scan screen.
![]() If you need to delete a code, verify that the code is NO LONGER USED anywhere in the system. Check your charge codes to ensure fee classes are no longer used and run a Variable Customer report to ensure the fee code is no longer used.
If you need to delete a code, verify that the code is NO LONGER USED anywhere in the system. Check your charge codes to ensure fee classes are no longer used and run a Variable Customer report to ensure the fee code is no longer used.
Enter Fee Codes
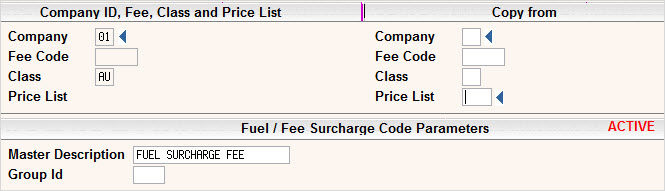
To add a new code click or press ![]() and the Fuel/Fee Surcharge Entry/Update screen will be displayed.
and the Fuel/Fee Surcharge Entry/Update screen will be displayed.

Company: enter your company ID.
Fee Code: enter the Fee Code that best describes your fuel or fee charge. This code will be entered onto the customer profile screen.
Class: When entering your initial Fee Code, you must leave the Class field blank.
Master Description: Enter a description that defines the Fee Code you are creating.
Group Id: Leave this field blank when entering your initial Fee Code.
Once you have updated the Fee Code information, click or press ![]() to accept. The system will display the following message:
to accept. The system will display the following message: ![]() . Click or press
. Click or press ![]() to accept the updates and return to the Fuel/Fee Surcharge Scan screen.
to accept the updates and return to the Fuel/Fee Surcharge Scan screen.
Enter Fee Class
To add a new class click or press ![]() and the Fuel/Fee Surcharge Entry/Update screen will be displayed.
and the Fuel/Fee Surcharge Entry/Update screen will be displayed.
Company: enter your company ID.
Fee Code: When entering your initial Fee Class, you must leave the Code field blank.
Class: enter the Fee Class that will best describes the type of fee charge. This code will be entered into the charge code master.
Master Description: Enter a description that defines the Fee Class you are creating.
Group Id: Leave this field blank when entering your initial Fee Class.
Once you have updated the Fee Code information, click or press ![]() to accept. The system will display the following message:
to accept. The system will display the following message: ![]() . Click or press
. Click or press ![]() to accept the updates and return to the Fuel/Fee Surcharge Scan screen.
to accept the updates and return to the Fuel/Fee Surcharge Scan screen.
Once you have your initial Fee Code and Fee Class created, then you are ready to create the actual Fee Code/Class details.
Enter Fee Code/Class with Details.
To add a new class click or press ![]() and the Fuel/Fee Surcharge Entry/Update screen will be displayed.
and the Fuel/Fee Surcharge Entry/Update screen will be displayed.
Company: enter your company ID.
Fee Code: Enter the Fee Code you created. This will go on the customer profile.
Class: Enter the Fee Class that you created to join with this Code. This will go into the Charge code.
Price List: Enter the price list that this code will be attached to. Entering a Price List is not mandatory but allows for additional flexibility to have unique fee code parameters based on price list instead of creating multiple fee codes.
Master Description: Enter a description that defines the Fee you will be generating.
Group Id: The Group ID does not currently perform any functions. It is a way to group your codes together for reporting purposes and is not a mandator field for entry.
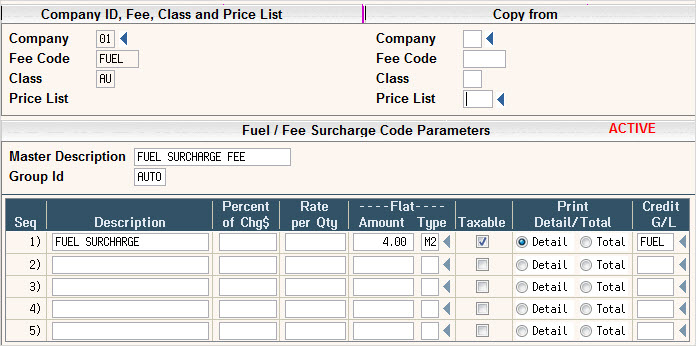
Fuel / Fee Surcharge Code Parameters
This is the section where you will enter the details of what is to be billed and how. You can enter an unlimited number of detail lines, but only 5 will appear on the screen at one time.
In the Description field, enter the description that you want to display with the charge. This will print on the customers bill if you select to print in detail.
The next 3 sections refer to the options you have to bill the fee's. You may only chose one per fuel/fee code. Every transaction where the customer has a matching Fee Code (FUEL in the example above) and size/charge code has a matching Fee Class (FF in the example above), will be used in the following calculations. If there is no match, then the fuel/fee will not be charged.
Percent of Chg$: This option will take the amount billed from a size/charge code and multiply it by the percent listed in this fuel/fee code. In the example above, If I bill a customer for a 2 yd container picked up one time a week for $45.00, when auto charges are run the program will automatically assess an additional fuel surcharge of $0.68.
Rate per QTY: This option looks at the quantity field to determine how much to bill. It will multiply the quantity of a sale record by the rate listed in the fuel/fee code.
Flat Amount & Type: This option will bill one flat fee based on the Type you select. There are 6 types you can choose from.
T=Per Transaction: Every transaction that gets charges from this fee code will be assessed this flat fee.
S=Per Scale Ticket: Every Scale Ticket that is created will automatically get this one time additional flat fee.
B1=Per Billing Period (for each Service): During auto charges and/or prorations, any Size/Charge Code billed from the Services screen will automatically get assessed this one time fee. This fee will NOT be multiplied by the number of months in the cycle.
B2=Per Billing Period (once per Fee Class): This option is similar to B1, except it will only bill one time per Fee Class. So if you have multiple lines in your Services screen but only 1 Fee Code, then it will only bill this flat fee one time. This fee will NOT be multiplied by the number of months in the cycle.
M1=Per Month/Day (for each Service): During auto charges and/or prorations, any Size/Charge Code billed from the Services screen will automatically get assessed this one time fee. This fee will also get multiplied by the Number of Months or Days listed in the cycle master.
M2=Per Month/Day (once per Fee Class): This option is similar to M1, except it will only bill one time per Fee Class. So if you have multiple lines in your Services screen but only 1 Fee Code, then it will only bill this flat fee one time. This fee will also be multiplied by the Number of Months or Days in the cycle.
Taxable: Y or N - If the Fee is marked as Taxable, then that fee line will be added to the $amount that is supposed to be taxed.
Print Detail/Total - This flag is only used when printing work orders (interactive and in batch), invoices from work orders, and Sales & Adjustments (interactive and in batch). If the Fee is marked as Detail, then this fee detail line will print in the detail for each charge. If the Fee is marked as Total, it will only print in a lump sum total after all detail charges have been printed.
Credit G/L: - Enter the abbreviated G/L code that you want this fee posted to.
Once you have filled out the appropriate fields, click or press ![]() to accept. The system will give you a message
to accept. The system will give you a message ![]() . Click or press
. Click or press ![]() to accept the changes and return to the Fuel/Fee Surcharge Scan screen.
to accept the changes and return to the Fuel/Fee Surcharge Scan screen.