Note Pad Codes are used in the Customer Notepad screen. The Notepad provides an area where all notes relating to the customer's account can be stored. This includes collection notes, sales notes, operation notes, etc. Notes can be added to a Customer's account through the Notepad, Batch Notes, the Collections Process or the Route Follow up feature.
Note Codes provide a means of tracking items such as Missed Pick ups, Complaints, Blocked Containers, Reasons for Lost Business, A/R (collection notes), etc. Through the use of abbreviated Note Codes, you can force consistent data entry which will allow for easy reporting later on. You can create Note Codes specific to your environment (BLOCK for a blocked container, FRZN for a frozen container, NCO for no can out, etc); in addition, there are Standard i-Pak Note codes that perform a specific function in the system.
|
*LINK |
This type of note is for linking several other types of notes together; such as MED for medical waste, HAZ for hazardous waste, etc. |
|
A/R |
This type of note is for notes that are entered in the comment section on the AR History screen. When the user selects 'Make Note' the comment is added to the Customer's Notepad with a code = A/R. |
![]() Any note codes created with an * in the first position will NOT be purged during a Purge of the Notepad.
Any note codes created with an * in the first position will NOT be purged during a Purge of the Notepad.
From the System Administration menu, select Master Files option # 11.
From the Master Files menu, select Note Pad Code Master option #9. The Note Pad Code search screen will be displayed.

To search, use either the code search or description search. You can type in just a company id and press enter and the system will display the Note Pad Code Scan screen. Select the one you want to view by double clicking on the line item.

To make changes select the one you want to update by double clicking on the line item. Once you have made any changes click or press ![]() to accept. The system will give you a message
to accept. The system will give you a message ![]() . Click or press
. Click or press ![]() to accept the changes and return to the Note Pad Code Scan screen.
to accept the changes and return to the Note Pad Code Scan screen.
To delete a code: from the Note Pad Code Scan screen select the code by double clicking on the line. Once in the Entry/Update screen click or press ![]() . The system will display a confirmation message on the bottom of the screen:
. The system will display a confirmation message on the bottom of the screen: ![]() .
.
![]() There is NO UNDO button, once a code is deleted it is gone.
There is NO UNDO button, once a code is deleted it is gone.
Click or press ![]() to confirm deletion.
to confirm deletion.
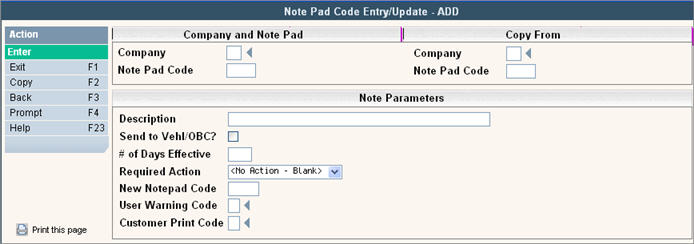
To add a new code click or press ![]() and the Note Pad Code Entry/Update screen will be displayed.
and the Note Pad Code Entry/Update screen will be displayed.

In the Company field enter your company ID.
In the Note Pad Code enter the note pad code (up to 5 characters).
In the Description enter a complete description for the Note Pad Code.
Send to Vehl/OBC? - This field is filled in when an On Board Computing system is used and the note code should be an option in the OBC system. Please contact the Sales Department for further information on On Board Computing systems.
# of Days Effective - Used with the 'required action' field below. The number of days before the 'required' action is performed (either changing the note code or deleting the note) during Day End.
Required Action - select a desired action to be done for the specific note code. Options are:
No action (blank) - no action to take place.
Delete Code - after the # of effective days indicated above, delete the note from all customers' notes.
Change Code - after the # of effective days indicated above, change the note code to the 'new notepad code' listed below.
New Notepad Code - used with the required action field if set to 'change code'. Enter the new code to be used in place of the existing notepad code. All customers' notes will be changed to the 'new' code at the specified # of effective days.
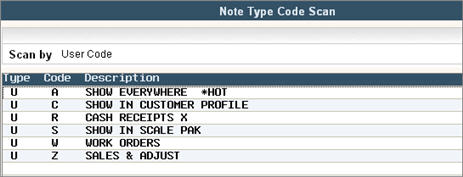
User Warning Code - if the note should 'pop' up when accessing a particular screen or function, select the appropriate code. Options are:

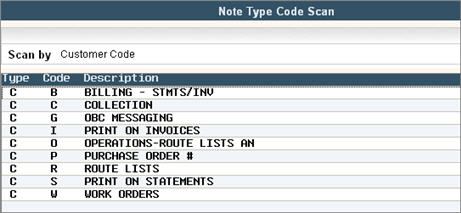
Customer Print Code - if the note entered should print on a particular form or output, select the appropriate option:

![]() Print Code of P (purchase order #) will print on a Statement and Invoice. It is the only print code that will print on a master bill if used in the sub account. Only the "newest" note with a print code of P will print. The PO# will print at the top of the detail section.
Print Code of P (purchase order #) will print on a Statement and Invoice. It is the only print code that will print on a master bill if used in the sub account. Only the "newest" note with a print code of P will print. The PO# will print at the top of the detail section.
Click on STATEMENT or INVOICE or Work Order to see examples of where the notepad codes print.
Once you have filled out the appropriate fields, click or press ![]() to accept. The system will give you a message
to accept. The system will give you a message ![]() . Click or press
. Click or press ![]() to accept the changes and return to the Note Pad Scan screen.
to accept the changes and return to the Note Pad Scan screen.