Sequencing a route involves assigning a sequence or 'stop' number - this determines the order they will be picked up on a route since route lists print in sequence number order. Typically when a customer is first added to the system, their stop number is not yet known since the driver or a route supervisor will usually decide where on the route that stop should go; therefore, a new customer will usually have a sequence number of 0 or 1. These stops will 'pop to the top' of the route sheet to be assigned a new sequence number.
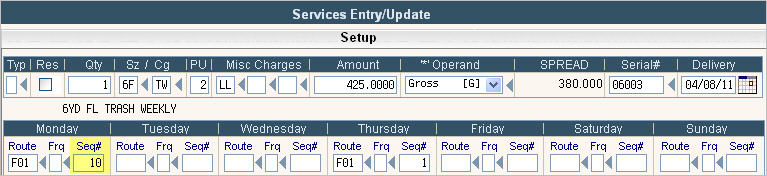
For customers that are new and have a sequence number of 0 or 1, these stops can be updated by changing the Services screen for that service item in the customer's account. In the example below, the customer is a new customer picked up on Monday and Thursday route F01, currently the sequence number for this stop is 1 on both days. This method can also be used if there are a few changes to be made to different customers.
Once the actual sequence number has been decided, the field can simply be updated by typing in the new sequence number (remember to be in Update mode), and pressing enter.
If you have more than a few changes to make, you do NOT need to go in to each customer. You can simply bring up the whole route on the screen and make the necessary changes and post them.
If you have access to Route Manager (#14 on the Operations Menu), that is the quickest and easiest way to change the route; however, this is a secured function so if you do not see it on your screen, you do not have access to it.
The route manager is a comprehensive procedure that can be used for different types of routing changes such as: moving a group of stops from one day to a different day, merging routes together, splitting routes, renumbering routes (reset sequence numbers in increments of 10 or 5, etc), and sequencing routes in a different order.
In this section, we will cover sequencing a route. Click here for additional information on the Route Manager.
From the Operations Menu, select the Route Manager option #14. The Route Manager selection screen will be displayed

Since only the route sequence numbers will be changed, you do not need to fill in the 'To Route' information. Only the top company, action code, frequencies and From Route information need to be filled in.
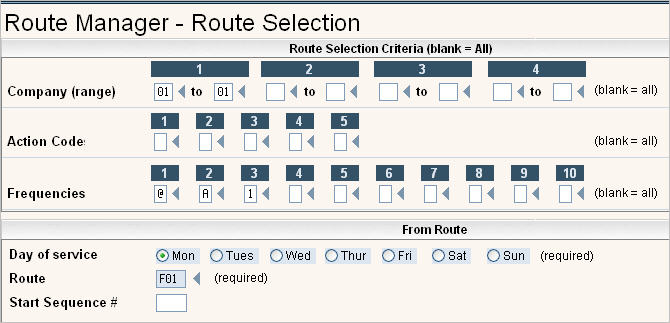
In the example above, we are going to sequence route F01 on Monday. The route is for company 01 and includes customers picked up weekly (@ frequency), customers on the every other week - A week (A frequency) and customers picked up once a month on the 1st week of the month (1 frequency).
Once this screen is filled in, press ![]() to continue. The entire list of stops for that route will be displayed.
to continue. The entire list of stops for that route will be displayed.

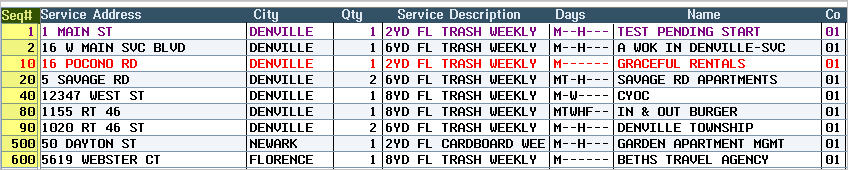
The system displays the Sequence # for each stop, the service address, city, qty for service, service description, all the days they are picked up on and the Customers Name. There is additional information provided, by moving the scroll bar on the bottom to the right (and back).
![]()
Additional information will be displayed - the company id, the customer # and the zip code.
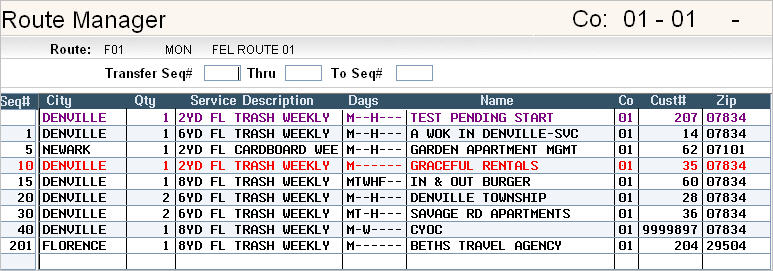
To make changes, go to the Seq# field for each stop and type in the new sequence number (this is usually written in on the printed route list.

Press Enter and the system will re-sort the screen in the new order.
You may want to print a new route list based on these changes, click on the ![]() button or press F15 (shift F3) to print a list.
button or press F15 (shift F3) to print a list.
Press the ![]() button to re-increment the stops. The following screen will be displayed:
button to re-increment the stops. The following screen will be displayed:
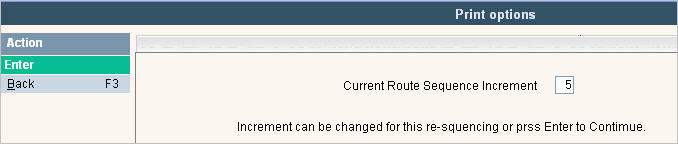
This screen tells that the Route Manager program will re-increment the stops by 5 (defaulted in from a setting in the system master) but you can override that number to anything that makes sense for this route. Keep in mind that the sequence# field is only 4 bytes long. If you have a large number of stops, you may want to keep the increment number lower than 5.

To put the order back to what it was originally, press the ![]() button or press F5.
button or press F5.
To confirm the new order, press the ![]() button or F11. A verification window will be displayed.
button or F11. A verification window will be displayed.

Click on Yes or No to put a ![]() in the circle. Press
in the circle. Press ![]() to continue. Once you press Enter, the changes are made in the customer's account.
to continue. Once you press Enter, the changes are made in the customer's account.