The Report Form Printer set up file contains a record for all the reports and forms that are in i-Pak. These entries contain settings that have to do with the printing of the reports & forms; such as, What printer queue should be used? Does the entry go on hold before printing? Is the entry saved after printing? What is the form code for the entry? etc. In addition, there may be additional i-Pak values that control features for the Report or Form.
![]() Since many of the flags control billing and output on forms or reports, you may want to contact Support Services if you are unsure of a setting.
Since many of the flags control billing and output on forms or reports, you may want to contact Support Services if you are unsure of a setting.
There are 2 places in i-Pak where Report/Form Printer Setup (RFS) can be accessed:
1. From the Billing Processes menu select Report/Form Printer Setup. The Report Form search screen will be displayed.
2. From the System Administration menu, select Report/Form Printer Setup.

Enter the Report name (printed on the top left corner of all reports) in the Code Search or the description (found on the top of the report) in the Report/Form Description search. Click or press ![]() to continue.
to continue.
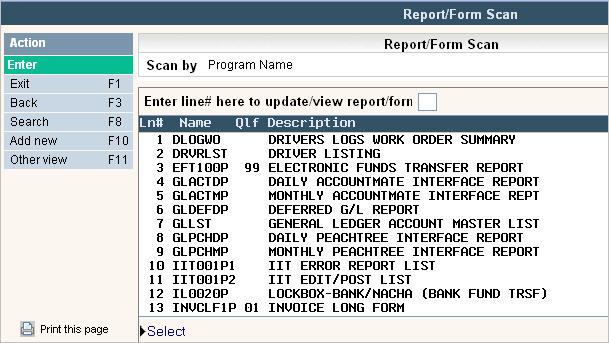
The Report/Form scan screen will be displayed.

Select your entry by double clicking on the line or entering the corresponding line# in:
![]()
Click or press ![]() to continue. The Report Form Entry/Update screen will be displayed.
to continue. The Report Form Entry/Update screen will be displayed.

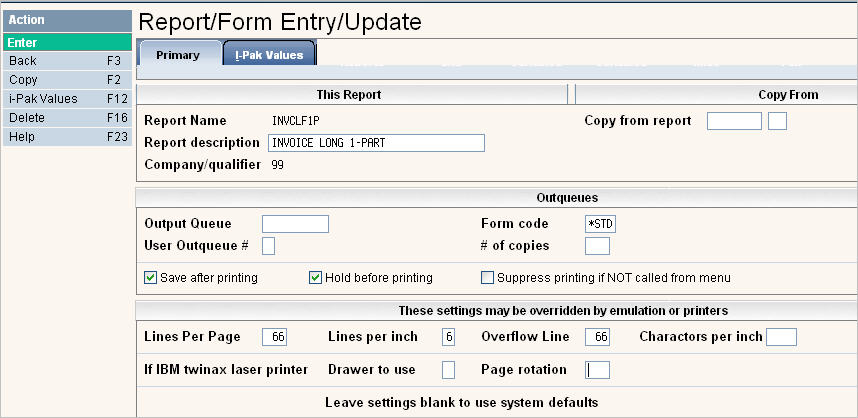
Report Name - the abbreviated name of the report program. This is provided by Soft-Pak and can usually be found in the upper left hand corner of your reports.
Report description - originally set up with a description for the report, you can modify this and make it more detailed if you wish.
Company/qualifier - some reports/forms can be set up to be company specific; such as work order, invoices or statements. If you have different setting for different companies, check with Support Services to see if the report/form can be set up company specific. Any report/form set up with a qualifier of 99 should be able to be set up by company. If selecting to make company specific report/forms, then the one with qualifier 99 will be the default used if no company specific report/form is created.
![]() Note: The following fields CANNOT be qualifier specific: Form Code, # of copies, Save, Hold, Lines per Inch, Characters per Inch and Overflow. This means they cannot be different on each report/form based on company. If you change them in one company, it will affect the printing for all company/qualifiers.
Note: The following fields CANNOT be qualifier specific: Form Code, # of copies, Save, Hold, Lines per Inch, Characters per Inch and Overflow. This means they cannot be different on each report/form based on company. If you change them in one company, it will affect the printing for all company/qualifiers.
Used to copy information from one report record in to another one. Enter the report name and company identifier (if applicable - may be 99) and press the ![]() button.
button.
![]() Printing can range from very simple to very complicated. Some of the options mentioned below should be discussed with your network administrator or someone familiar with printer set up. In addition, you may need assistance from Support Services if your needs are complicated.
Printing can range from very simple to very complicated. Some of the options mentioned below should be discussed with your network administrator or someone familiar with printer set up. In addition, you may need assistance from Support Services if your needs are complicated.
|
Output Queue |
If the report/form should be directed to an outque or printer that is different than the User's or Systems Default printer on the I-series server. |
|
User outqueue # |
Used in conjunction with the i-Pak User security file. If this report/form entry should point to a specific outqueue id in the User security file (found on the SYS ADMIN tab), enter here. |
|
Form code |
If the report/form requires a form code enter here. This will force a prompt on the i-series server to 'change forms' if the form code is different than a print job before. Enter *STD for standard white 8.5 X 11 paper. |
|
# of copies |
How many copies do you want to print for this report/form. |
|
Save after printing |
After the form/report has been printed, should the entry be saved. Typically Billing, Day End and Month End output are set to Y in case they need to be reprinted. Keep in mind, what ever is saved should be deleted manually at some point in the future to keep your disk clean. |
|
Hold before printing |
Before the report/form prints should it be held. Billing, Day end and Month end output are typically set to Y. |
|
Suppress printing if NOT called from menu |
If the report is automatically generated during a function, and you do NOT want it to be generated, you can say Y to have it suppressed. |
These may be overridden by a printer driver or emulation settings. The settings are often blank, which means they will use the iseries defaults. Please run a test if you make any changes to these fields to ensure you have adjusted the settings correctly.
|
Lines per Page |
How many lines print per page |
|
Lines per Inch |
How many lines print per inch |
|
Overflow line |
At the bottom of the page, at what point should the page overflow. |
|
Characters per inch. |
How many characters per inch. This controls how many columns can fit on a page from left to right. Value must be 5, 10, 12, 13.3, 15, 16.7 or blank. |
|
If IBM twinax laser printer Drawer to use |
If your printer has multiple drawers, then what drawer do you want the paper to pull from? Must be 1, 2, 3 or blank. |
| Page Rotation | Allows you to determine a page rotation for how the page should be printed. Entering 0 can sometimes stop the printer from auto rotating a page from portrait to landscape. Value must be 0, 90, 180, 270, COP or blank. |
If you have made any changes, click or press ![]() to accept your changes. The system will ask you to confirm your changes.
to accept your changes. The system will ask you to confirm your changes.
![]()
To return to the scan screen click or press ![]() . To view the i-Pak values, click
. To view the i-Pak values, click ![]() button, the changes will be saved.
button, the changes will be saved.
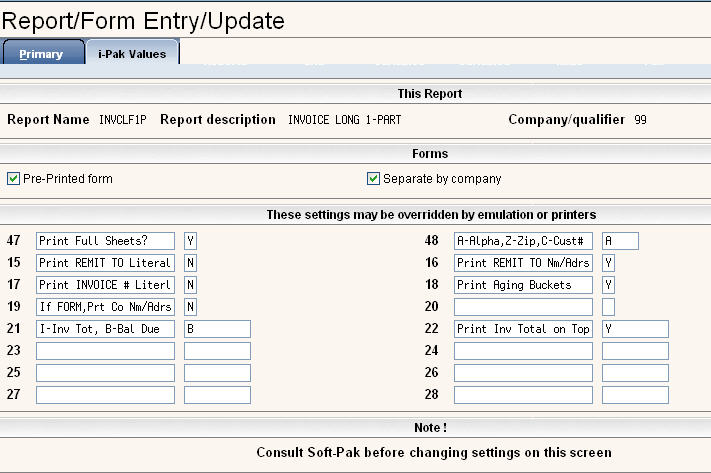
These fields depend on what type of record you have accessed. Some values only exist for certain types of forms. Contact Support Services before making ANY changes.
In this example, we have listed values for Invoices. See the sample Invoice, Statement, or Work Order for form options.

Make any changes and click ![]() to accept. You will get a message saying data has been changed.
to accept. You will get a message saying data has been changed.
![]()
Click ![]() or press enter to accept and continue, you will return to the primary screen. Click or press
or press enter to accept and continue, you will return to the primary screen. Click or press ![]() to accept, you will return to the scan screen. Click or press
to accept, you will return to the scan screen. Click or press![]() to return to the menu.
to return to the menu.