This file is also know as 'container inventory'. The highlights of the Bin Serial # Master file are that it allows the user to complete the following tasks:
Maintain an inventory of containers/bins/carts/boxes owned, or used by the company.
Track containers/bins/carts/boxes with either or both Literal and Sequential numbering.
Containers are either assigned to customers (Active) or the inventory yard (Available) for ease of tracking.
Set up parameters for Roll off Inactivity Reporting.
Serial #'s can be added individually, in bulk, or created from what already exists on the Customers' Services screens; OR a combination of all three.
To activate this feature, some serial # controls must be define in the Cycle Master. Click here to see additional information on the Cycle Master.
![]() Before adding new serial numbers, you must create an 'Inventory yard' - this is a Customer account that is assigned to cycle 'CM' (container maintenance) - with the number '9999999'. Click here to see how to set up an Inventory Yard.
Before adding new serial numbers, you must create an 'Inventory yard' - this is a Customer account that is assigned to cycle 'CM' (container maintenance) - with the number '9999999'. Click here to see how to set up an Inventory Yard.
To update the Bin Serial # Master to make changes to existing serial #s or create new numbers individually, select the Bin Serial # Entry/Update option.
From the System Administration menu, select the Master Files option.
From the Master Files menu, select the Operations Master Files Menu (this option can also be access from the Operations Menu).
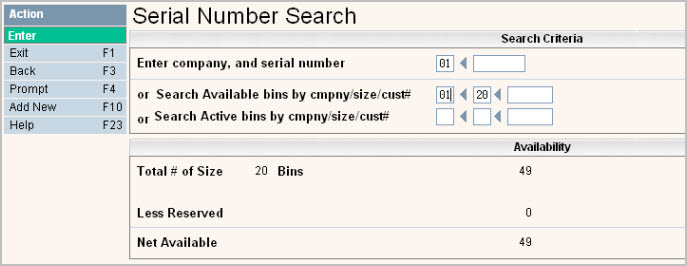
From the Operations Master Files Menu, select the Bin Serial # Entry/Update option; either the Serial Number search or scan screen will be displayed depending on the settings in the system master record. We will begin with the search screen.

You can search available bins by entering the company id or company id and size and click or press ![]() to continue. A summary of available serial numbers will be displayed on the bottom of the search screen.
to continue. A summary of available serial numbers will be displayed on the bottom of the search screen.

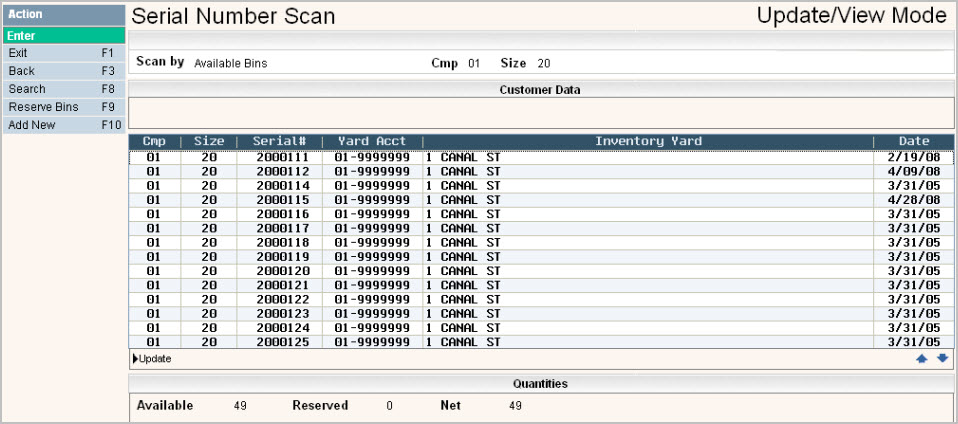
To display all the numbers that are available ![]() , the serial number scan screen will be displayed.
, the serial number scan screen will be displayed.

To make changes select the serial number you want to update by double clicking on the line item, this will display the Serial Number Entry/Update screen.
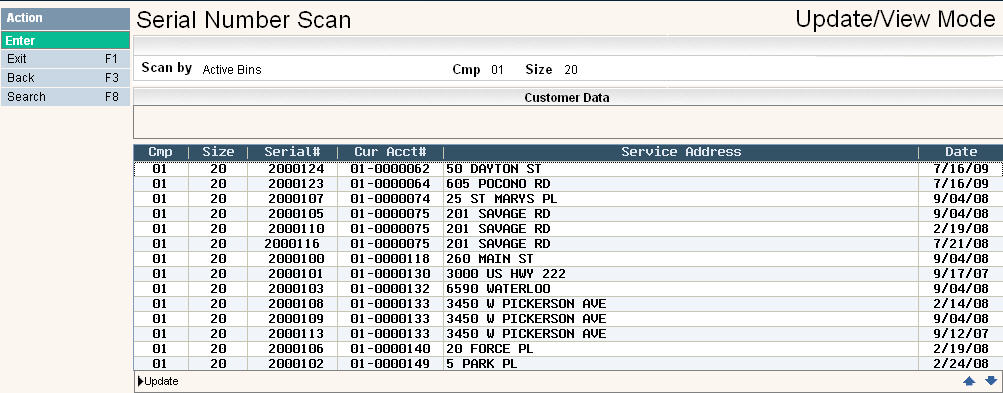
You can search active bins by entering the company id or company id and size and click or press ![]() to continue. The Serial Number Scan screen will be displayed.
to continue. The Serial Number Scan screen will be displayed.

To make changes select the serial number you want to update by double clicking on the line item, this will display the Serial Number Entry/Update screen
Once you have made any changes click or press ![]() to accept.
to accept.
The system will give you a message ![]() . Click or press
. Click or press ![]() to accept the changes and return to the Serial Number Scan screen.
to accept the changes and return to the Serial Number Scan screen.
To delete a code: from the Serial Number Scan screen select the code to update by double clicking on the line - an active serial number CANNOT be deleted.
Once in the Entry/Update screen click or press ![]() . The system will display a confirmation message on the bottom of the screen:
. The system will display a confirmation message on the bottom of the screen: ![]() .
.
![]() There is NO UNDO button, once a code is deleted it is gone.
There is NO UNDO button, once a code is deleted it is gone.
Click or press ![]() to confirm deletion.
to confirm deletion.
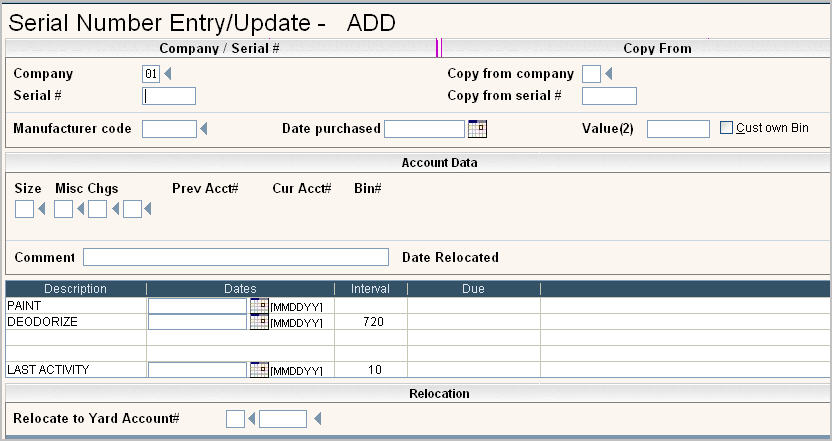
To add a new code click or press ![]() and the Serial Number Entry/Update screen will be displayed.
and the Serial Number Entry/Update screen will be displayed.

Company - enter the company id or the shared company id for the serial number.
Serial # - enter the serial number (up to 8 characters).
Manufacturer code - enter the Manufacturer code for the carts/containers. Click ![]() or press F4 to display your choices for this field. This field is required.
or press F4 to display your choices for this field. This field is required.
Date purchased - if available, enter the purchase date of the carts/containers. This field is for information only.
Value - if available, enter the individual purchase price for the carts/containers. This field is for information only. Enter the amount with a decimal point.
Cust own bin - if the customer owns the container answer yes (![]() ) or leave blank for no.
) or leave blank for no.
Size - enter the size of the container. This field should (but does not need to) match the SZ portion of your charge codes so that it's easier to select the serial numbers for the appropriate charge code. This field is required. Click on the ![]() to display choices for the size field (from the Charge Code master).
to display choices for the size field (from the Charge Code master).
Misc Chg Codes - if applicable enter miscellaneous charge codes to describe characteristics of the cart/container (such as locking lids, plastic lids, steel wheels, etc), these will automatically default in to the services/bin line when the serial # is selected.
![]() The 3rd Misc Chg Code field is used in conjunction with the field
The 3rd Misc Chg Code field is used in conjunction with the field ![]() that is found in the Cycle master. If this flag is Yes
that is found in the Cycle master. If this flag is Yes ![]() in the cycle master, then the 3rd Misc Chg code will NOT be defaulted into the 3rd Misc Chg Code field of the services screen. Instead, the size field above and this 3rd Misc Chg code are joined together to create the size/charge code that gets moved into the services screen through drivers logs.
in the cycle master, then the 3rd Misc Chg code will NOT be defaulted into the 3rd Misc Chg Code field of the services screen. Instead, the size field above and this 3rd Misc Chg code are joined together to create the size/charge code that gets moved into the services screen through drivers logs.
Prev Acct# - the company id and customer number this specific serial # was PREVIOUSLY assigned to. This is updated by the program when the serial# is moved in and out of customers.
Cur Acct# - the company id and customer number this specific serial # is CURRENTLY assigned to. This is updated by the program when the serial# is moved in and out of customers.
Bin # - the customer's service/bin line # where the serial # is assigned to.
Name & Service Address - the service name and address for the current account. (Displays next to the Bin # field once the serial# has been created.)
Comment - enter any comments you might want to show for the Serial #.
Date relocated - the date the container was 'relocated' to the current account. This is a display only field and is the defaulted 'delivery' date from the current customer's service bin line OR the date the container was relocated back to inventory.
Description/Dates/Interval/Due - these fields are defaulted from the Company Master, Misc Variables tab. If you have set up any default intervals (such as container cleaning, container painting, last activity, etc) they will be displayed in this section. Enter the Date the process was done in the Dates field and the system will calculate the 'Due' date based on the interval.
Relocate to Yard Account # - We require you to have at least 1 yard account set up (this is customer # 9999999) but you can create as many yard accounts that are necessary in your organization. The only requirement is that they have cycle = CM. A good example of a secondary yard account is a SERVICE YARD for containers that are unavailable due to needing repairs of some kind. Since the system will always default your serial#'s into the 9999999 account, you will use this feature to move your serial#'s from the default yard to any other yards you have set up, or from the other yards back into the default yard (available inventory).

Once you have filled in the screen, click or press ![]() to continue.
to continue.
You will get a message ![]() press
press ![]() to continue. You will return to the previous screen.
to continue. You will return to the previous screen.