![]() Reminder: the system master MUST be set up first before any company records are created.
Reminder: the system master MUST be set up first before any company records are created.
The Company Record contains controls for a specific company id.

From the Company Scan either select an existing company by double clicking on the line item or type in the corresponding line number in and click or press ![]() .
.
![]() When creating a new company or making changes to an existing company, be sure to click or press
When creating a new company or making changes to an existing company, be sure to click or press ![]() through all tabs/screens until you get back to the Company scan screen or click or press
through all tabs/screens until you get back to the Company scan screen or click or press ![]() in order to save the changes/entry.
in order to save the changes/entry.
To add a New Company click or press ![]() and a new Company master record will be displayed.
and a new Company master record will be displayed.
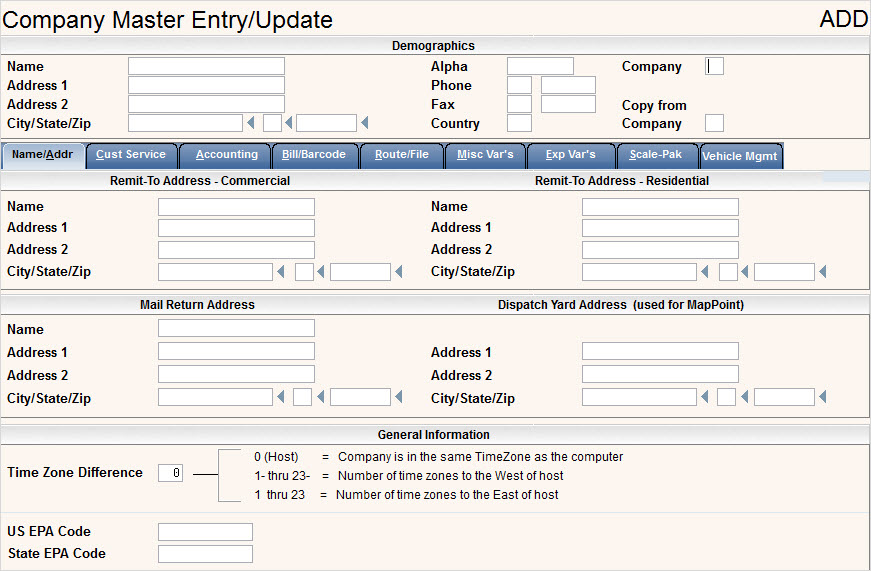

In the Name field, enter the Company name for the new company. This name will appear on Bills (if not pre-printed), reports and certain display screens.
In the Alpha field, type in an abbreviation of your Company or Corporation name.
In the Company field,enter the company id for the new company. This is a 2 position field that can be an alpha-numeric id or numeric only. The most common type of company id's are: 01, 02, 03, etc.
![]() We recommend the Company ID NOT contain blanks or special characters.
We recommend the Company ID NOT contain blanks or special characters.
Type in the Address and phone information for the Company in the remaining demographics section.
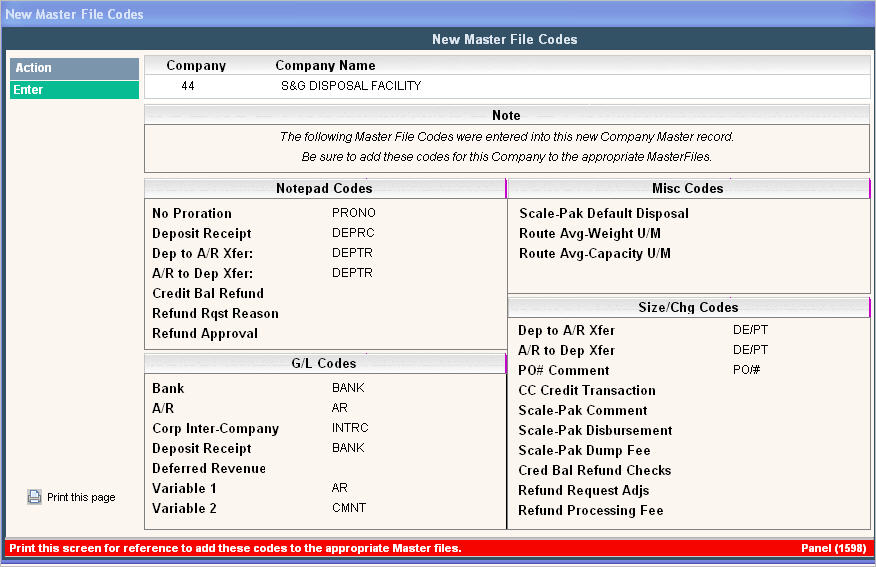
Copy from Company: if you want to copy information from a Company ID that already exists, simply type the Company ID then press the Copy F2 button ![]() or the F2 key on your keyboard. Make sure to update the name and address with the appropriate information for the new company. After you have selected to Copy the Company information and have entered through all the screens and saved the information, a pop-up window will appear listing the master file codes you need to create. It's a good idea to print this page so you can make sure the codes all get added to the appropriate master files for the new Company ID.
or the F2 key on your keyboard. Make sure to update the name and address with the appropriate information for the new company. After you have selected to Copy the Company information and have entered through all the screens and saved the information, a pop-up window will appear listing the master file codes you need to create. It's a good idea to print this page so you can make sure the codes all get added to the appropriate master files for the new Company ID.
![]() Note: the name and address fields will show on all screens in the Company master, but can only be updated from the Name/Address tab (first screen).
Note: the name and address fields will show on all screens in the Company master, but can only be updated from the Name/Address tab (first screen).

These fields are used to print on bills in a 'remit to' section, if different from the Company address. However, these fields can also be used to print a phone number or message on the bill if needed. To activate the printing of this information, fill in the name and address fields above and turn on 'Print Remit to' in the Report Form Printer Set up. Click here for additional information on setting this up.
Remit-To Address - Commercial: This is the Remit-To address used for any accounts where the cycle is set up as Resi = NO.
Remit-To Address - Residential: This is the Remit-To address used for any accounts where the cycle is set up as Resi = YES.

Mail Return Address: These fields are intended to be used for a unique address for returned mail. They currently do not print on any of our standard forms in i-Pak.
Dispatch Yard Address: If you are using the MapPoint interface, you must enter a Dispatch yard address. This is the address i-Pak will use as the 'starting point' when sending information to MapPoint. Click here for additional information on the MapPoint interface.

Time Zone Difference - If your system is used for companies in different time zones, OR if you are an e-Pak customer, you can have i-Pak adjust the time that is printed on different reports and work orders. Simply select the #of hours to add or subtract to the 'Host' time. For example, if I am a customer on the East Coast and my parent company is in California, I would select + 3 since California is 3 hours earlier than the East Coast.
EPA Codes

These are codes designed to be used in our Hazardous Waste product. They print on any shipping documents generated. Please contact our Sales Team for more information on our Hazardous Waste Module.
Action Function Key Options
Confirm Active/Inactive ![]()
The company master can be marked Inactive when no longer used. This prevents users from using the company without permanently deleting it and allows you to keep the master file for historical and reporting purposes.
To mark a company inactive, simply click or select ![]() while in update mode. You cannot mark a company inactive if there are any open work orders, Sales & Adjustment batches or Cash Receipt batches. If one exists, you will get a message like
while in update mode. You cannot mark a company inactive if there are any open work orders, Sales & Adjustment batches or Cash Receipt batches. If one exists, you will get a message like ![]() . If your company is void of any open batches or work orders, when you click or select
. If your company is void of any open batches or work orders, when you click or select ![]() you will get the following message:
you will get the following message: ![]() . Once you press
. Once you press ![]() the top of your company master will read
the top of your company master will read ![]() and will display in yellow on the Company Scan screen.
and will display in yellow on the Company Scan screen.
To mark a company active again, simply click or select ![]() and you will get the message
and you will get the message ![]() . Once you press
. Once you press ![]() the top of your company master will read
the top of your company master will read ![]() and your company will display in the normal color on the Company Scan Screen.
and your company will display in the normal color on the Company Scan Screen.
![]() The following fields pertain to additional modules that can be purchased: Broker and EFT (electronic funds transfer) handling. If you have not purchased these modules, please skip this section. If interested, please contact the Soft-Pak Sales Department at 888-763-8725.
The following fields pertain to additional modules that can be purchased: Broker and EFT (electronic funds transfer) handling. If you have not purchased these modules, please skip this section. If interested, please contact the Soft-Pak Sales Department at 888-763-8725.
This button links to the Broker Code Scan information if the Broker module has been purchased. The Broker Module billing is a method of sending electronic bills to a customer that prefers to receive them in a file (such as a broker or government agency). In order for the customer to identify the file and the 'vendor' they may assign a 'broker code' which must be entered in the Broker Code Entry/Update screen. (Additionally, there is customer specific information that must be entered in the Customer Service Additional Information Tab).

To create a new code, simply click the ![]() button and the Broker Code Entry/Update screen will be displayed:
button and the Broker Code Entry/Update screen will be displayed:

Enter your company id, the broker code for your company, a brief description and an account number. Press enter ![]() to accept and
to accept and ![]() to save.
to save.

These fields are used for your company banking information if you purchased the EFT Processing 'add on' feature. Click here for additional information.
Once you have filled in all the appropriate fields on the tab, click or press ![]() to accept your entries, you will get a message
to accept your entries, you will get a message![]() press
press ![]() again to save and continue to the next screen.
again to save and continue to the next screen.
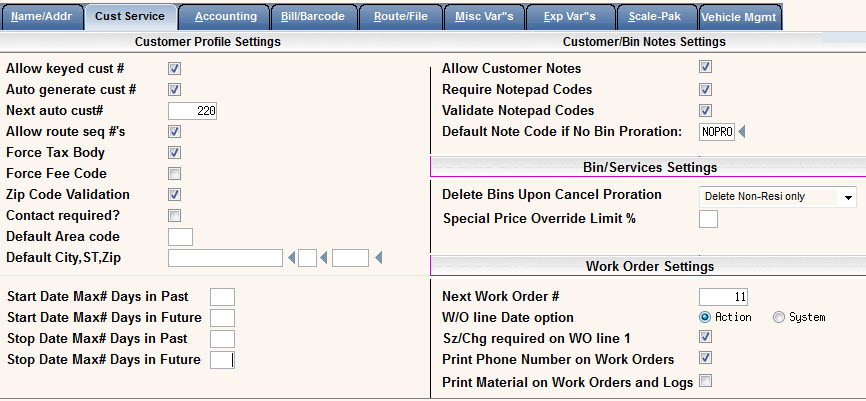
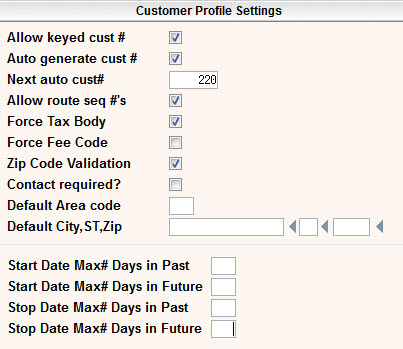
Allow keyed cust # - this is typically set to no (blank box) since the system can automatically generate new customer numbers and keep track of the next number to use. If you want your users to be able to enter new customers numbers, answer yes (put a ![]() in the box).
in the box).
Auto generate cust # - this is typically set to yes (![]() in the box) - the system will automatically generate customer numbers and keep track of the next number to use. If you do not want the system to generate customer numbers, leave the box blank to answer no.
in the box) - the system will automatically generate customer numbers and keep track of the next number to use. If you do not want the system to generate customer numbers, leave the box blank to answer no.
Next auto cust# - this field is used in conjunction with auto generate cust #, if the system is assigning customer numbers this field keep track of the next customer number the system will use.
![]() The system will NOT create duplicate numbers. It will check first to see if the next auto customer number is being used. If it is, it will look for the next available number.
The system will NOT create duplicate numbers. It will check first to see if the next auto customer number is being used. If it is, it will look for the next available number.
Allow route seq #'s - do you want the system to allow route sequence numbers (stop numbers). If set to yes, a field will be displayed on the Services tab to key in a sequence number. Route lists are printed in the order of sequence numbers. This field is typically set to yes (![]() in the box), leave blank to answer no.
in the box), leave blank to answer no.
Force Tax Body - do you want the system to force the entry of a tax body on the Customer Profile screen? If you do not have taxation or fees in your environment, this can also provide an additional field to use for reporting. This is typically set to yes (![]() in the box), leave blank to answer no.
in the box), leave blank to answer no.
Force Fee Code - do you want the system to force the entry of a fee code on the Customer Profile screen? If using the Fee code master for fuel or other fees, then click yes ![]() in the box. Otherwise leave blank to answer no.
in the box. Otherwise leave blank to answer no.
Zip Code Validation Active - Zip code validation allows the user to key in a City and State and have the Zip code automatically filled in, or key in the Zip code and have the City, State and Country automatically filled in. In addition, the system will validate the city, state and zip code using the Zip Code Master. Other fields can also be filled in such as area code, tax body, price list and default W/O route.
Contact Required - do you want the system to force the entry of a contact person? If yes, and you do not have Sales Management installed, then your users will be forced to enter a contact name on the customer profile. If yes and you do have Sales Management installed, then your users will be forced to enter a contact in the 'contacts' section of Sales Management.
Defaults: Area Code, City, State, Zip - if entered, these fields will automatically be filled in with the information entered on the Customer Profile screen.
Start Date Max# Days in Past - this flag will stop users from entering a start date that is older than the max you allow.
Start Date Max# Days in Future - this flag will stop users from entering a start date that is too far in the future. Both the Past and Future flags are beneficial for stopping users from making keying errors, especially over a new year. Leave blank if you don't want to put limits on the Start Date.
Stop Date Max# Days in Past - this flag will stop users from entering a stop date that is older than the max you allow.
Stop Date Max# Days in Future - this flag will stop users from entering a stop date that is too far in the future. Both the Past and Future flags are beneficial for stopping users from making keying errors, especially over a new year. Leave blank if you don't want to put limits on the Stop Date.

Allow cust notes - do you want the system to allow the entry of notes in the Customer Notepad? This field is typically set to yes (![]() in the box), leave blank to answer no.
in the box), leave blank to answer no.
Require notepad codes - do you want the system to require the use of notepad codes when entering notes? This helps to ensure consistent data entry and easy reporting. This is typically set to yes (![]() in the box)
in the box)
Validate notepad codes - do you want the system to validate notepad codes to ensure that data entry is consistent? This is typically set to yes (![]() in the box). The user can still key in free form text in the note area.
in the box). The user can still key in free form text in the note area.
Default Note code if No Bin Proration: enter a note code to be added to the customer's note pad if a change in service is made but NO PRORATION was performed. This works in conjunction with the 'warn if no bin proration done' flag in the Cycle Code Master.

Delete Bins/Cancel Proration - when doing cancel prorations, should the system also delete the services. This will depend on whether you want to keep the service/bins record on the Customer's account. You can select to Not Delete, Delete Non-Resi only, Delete Resi only, or Delete Resi and Non-Resi.
Special Price Override Limit % - if you use default or standard pricing in your environment and the pricing will be set up in the Charge Code master, AND you allow users to override the price - what do you want the limit to be. For example - they can override (discount) the price 20% or 15%, etc. Enter the percentage amount (20 percent would be entered as .20). This limit will apply to ALL charge codes. There is also a field in the Charge Code Master that will allow the entry of a percentage on a charge code basis. Leave blank for no limit. If supervisors are allowed to override or discount more - the system can issue a message and allow the supervisor to accept the amount - a note will also be added to the customer's note pad (please see description of pricing override in the User security section).

Next Work Order #: the next work order number to be used if assigning work orders by company instead of data set (defined in the Systems Control master).
W/O line Date option: (Action or System) - during Work Order Entry/Update, do you want the Action date of the work order or the System date to default in to each line item. The date can be changed, this is the default option. This field is typically set to Action. To set to System, click on system to put a ![]() in the circle.
in the circle.
Sz/Chg required on WO line 1: if you want to require your users to enter a sz/chg code on line 1 of every work order in this company, then select or check ![]() yes in the box.
yes in the box.
Print Phone Number on Work Orders: if you want to print the customers' phone number (phone #1 off the customer profile) then check Yes ![]() here. The phone number will print directly below the service address information on the top portion of the work order. There is also a flag at the Cycle level. If the company master says Yes, all phone numbers will print. If the company master says NO, then we look to the cycle master to determine which cycles will print the phone number on the work orders.
here. The phone number will print directly below the service address information on the top portion of the work order. There is also a flag at the Cycle level. If the company master says Yes, all phone numbers will print. If the company master says NO, then we look to the cycle master to determine which cycles will print the phone number on the work orders.
Print Material on Work Orders and Logs: if you entered a material into your work order, do you want it to print on the work orders and work order logs? Check Yes ![]() to print the material code or leave blank to not print.
to print the material code or leave blank to not print.
Once you have filled in all the appropriate fields on the first tab, click or press ![]() to accept your entries, you will get a message
to accept your entries, you will get a message![]() press
press ![]() again to save and continue to the next screen.
again to save and continue to the next screen.
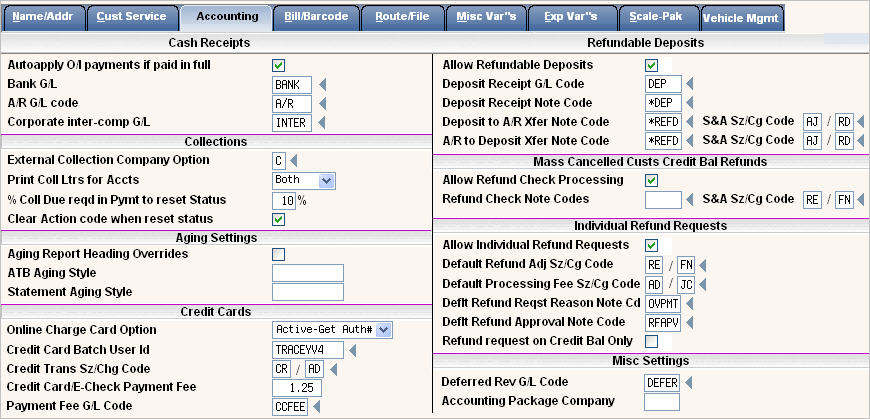

Auto apply O/I payments if paid in full - during payment entry if the payment amount is paying the balance due on an account and this is an Open Item or Summary Invoice customer, do you want the system to automatically apply the payment, or do you want the invoices to display for payment application. This is typically set to yes (![]() in the box), leave blank to answer no.
in the box), leave blank to answer no.
Bank G/L - enter the abbreviated general ledger code to be used for the Debit side of Cash Receipts (payment entry).
A/R G/L code - enter the abbreviated general ledger code to use for the Accounts Receivable side of transactions.
Corporate inter-comp G/L code, enter the abbreviated general ledger code to be used for the Debit side of Cash Receipts (payment entry) - if using multiple company cash receipts.
![]() Make note of the general ledger codes used as these will need to be entered in to the General Ledger Code file.
Make note of the general ledger codes used as these will need to be entered in to the General Ledger Code file.
 External Collection Company Option: Which External Collection Company are you using? Options are:

Print Coll Ltrs for Accts: This option allows you to select which type of accounts in this company you wish to print collection letters for. Options are:
% Coll Due reqd in Pymt to reset Status: How much of a payment will you require before a customers collection status is reset. If this field is blank, the status will be reset whenever ANY payment is made, regardless of the amount. If this is set to any value besides zero, the customer’s total payment for the day must be at least this percentage of what was owed at the time a collection letter was generated for this customer in order for their collection status to be reset. Therefore, if they owed $100 at the time the letter was generated and this is set to 50%, the customer’s total payment for the day must be at least $50 or else their collection status will not be reset. If this is set to 100%, then the total payment of what was owed (the entire $100) must have been paid for the status to be reset.
![]() Note: The status will only be reset if they have not yet been sent to an external collection agency.
Note: The status will only be reset if they have not yet been sent to an external collection agency.
Clear Action code when reset status: If the collection letter status has been reset, do you want the system to automatically clear the Action Code as well? If yes, the action code will be cleared and a note will be written to the notepad based on the Action Code settings in the FROM note field.

Aging report heading override - do you want the ability to override the headings on the Variable Aging Report? Typically, the headings are 'Current', '31-60', '61-90', and '90+'. If set to yes (![]() in the box), you can override the descriptions in the Cycle Master. Since some cycles are for periods that are not monthly (quarterly, yearly, etc), and you have the ability to age customers when you want, you might want headings that are different - such as quarter 1, quarter 2, etc. This is typically left blank to answer no.
in the box), you can override the descriptions in the Cycle Master. Since some cycles are for periods that are not monthly (quarterly, yearly, etc), and you have the ability to age customers when you want, you might want headings that are different - such as quarter 1, quarter 2, etc. This is typically left blank to answer no.
ATB Aging Style: What Aging Style do you want to use for this companies Variable Aged Trial Balance report? Leave blank for standard aging styles.
Statement Aging Style: What Aging Style do you want to use for this companies Statements? This feature is currently unavailable.

Online Charge Card Option:
Credit Card Batch User Id: If you are processing credit cards, which User ID do you want the payments to be batched under?
Cred Trans Sz/Chg Code: If you need to reverse a charge that has already been processed through your credit card authorizing company, then what Sz/Chg Code would you like the system to use to put the charges back on the account?
Credit Card/E-Check Payment Fee: If you would like to charge a Credit Card/E-Check Payment Fee, then enter the amount to charge in this field. This fee will only be assessed on positive dollar amounts, not on any credits or voids.
Payment Fee G/L Code: If you are charging a fee for processing credit cards, then what GL code do you want the Fee Amount to be applied to?
If these bottom two fields have a value, then in CC Payment (from the customer profile screen) you will see additional lines for Convenience Fee and Total Charged. The Convenience fee is added to the payment amount to get the Total Charged to the customer. The Convenience Fee is entered into the C/R batch as a Miscellaneous Cash Receipt using the Payment Fee G/L Code.


Allow Refundable Deposits: Will you be using Refundable Deposits in this company? If yes, the remaining fields in this section will be required.
Deposit Receipt G/L Code: Enter the abbreviated G/L code that the deposits for this company should be posted to.
Deposit Receipt Note Code: Enter the Note Pad code that you want to be entered whenever a deposit is received on an account.
Deposit to A/R Xfer Note Code: What note code do you want to use to record when an Amount is being transferred from the Deposit to A/R?
S&A Sz/Cg Code: What size/charge code do you want to use to create and post a Sales Adjustment for the $ Amount that is being transferred from the Deposit to A/R.
A/R to Deposit Xfer Note Code: What note code do you want to use to record when an Amount is being transferred from A/R to the Deposit?
S&A Sz/Cg Code: What size/charge code do you want to use to create and post a Sales Adjustment for the $ Amount that is being transferred from A/R to the Deposit.

Allow Refund Check Processing: If your company will be using Refund Check Processing, then click yes ![]() .
.
Refund Check Note Codes: Enter the note code you want to use when requesting a refund check be issued.
S&A Sz/Cg Code: Enter the sz/chg you want to use to offset the credit balance on the customers account.

Allow Individual Refund Requests: Are you going to use Individual Account Refund Requests? If yes, answer the remaining fields. If no, skip to the next section.
Default Refund Adj Sz/Cg Code: Enter the sz/chg code you want to use to offset the amount you are refunding on the customers account.
Default Processing Fee Sz/Cg Code: Enter the sz/chg code you want to use to assess a Processing Fee on the customers account for creating the refund check. Leave blank if your company does not charge a processing fee.
Deflt Refund Reqst Reason Note Cd: Enter the note code you want entered on the account for why the refund is being requested, when (date & time) and what user requested it. The description of the note code can be overridden at the time of the refund request.
Deflt Refund Approval Note Code: Enter the note code you want entered on the account showing that it was approved, when (date & time) and who approved it. If the refund request is being denied, then the person denying the request will select their own note code and description.
Refund request on Credit Bal only: Click yes ![]() if you want to limit the refund requests to only include accounts that have a credit balance.
if you want to limit the refund requests to only include accounts that have a credit balance.

Deferred Rev G/L Code: Enter the abbreviated G/L code that you want your deferred revenue to be posted to. You can enter a cycle specific Deferred Rev G/L Code in the Cycle Master if you want your deferred revenue to be broken out by line of business or other factors. This will be the default for any cycle code that doesn't have a Deferred Rev G/L code entered. Click here to learn more about the Deferred Revenue process.
Accounting Package Company: Enter the Accounting Package Company ID if you are using an Accounting Interface with i-Pak.
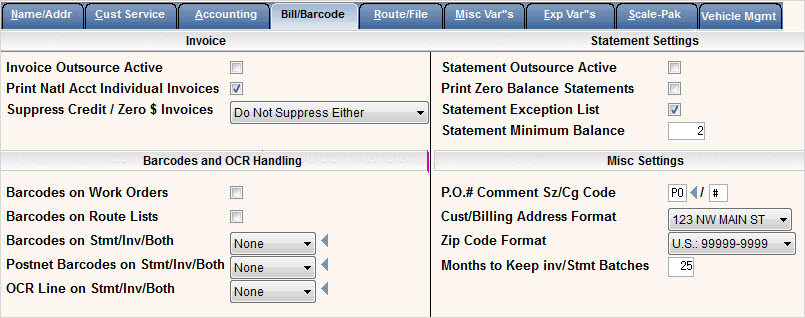
Invoice

Invoice Outsource Active: If you are generating an outsource file for Invoices, check yes ![]() . Contact the Soft-Pak Sales Dept if you'd like more information on this topic.
. Contact the Soft-Pak Sales Dept if you'd like more information on this topic.
Print Natl Acct Individual Invoices: If you want one invoice to go to a National Account only, then leave this field unchecked. If you would like an invoice to be sent to each sub account as well as the National account, then check this box yes ![]() .
.
Suppress Credit/Zero $ Invoices: Do you want to suppress invoices from generating a bill when they have a credit and/or zero total on the invoice? Options are:
Do Not Suppress Either - All invoices will be generated regardless of whether they have a credit or zero $ total.
Suppress Zero $ Invoices - All credit and debit invoices will be generated but no invoice will be generated for those with a zero invoice total.
Suppress Credit $ Invoices - All Zero and debit invoices will be generated but no invoice will be generated for those with a credit invoice total.
Suppress Both Zero and Credit Bal Invoices - No invoices with an invoice total of zero or a credit will be generated. Only invoices with a debit balance will generate an invoice.
![]() Please note that these settings are referring to the Invoice Total and not the Customers Balance Due.
Please note that these settings are referring to the Invoice Total and not the Customers Balance Due.
Barcodes and OCR Handling
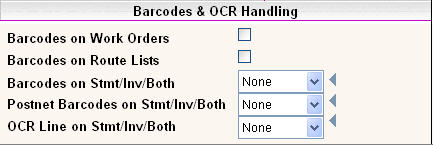
i-Pak has the ability to print Barcodes, Postnet Barcodes or OCR lines on your Statements, Invoices or Both. These features are custom and need to be programmed into your system. If you are interested in learning more about this option, please contact the support services department at 1-800-860-4327.
Statement Settings

Statement Outsource Active: If you are generating an outsource file for Statements, check yes ![]() . Contact the Soft-Pak Sales Dept if you'd like more information on this topic.
. Contact the Soft-Pak Sales Dept if you'd like more information on this topic.
Print Zero Balance Statements - do you want to print statements for customer at a 0 balance? This field is typically left blank to answer no.
Statement Exception List - if the customer's balance does not meet the Statement minimum balance, do you want an exception list to print. This can provide a tool to review customers with small balances for write offs or to review customers with credits balances.
Statement Minimum balance - what is the minimum balance required to print a statement for a Customer. Due to the cost of printing and mailing, you might want to consider those costs to determine the minimum balance. Typically this field is set at 2 or 3. Enter a number without decimal positions, such as $2.00 is entered as 2. If you want a list of customers that do not meet the minimum balance, set print statement exception list above to 2.
![]() If this field is left blank, credit statements will be printed.
If this field is left blank, credit statements will be printed.
Misc Settings
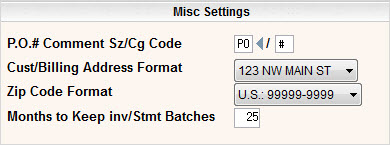
P.O.# Comment Sz/Cg Code: If you enter a PO# into your work orders and want it to print on the bills (statements and/or invoices), what Sz/Cg do you want to use to attach to the PO#. The system will post the PO# from the work order into the Sales History and print on the bills if the sz/cg is set to print on those forms.
Cust/Billing Address Format: Certain areas require specific formats of the billing address for mailing purposes. We offer 3 different options on how to print the billing address on your forms:


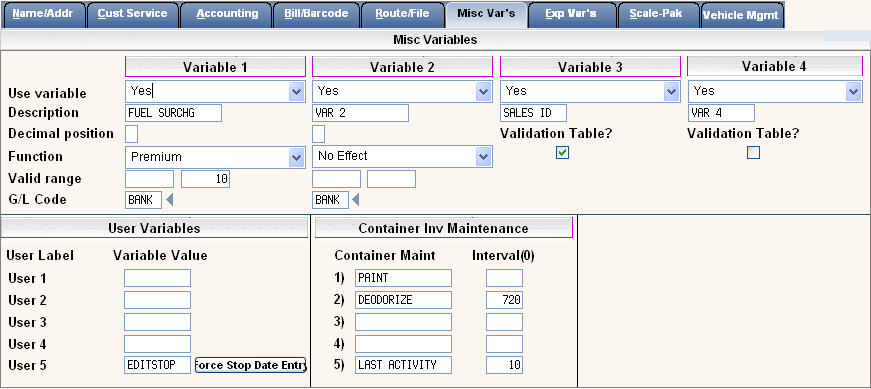

Use variable - click on ![]() to display choices of
to display choices of  .
.
Select Yes to use the field and have it displayed
No to not use the field and it will not be displayed
Protect to display the field but protect the information so it can not be changed - information may be filled in from a global update, conversion, etc.
Required to use this field and force the user to enter something in the field.
Description - enter the description to display on the Variables tab. This is also the description that will print on your bills if the field is set up with a function to bill with auto charges.
Decimal positions - enter the number of assumed decimal positions for the field.
Function - click on ![]() to display choices of
to display choices of 
Select Add to add the amount entered to the Monthly Charge on the Customer's account.
Select Subtract to subtract the amount entered from the Monthly Charge on the Customer's account.
Select Discount (Percent Subtract) to calculate an amount using the amount entered in the field and Subtract it from the Monthly Charge on the Customer's account.
Select Premium (Percent Add) to calculate an amount using the amount entered in the field and Add it to the Monthly Charge on the Customer's account.
Select No Effect for an 'informational' only field that does not change the Monthly Charge.
Valid Range - enter a range amount for the information entered in the field on the Customer's Profile. This helps to keep limits on amounts entered to reduce user error.
G/L Code - what General Ledger code should be used for calculated amounts.
Use variable - click on ![]() to display choices of
to display choices of  .
.
Select Yes to use the field and have it displayed
No to not use the field and it will not be displayed
Protect to display the field but protect the information so it can not be changed - information may be filled in from a global update, conversion, etc.
Required to use this field and force the user to enter something in the field.
Description - enter the description to display on the Variables tab.
Use table to verify - if you want to keep the information consistent and prevent user error, select this option by clicking on the box to put a ![]() . The options for this field are then entered by going to the System Admin menu, then to master files and updating them under Customer Variable 3 or 4.
. The options for this field are then entered by going to the System Admin menu, then to master files and updating them under Customer Variable 3 or 4.
User Variables
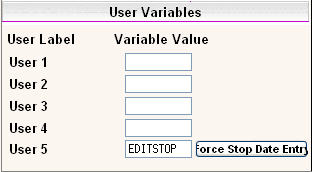
Fields User 1 - User 4 are reserved for future custom programming if needed.
User 5 is used to force the entry of a Stop date when the customer is cancelled. Click on the ![]() button to fill User 5 with the word 'EDITSTOP' to force the stop date. Leave blank to not force the stop date. This field is typically set to EDITSTOP to force the stop date.
button to fill User 5 with the word 'EDITSTOP' to force the stop date. Leave blank to not force the stop date. This field is typically set to EDITSTOP to force the stop date.
Container Inv Maintenance
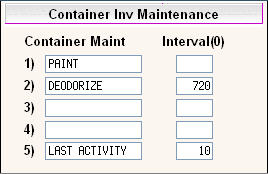
Container Maint / Interval - these fields are displayed in the Serial # Master file for each container record. You can enter maintenance intervals so that you can report when a particular maintenance is needed on the container such as; disinfectant, clean the container (packers), painting, etc.
The system uses #5 in calculating Last Activity for a container so that a 'Last Activity' report can be printed. This is helpful in finding which Roll Off boxes have NOT been serviced/picked up in a certain amount of time. If you want to use this option, enter Last Activity in the Container Maint box and in the Interval, select the interval you want to use. In my example I have selected 10 days. This field is entered as a whole number. Click here for more information on how to set this up and use the Roll-Off Inactivity reporting.
![]() This feature requires the use of serial numbers for the containers and entering the serial numbers in work orders and the services screen.
This feature requires the use of serial numbers for the containers and entering the serial numbers in work orders and the services screen.
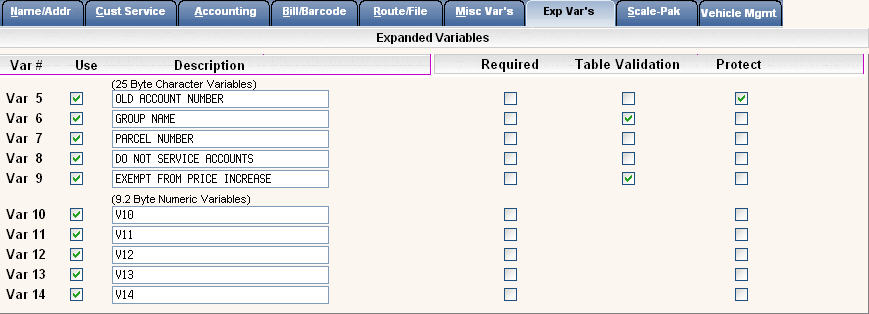
Expanded variables provide up to 10 additional fields that you can use in your environment. They can be for additional information only or they can be used for additional search criteria. In order to use them as search options they must be defined in the Systems Control Master. Expanded Variables set up here are displayed in the Variables Tab on the Customer Profile screen.
![]() If you are using the variables as search criteria they must be set up in each company. Therefore you may want to make sure these fields are the same in each company you use.
If you are using the variables as search criteria they must be set up in each company. Therefore you may want to make sure these fields are the same in each company you use.
For each variable line you want to use click on the Use box to change to ![]() .
.
In the Description field, type the description that will be displayed on the Expanded Variables tab on the Customer Profile screen.
If you want to require your users to enter data into the variable field, click on the required box to change to ![]() . This will force your users to enter something into this field before they can exit the account.
. This will force your users to enter something into this field before they can exit the account.
If you want to allow only certain data in the field,cliick on the Table Validation box to change to ![]() . Leave blank to answer no. If using a Table, valid entries can be added by going to the System Admin menu, then Master Files and clicking on Expanded Variables 5 - 9.
. Leave blank to answer no. If using a Table, valid entries can be added by going to the System Admin menu, then Master Files and clicking on Expanded Variables 5 - 9.
If you want to protect the field and NOT allow changes, click on the Protect box to change to ![]() . This option is helpful if you have converted information and are storing an old account number and want to prevent users from changing it. These fields can also be added to by using a Global Update.
. This option is helpful if you have converted information and are storing an old account number and want to prevent users from changing it. These fields can also be added to by using a Global Update.
![]() The Scale-Pak and Vehicle Mgmt screens are company master settings for Scale House Management and Vehicle Management. Please contact the Sales Department for more information about these modules.
The Scale-Pak and Vehicle Mgmt screens are company master settings for Scale House Management and Vehicle Management. Please contact the Sales Department for more information about these modules.