
The company master contains 2 types of records - a Systems Master record and a Company record (for each company in your system.)
The Systems Master is for the whole system and may be your company name or 'corporation' name. It contains information on how the system should work for all companies. This record must be set up first.
The Company Record contains controls for a specific company id.
From the System Administration Menu, select Master Files.
From the Master Files menu, select Company Code and the Company Scan screen will be displayed.

To update an existing Company ID, select the company by double clicking on the appropriate line or highlighting the line and pressing ![]() to continue to the Company Master Entry/Update screen.
to continue to the Company Master Entry/Update screen.
Enter the Systems Control Master
From the Company scan screen click or select ![]() and the System Master Entry/Update screen will be displayed.
and the System Master Entry/Update screen will be displayed.
To make changes to any information you must be in Update (not Inquiry) mode - click the ![]() button.
button.
![]() If making changes to an existing record, be sure to click or press
If making changes to an existing record, be sure to click or press ![]() through all tabs/screens OR press
through all tabs/screens OR press ![]() which will bring you back to the Company Scan screen. If you exit prior to doing either one of these two steps, you will lose any changes that were made.
which will bring you back to the Company Scan screen. If you exit prior to doing either one of these two steps, you will lose any changes that were made.
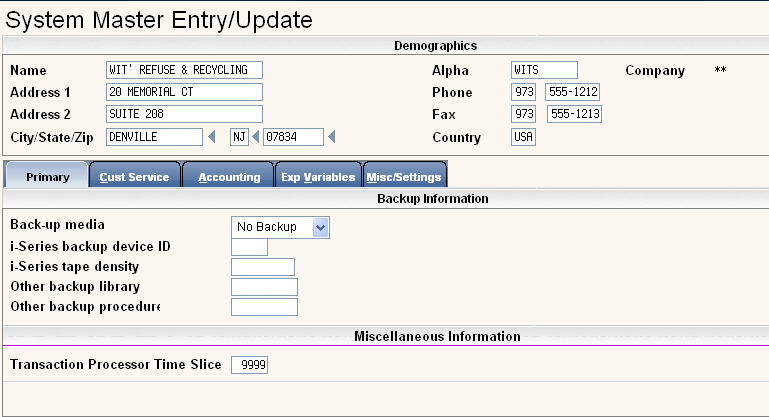
Demographics

Name: enter your company or corporation name.
Alpha Field: type in an abbreviation of your company or corporation name.
Other: type in the address and phone/fax information for the company or corporation.
Primary
Demographics

This section contains settings for performing a backup of your i-Pak Data Set files.
In the Back-up media section, select one of the options in the drop down menu. 
Tape = the system will back up your i-Pak Data Set files to tape during the dayend process. (Your data set files are stored in library IWSE#XX, where # = the version of i-Pak you are on and XX = your data set id.) Fill in the back up device ID and tape density for your i-Series server.
![]()
Disk = this option is no longer used.
Other = if you have a separate back up procedure to run, select other.
No Backup = select if you are running a back up independent of the i-Pak system.
Other backup library: The i-Pak dayend/monthend backup saves library IWSE#XX (where # = the version of i-Pak you are on and XX = your data set id.) If you want any other library backed up, enter it here. If you are using the outsource module, it would be a good idea to save library IWSB#XX which holds all of your billing/outsource files.
Other backup procedure: If you have an existing program name that you want to run, enter the program name here and it will be submitted when you select Day End or Month End. The program must be held in the users Library List to be included.
![]() Be sure that the
i-Pak data set files are included in the back up if you are not using the back-up in Day End. Contact Support Services at 1-800-860-4327 for specifics.
Be sure that the
i-Pak data set files are included in the back up if you are not using the back-up in Day End. Contact Support Services at 1-800-860-4327 for specifics.
![]() Soft-Pak strongly suggests that you run a full system save, independently of i-Pak, at least once a month as well as the saves done in dayend.
Soft-Pak strongly suggests that you run a full system save, independently of i-Pak, at least once a month as well as the saves done in dayend.
Miscellaneous

The Transaction Processor Time Slice affects the amount of processor resources that are used for the i-Pak Transaction Processor. Do NOT modify this field without Soft-Pak assistance unless you are familiar with i-Series time slice settings.
When you have filled this screen in, click or press ![]() to continue to the next tab. You will get a message on the bottom of the screen:
to continue to the next tab. You will get a message on the bottom of the screen:
![]()
Press ![]() to save and continue to the next tab.
to save and continue to the next tab.
Cust Service
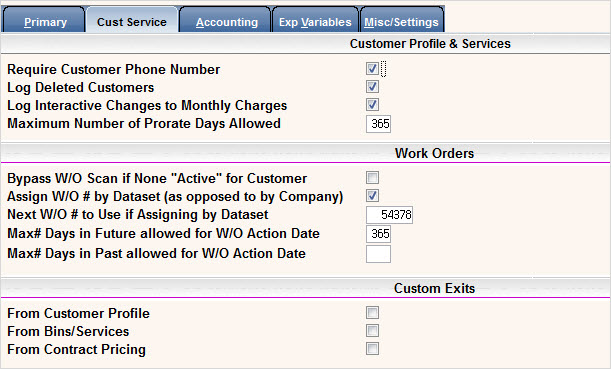
Customer Profile and Services

Require Customer Phone Number: Answer yes (click on box for ![]() ) to force the entry of phone number 1 on the customer profile screen, or answer no (leave box blank).
) to force the entry of phone number 1 on the customer profile screen, or answer no (leave box blank).
Log Deleted Customers: This controls if deleted customers are recorded in a file. The 'Deleted Customers' report (option on the reports menu) can be selected to print all deleted customers.
Log interactive Changes to Monthly Charges: This controls if any changes to a customers reoccurring 'monthly' charges are recorded in a file. The 'Monthly Serv Chg Changes' report (option on the Accounting menu) can be selected to print such changes.
Maximum Number of Prorate Days Allowed: Enter the maximum number of days included in the proration calculation. This helps to prevent keying or selection errors. Enter the number of days in the biggest billing period; for example, if the most amount of months you bill for at any one time is 3 (such as residential quarterly) you may want to enter 92. If you bill for more than 3 months at one time (such as yearly or biannually) you may want to use 184 or 360. If the user enters a date range larger than the number of days indicated, they will get an error message and will be unable to proceed.
![]() The maximum number of days that can be entered is 366. If you leave the field blank, it will assume a maximum of 365.
The maximum number of days that can be entered is 366. If you leave the field blank, it will assume a maximum of 365.
Work Orders

Bypass Work Order scan if none “active” for customer - If there are not any active (non posted) work orders for a Customer, do you want to bypass the Work Order scan screen and display a new Work Order Entry screen? Answer yes (click on box for ![]() ) if you want to have a new Work Order Entry screen to be displayed, answer no (leave box blank) to always display the Scan screen.
) if you want to have a new Work Order Entry screen to be displayed, answer no (leave box blank) to always display the Scan screen.
Many users like to have the scan screen displayed so they can view past work orders at a glance before entering a new work order.
Assign Work Order # by data set (as opposed to by Company): Select yes (click on box for ![]() ) to have one 'pool' of work order numbers for the entire system, or answer no (leave box blank) to have work orders company specific. In the Company master for each company you will then need to set the next work order number to use.
) to have one 'pool' of work order numbers for the entire system, or answer no (leave box blank) to have work orders company specific. In the Company master for each company you will then need to set the next work order number to use.
![]() Soft-Pak recommends assigning work order numbers by data set if you use Scale-Pak or any on board computing interface as this will prevent duplicate work order numbers.
Soft-Pak recommends assigning work order numbers by data set if you use Scale-Pak or any on board computing interface as this will prevent duplicate work order numbers.
If you answered Yes to assign work order # by data set, enter the next work order number in Next Work Order # to use if assigning by data set. Enter a starting work order number to use. This field will be automatically updated as work orders are used in the system.
Max# Days in Future allowed for W/O Action Date: this field is used to help prevent keying errors when entering an action date in a work order. Enter the maximum number of days in the future allowed when entering a work order action date. In the example above we are using 365 days, so a user can not enter a date more than 1 year in advance. Leave the field blank if you do not wish to have limits on the action dates allowed to be entered.
Max# Days in Past allowed for W/O Action Date: this field is also used to help prevent keying errors when entering an action date in a work order. Enter the maximum number of days in the past allowed when entering a work order action date. Leave the field blank if you do not wish to have limits on the action dates allowed to be entered.
Custom Exits

Custom exit options - if you have custom programming to display an additional screen when exiting from customer service, bins/services or contract pricing select one of these options.
![]() Do not change without the assistance of Soft-Pak Support as this could affect the operation of your i-Pak system.
Do not change without the assistance of Soft-Pak Support as this could affect the operation of your i-Pak system.
When you have filled this screen in, click or press ![]() to continue to the next tab, you will get a message on the bottom of the screen:
to continue to the next tab, you will get a message on the bottom of the screen: ![]() .
.
Press ![]() to save and continue to the next tab.
to save and continue to the next tab.
Accounting
Cash Receipts

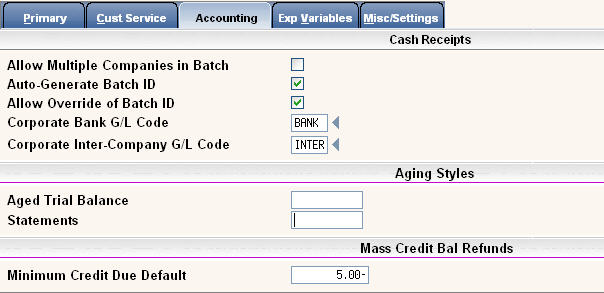
The first section of the screen is for Cash Receipts settings.
Allow multiple companies in cash receipts: If you have more than one company in your system and want to be able to enter payments (cash receipts) for all companies in one batch, click the box ![]() to indicate yes, leave the box blank for no.
to indicate yes, leave the box blank for no.
Auto generate batch ID: If you want the system to automatically create a batch id in cash receipts (payments), click the box ![]() to indicate yes, leave the box blank for no.
to indicate yes, leave the box blank for no.
Allow override of Batch ID - If the system generates the cash receipts batch id, and the user is able to override the batch id, click the box ![]() to indicate yes, leave the box blank for no.
to indicate yes, leave the box blank for no.
In the Corporate bank G/L code enter the abbreviated general ledger code to be used for the debit side of Cash Receipts (payment entry) - if using multiple company cash receipts.
In the Corporate Inter-Company G/L code, enter the abbreviated general ledger code to be used for the credit side of Cash Receipts (payment entry) - if using multiple company cash receipts.
![]() Make note of the general ledger codes as these will need to be entered in to the General Ledger Master file with a company id of '**').
Make note of the general ledger codes as these will need to be entered in to the General Ledger Master file with a company id of '**').
Aging Styles

Aged Trial Balance: This option provides the ability to create user defined aging buckets that are used in the Variable Aging report.
If no aging style has been specified the default 30-60-90 will be used.
Statements: ![]() The statement aging style is not currently active.
The statement aging style is not currently active.
Mass Credit Balance Refunds

This option defines the minimum credit amount due on a customer's account to be included in the mass refund process. In our example the customer must have at least a credit of $5 in order to get a refund, if they had a credit of $4.50 they would NOT be included in the mass refund process.
When you have filled this screen in, click or press ![]() to continue to the next tab, you will get a message on the bottom of the screen:
to continue to the next tab, you will get a message on the bottom of the screen: ![]() .
.
Press ![]() to save and continue to the next tab.
to save and continue to the next tab.
Expanded Variables
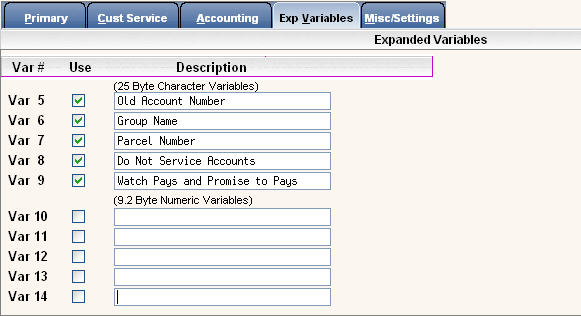
The Expanded Variables tab provides up to 10 additional fields that can be used as additional search criteria or additional information - these are user defined which means you can label them whatever you want.
In order for the variables to act as additional search criteria, they HAVE to be set up in the system master. In addition, the same ones should be set up in each company record so they are consistent throughout the system.
To set up, click on the use column to the right of the variable number to put a ![]() in the box. Type in a description for the variable in the description box. This set up will provide the search options in customer service, but the information should be filled in for the customers on the customer profile variables tab.
in the box. Type in a description for the variable in the description box. This set up will provide the search options in customer service, but the information should be filled in for the customers on the customer profile variables tab.
![]() Since the same variables should be set in each company record make or print a copy of this screen so the variables are consistent throughout the system.
Since the same variables should be set in each company record make or print a copy of this screen so the variables are consistent throughout the system.
Variables 5-9 are 25 byte character fields (this means the field is 25 characters wide).
Variables 10-14 are 9.2 byte numeric fields (this means the field is 9 digits long with 2 decimal positions). There is an option to set these fields up so they do not display a decimal. Please contact support to activate this feature for you.
When you have filled this screen in, click or press ![]() to continue to the next tab, you will get a message on the bottom of the screen:
to continue to the next tab, you will get a message on the bottom of the screen: ![]() .
.
Press ![]() to save and continue to the next tab.
to save and continue to the next tab.
Misc Settings
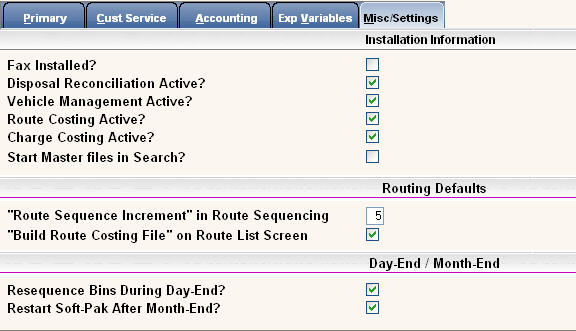
Installation Information

The installation section contains settings for certain features of the system.
Fax installed = if you have IBM fax software loaded on your i-Series server, set this flag to yes by clicking on the field to put a ![]() in the box. This feature will display fax settings on the print request window in the A/R History screen of a customer's account. You can use it to fax a reprinted invoice, history recap, Invoice history, Check # History and reprinted Statement.
in the box. This feature will display fax settings on the print request window in the A/R History screen of a customer's account. You can use it to fax a reprinted invoice, history recap, Invoice history, Check # History and reprinted Statement.
Disposal Reconciliation Active?: Used to produce a disposal reconciliation report for verifying disposal bills from outside facilities (as well as internal facilities). If you want to keep track of disposal information entered in order to verify disposal bills, click in the box ![]() to indicate yes, leave blank for no. Click here for additional information on Disposal Reconciliation.
to indicate yes, leave blank for no. Click here for additional information on Disposal Reconciliation.
Vehicle Management Active?: If you have purchased the Soft-Pak Vehicle Management system, this box ![]() should be checked to indicate that it is active. The system will verify that the vehicle management module has been activated by Soft-Pak Support.
should be checked to indicate that it is active. The system will verify that the vehicle management module has been activated by Soft-Pak Support.
Route Costing Active?: If you want to use
Route Costing, click in the box ![]() to indicate yes, leave blank for no.
to indicate yes, leave blank for no.
Charge Costing Active?: If you want to use Charge Costing, click in the box ![]() to indicate yes, leave blank for no.
to indicate yes, leave blank for no.
Start Master files in Search?: When prompting on the arrow ![]() , pressing F4 or selecting from a master files menu, should the system display the master file search window or the scan list. If you have only one company, you may want to leave this blank (to indicate no) so the scan will be displayed. If you have multiple companies, you may want to select yes (click in the box
, pressing F4 or selecting from a master files menu, should the system display the master file search window or the scan list. If you have only one company, you may want to leave this blank (to indicate no) so the scan will be displayed. If you have multiple companies, you may want to select yes (click in the box ![]() to indicate yes) so the search window is displayed and the company code can be entered for searching. This is a default option and can be changed when in the files.
to indicate yes) so the search window is displayed and the company code can be entered for searching. This is a default option and can be changed when in the files.
Routing Defaults

"Route Sequencing Increment" default value (in route sequencing). Enter the number to use when re-sequencing (renumbering) a route in Route Manager. The most common value is 10.
![]() Keep in mind that the route sequence number field is 4 digits in length. An increment of 10 would limit a route to 999 stops. If you have larger routes, you may want to use 5.
Keep in mind that the route sequence number field is 4 digits in length. An increment of 10 would limit a route to 999 stops. If you have larger routes, you may want to use 5.
"Build route costing file" default on route list screen: Answer yes (click in the box ![]() to indicate yes) to default a
to indicate yes) to default a ![]() next to the "Create route costing file' selection on the Route List selection screen. Answer no (leave box blank) to default a NO or unchecked box
next to the "Create route costing file' selection on the Route List selection screen. Answer no (leave box blank) to default a NO or unchecked box ![]() with no date field displayed. These are just defaults and can be changed when making selections on the individual Route List Selection screen.
with no date field displayed. These are just defaults and can be changed when making selections on the individual Route List Selection screen.
Day/Mth End

Automatically re-sequence bins during day end. Services/Bins are numbered internally in the BINS file. Since they can be deleted during Day End through the proration routine, should they be renumbered. Click in the box to indicate yes, leave blank for no.
Start Soft-Pak after Month end. The Month End procedure is a dedicated process - users can NOT be on the system. When Month end starts, it 'stops' i-Pak so users can not sign back in. When Month end completes, do you want the system to start or do you want to start it manually.( Some customers like to balance their Month End before they have users get back in to the system.) Click in the box ![]() to indicate yes, leave blank for no.
to indicate yes, leave blank for no.
When you have made your selections, click or press ![]() to save your selections. The following message will be displayed on the bottom of the screen:
to save your selections. The following message will be displayed on the bottom of the screen: ![]()
Press ![]() to save and return to the Company Scan.
to save and return to the Company Scan.