The Route Follow-Up feature gives a user the ability to access one entry program to handle all route related information that comes back with a route list. This includes any on board scale weights, notes, sales & adjustments (charges) and work orders all in one section. In addition, the route follow up file is created from a route list, so data entry is quick and easy.
Once the Route Follow Up file is updated with the necessary information, the file is posted. This will post any weights entered in the file, toggle any work orders, and create batches for notes and sales/adjustments.
Running a Route List to create the file (you do not need to actually print the list).
Updating the Route Follow Up file (a file can be manually created if step #1 was not done).
Listing the Route Follow up Details for review and editing.
Posting the Route Follow up file.
Posting any toggled work orders.
Posting any note batches created.
Posting any Sales & Adjustment batches created.
![]() If you are unfamiliar with some of the i-Pak accounting functions (toggling work orders, entering note batches, entering sales & adjustment batches, you may want to review those sections before getting started here).
If you are unfamiliar with some of the i-Pak accounting functions (toggling work orders, entering note batches, entering sales & adjustment batches, you may want to review those sections before getting started here).
From the Operations Menu, select the Print Daily Route Lists option # 11.
Fill in the selections for the Route Lists you wish to create - you do NOT have to do each route individually, you can do several at one time.
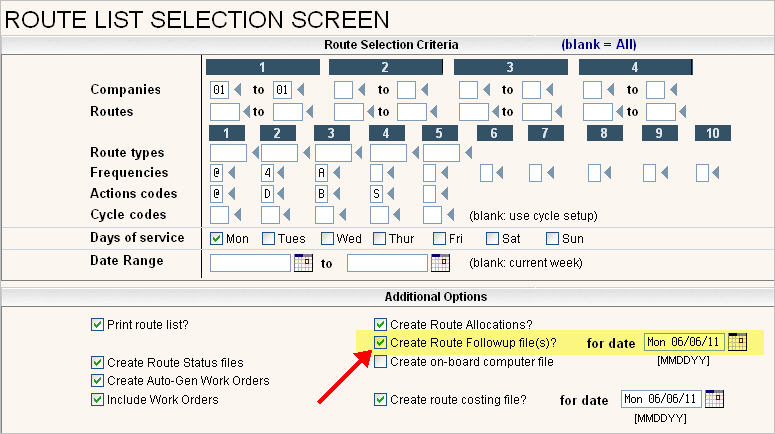
Under the Additional Options section, answer yes to ![]() by clicking on the field on the to put a
by clicking on the field on the to put a ![]() in the box.
in the box.
![]() Updating the Route Follow-up files is done AFTER the drivers have completed their routes for the day.
Updating the Route Follow-up files is done AFTER the drivers have completed their routes for the day.
From the Accounting Menu, select the Update/Post Route Follow up option #31. The Route Follow up Scan screen will be displayed.
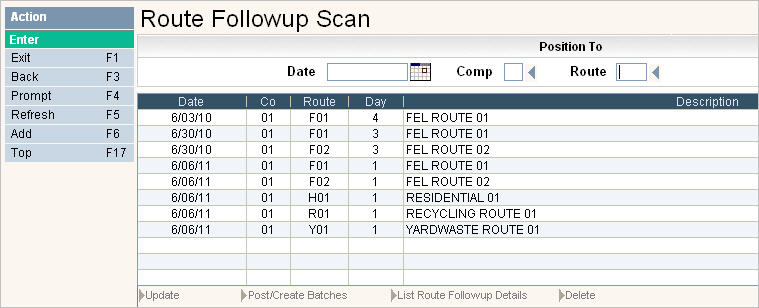
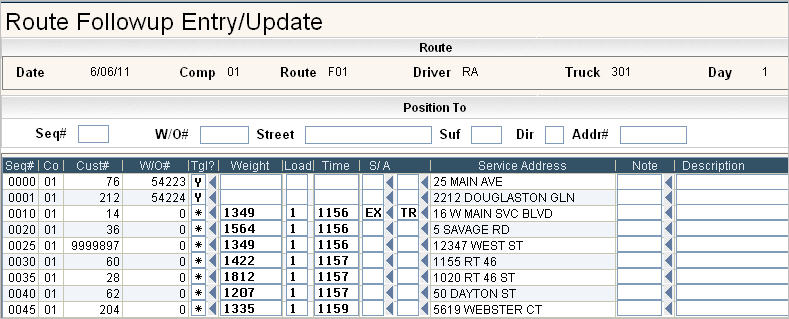
Select the file you want to update by double clicking on the line. You can also right click on the line and select the update option. The Route Follow up Entry/Update screen will be displayed.
If the ‘Create Route Follow up file’ option was not selected when the Route List was generated, you can add a file by clicking on the ![]() button or press F6 to add a new file.
button or press F6 to add a new file.
![]() If there are several pages of routes and you want to quickly access the day and route you want, simply go to the Position to area on the top of the screen and type in the date, company and route you are updating (you can also just key in the date). Press Enter and the screen will re-display beginning with that date. You can also use the
If there are several pages of routes and you want to quickly access the day and route you want, simply go to the Position to area on the top of the screen and type in the date, company and route you are updating (you can also just key in the date). Press Enter and the screen will re-display beginning with that date. You can also use the ![]()
![]() arrows or Page Down and Page Up to move through the screens.
arrows or Page Down and Page Up to move through the screens.
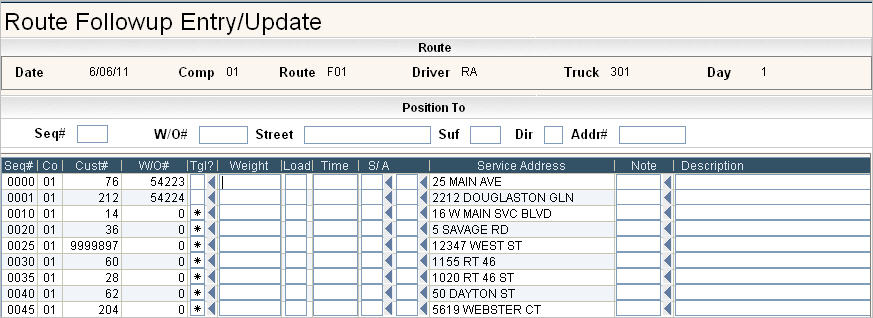
Each entry on this screen represents a line item that was printed on the route list. They can be updated by:
Updating and toggling the work order if a work order exists - Toggle?
Adding an on board weight - Weight/Load/Time
Adding a sales/adjustment to a customer (such as extra bags of trash, extra yards, etc) - S/A
Adding notes to a customer (such as Blocked container, No Can Out, etc) - Note/Description
You can do all, one, a couple, a few, or none of the functions for each line item. Each function will be covered separately below.
![]() Work Orders will only appear on this screen if they were also printed on the Route List. If your work orders print on a separate list they will not be on this screen, but can be added to the file (see Add New Records below).
Click here to see how to turn on work orders to print on Route Lists
Work Orders will only appear on this screen if they were also printed on the Route List. If your work orders print on a separate list they will not be on this screen, but can be added to the file (see Add New Records below).
Click here to see how to turn on work orders to print on Route Lists
![]() - These are display fields that show the Sequence # for the stop, the Company number and the Customer #.
- These are display fields that show the Sequence # for the stop, the Company number and the Customer #.
![]() - If there is a work order in the batch then the WO# field will be filled in.
- If there is a work order in the batch then the WO# field will be filled in.
![]() - If there is a work order in the batch, then you can click on the
- If there is a work order in the batch, then you can click on the ![]() under the Tgl? column to access the work order toggle window.
under the Tgl? column to access the work order toggle window.

If there are no additional changes to be made to the work order, just click or press ![]() . You will return to the Route Follow up Entry/Update screen.
. You will return to the Route Follow up Entry/Update screen.
If there are changes or additions to be made, click on the ![]() button or press F8. This will display the work order.
button or press F8. This will display the work order.
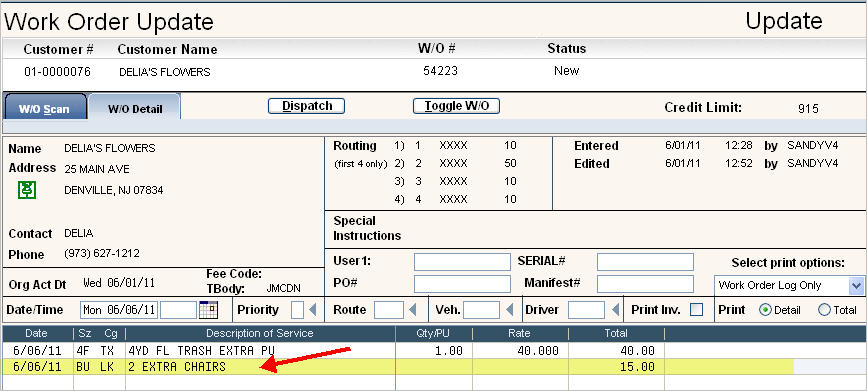
Make any necessary changes and be sure to press enter to accept. In the example above, I have added a bulky item charge for 2 extra chairs.
Click on ![]() or press F3. You will return to the WO toggle window. Click or press
or press F3. You will return to the WO toggle window. Click or press ![]() and you will return to the Route Follow up Entry/Update screen.
and you will return to the Route Follow up Entry/Update screen.
![]() Once you have done this process, you will see a Y in the Tgl? column. You must follow the steps above in order to toggle a work order. If you simply enter a Y in the field, the work order will NOT be toggled.
Once you have done this process, you will see a Y in the Tgl? column. You must follow the steps above in order to toggle a work order. If you simply enter a Y in the field, the work order will NOT be toggled.
![]() Work Orders will need to be posted by using the Post Work Orders option #28 on the Accounting Menu.
Work Orders will need to be posted by using the Post Work Orders option #28 on the Accounting Menu.
The following information can be entered directly into the Route Follow Up screen and will populate the Activity Screen on the Sales History tab on the Customer's account when the Route Follow up file is posted.
![]() Enter the weight of the container in pounds (whole numbers)
Enter the weight of the container in pounds (whole numbers)
![]() Enter which disposal load # the weight is from.
Enter which disposal load # the weight is from.
![]() Enter the time (in military time) when the container was dumped (numbers only, do not enter the ':'). You can also enter the time the stop was picked up, just make sure you are consistent with your data entry.
Enter the time (in military time) when the container was dumped (numbers only, do not enter the ':'). You can also enter the time the stop was picked up, just make sure you are consistent with your data entry.
To enter Sales and adjustments, click on the ![]() in the
in the ![]() box, the Sales/Adjustment Quick Entry screen will be displayed.
box, the Sales/Adjustment Quick Entry screen will be displayed.

Enter the applicable charge code in the Sz/Cg fields, and the quantity in the Qty/PU field. When you press enter, the description and amounts will be filled in. If the pricing is not set up as a default in the charge code master, and there is not any contract pricing for this customer, the pricing will need to be entered.
Fill in any of the bottom row fields if needed.
Once you press Enter, you will get a ![]() message on the bottom of the window. Press or click
message on the bottom of the window. Press or click ![]() to accept and continue.
to accept and continue.
![]() If Sales and Adjustments are entered in this screen, batches will be created when the Route Follow up File is Posted. You will then need to Post the Sales & Adjustment batches from the Accounting Menu option #8. You should also run a Sales & Adjustment Edit list to verify the batch before Posting.
If Sales and Adjustments are entered in this screen, batches will be created when the Route Follow up File is Posted. You will then need to Post the Sales & Adjustment batches from the Accounting Menu option #8. You should also run a Sales & Adjustment Edit list to verify the batch before Posting.
Two types of NOTES can be created from the Route Follow up file. If a note CODE is entered, the note code and the description will be added to a Note Batch when the Route Follow up file is posted. If a note CODE is not entered, the description will post to the ‘remarks’ on the Activity screen in Sales History on the Customer's account.
To enter notes, simply enter the note code into the field under the ![]() column or click on the
column or click on the ![]() button to display the Note Pad Code Scan for you to select a code. The description will default in from the master file but can be overridden. In the example below, I have added a note code of BLOCK and entered information that helps identify what was blocking the container.
button to display the Note Pad Code Scan for you to select a code. The description will default in from the master file but can be overridden. In the example below, I have added a note code of BLOCK and entered information that helps identify what was blocking the container.
![]()
If the note is just related to the weight or dump of the container, leave the ![]() field blank and fill in the description only.
field blank and fill in the description only.
![]()
![]() If Notes (with Codes) are entered in this screen, batches will be created when the Route Follow up File is Posted. You will then need to Post the Note batches from the Accounting Menu option #23. You should also run a Note Batch Edit list to verify the batch before Posting.
If Notes (with Codes) are entered in this screen, batches will be created when the Route Follow up File is Posted. You will then need to Post the Note batches from the Accounting Menu option #23. You should also run a Note Batch Edit list to verify the batch before Posting.
If you need to add line items that are not in the file, press the ![]() button or press F6. An empty line item screen will appear.
button or press F6. An empty line item screen will appear.

Enter a new sequence # for the line - this can be left 0.
Enter the Company id and Customer number (Co# Cust#) - these are required.
Enter a work order number (if applicable), bin #, Sz/Cg (required), weight, load, and time.
Press or click ![]() to accept.
to accept.
To UPDATE a record, you can just enter the data directly into the fields. If you highlight a line and hit ![]() at the bottom of the screen, the Display Route Followup Record screen will display. If you go into
at the bottom of the screen, the Display Route Followup Record screen will display. If you go into ![]() mode, you can Update the Seq# and/or Bin#. You can also access the
mode, you can Update the Seq# and/or Bin#. You can also access the ![]() screen from here which gives you additional access to work orders, service history and contract history.
screen from here which gives you additional access to work orders, service history and contract history.

To DELETE a record - Highlight the line you wish to delete and click on ![]() . A Delete Route Follow up Record screen will be displayed.
. A Delete Route Follow up Record screen will be displayed.

Click on the ![]() button or press F16 (shift F4).
button or press F16 (shift F4).
Once you have all the information entered, click on ![]() or press F3. This will bring you back to the Route Follow up Scan.
or press F3. This will bring you back to the Route Follow up Scan.
Print an Edit List
You can print an edit list from the Route Followup Scan by highlighting the file you want and clicking on ![]() on the bottom of the screen.
on the bottom of the screen.

Once you have reviewed the Route Follow Up Edit Report, you are ready to post. From the Route Follow up Scan, highlight (single click) the file you want and click ![]() on the bottom of the screen. You will get a confirmation screen.
on the bottom of the screen. You will get a confirmation screen.

Click on ![]() or press F11. Sales and Adjustment batches and Note batches will be created, and the weights will be posted to the Activity Screen. Several reports are generated during the post. Please review the Sales and Adjustment list (S/A Batches Created) and Note List (Note Batches Created) carefully before posting those batches.
or press F11. Sales and Adjustment batches and Note batches will be created, and the weights will be posted to the Activity Screen. Several reports are generated during the post. Please review the Sales and Adjustment list (S/A Batches Created) and Note List (Note Batches Created) carefully before posting those batches.


