Toggling is a term that refers to the action of changing the status of something one way then back to it's original status. A light switch for example is a 'toggle' switch-the switch changes the status of the light from off to on and then can change it back to off again.
In the i-Pak system, the toggling action is one that changes the status of a work order from New or Work Order Printed to Post Pending back if needed (for changes). The purpose is to let the system know that the work order is done and to add any additional charges that might be necessary - such as disposal fees, dry run charges, the type of bulk item that was picked up, etc. In addition, disposal information (landfill/dump facility, ticket number, material, tonnage and your cost) can be entered on the work order so that Landfill Reconciliation reports can be run to verify dump bills. The toggling function also provides a link to the Service Tab so that inventory can be added or removed. Once the work orders have been updated with charges (if necessary) and/or disposal information and toggled to a 'post pending' status, they can be posted. Once posted the charges appear on the customers' account.
Before getting started on toggling, you should have the driver's paperwork handy for any additional notations they have made, serial numbers delivered, weight & disposal information (if NOT using Driver's Logs), etc.
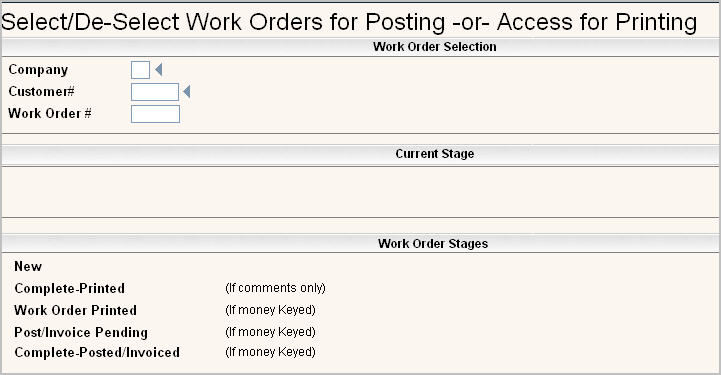
From the Accounting Menu, select Work Order Toggling (Individual) option #26. The Select/De-Select Work Orders for Posting screen will be displayed.

In the Company field ![]() , enter the 2 digit company id for the work order.
, enter the 2 digit company id for the work order.
The Customer # ![]() , can be left blank if the work order number is available as company/work order numbers are unique to a customer.
, can be left blank if the work order number is available as company/work order numbers are unique to a customer.
In the Work Order # ![]() field, enter the work order number.
field, enter the work order number.
If you are using your field exit key (the + key on the numeric keypad), the Work Order Toggling window will be displayed. If not, click or press ![]() .
.
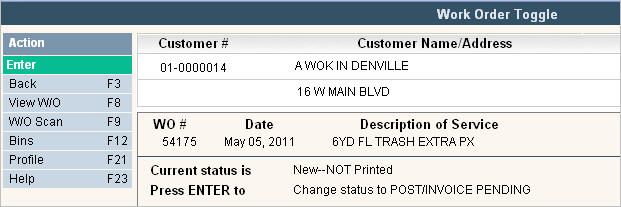
The system will display information about the work order such as the Customer (billing) Name, the Service Address, Action Date and Description of Service (description entered in line 1 of the work order).
It will display the Current status, and Press Enter to change status to _________.
The object is to change all the status stages of your work order to POST/INVOICE PENDING. The ONLY work orders that are included when you Post are ones with a status of POST/INVOICE PENDING.
At this point, if there are no changes to be made to the work order (add disposal, or update inventory/prorate from the Services/Bins screen) you can click or Press ![]() to change the status to POST/INVOICE PENDING (Toggle the work order).
to change the status to POST/INVOICE PENDING (Toggle the work order).
![]() When the status is changed FROM Post/Invoice Pending to Printed - that is referred to as 'Un-toggling'. The steps are the same to Un-Toggle a work order as they are to toggle the work order.
When the status is changed FROM Post/Invoice Pending to Printed - that is referred to as 'Un-toggling'. The steps are the same to Un-Toggle a work order as they are to toggle the work order.
If there are any changes that need to be made to the work order (additional information to be added or additional charges (such as disposal, items picked up for a bulky pick up, etc) to be added) you can access the work order. To access the Work Order, simply click on the ![]() button and the Work Order Update screen will be displayed.
button and the Work Order Update screen will be displayed.
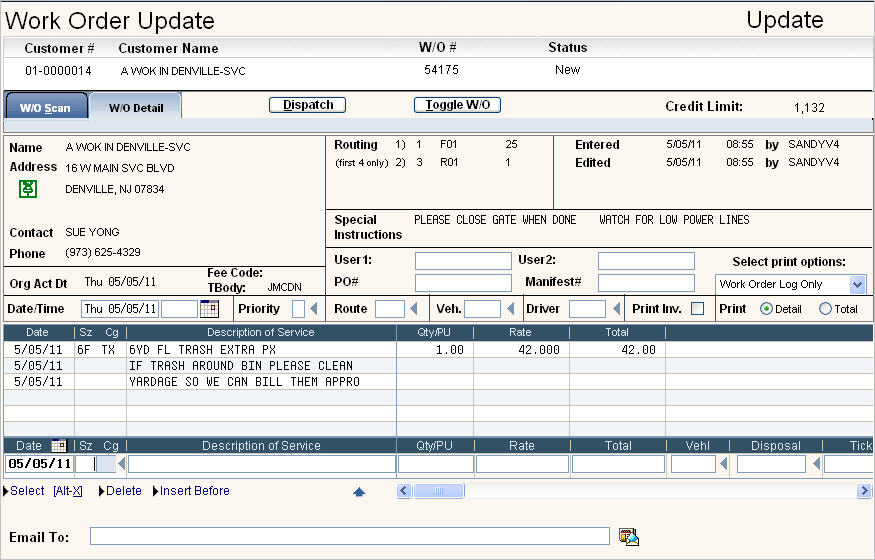
Make any changes you need to make.
On the line item, ![]() enter the size and charge code for disposal in your environment. Click on the
enter the size and charge code for disposal in your environment. Click on the ![]() to display your choices for this field.
to display your choices for this field.
In the ![]() field, type a description or leave blank and the default description from the Charge Code master will be used for the Sz/Cg code you selected.
field, type a description or leave blank and the default description from the Charge Code master will be used for the Sz/Cg code you selected.
In the ![]() type in a quantity. If entering disposal this would be the net tonnage (or yards if billing by the yard).
type in a quantity. If entering disposal this would be the net tonnage (or yards if billing by the yard).
In the ![]() field, type in the rate for the service (if this is a 'Rate'type charge code). If pricing is set up as standard in the Charge Code master or if contract pricing has been set up for this customer the price will default in automatically.
field, type in the rate for the service (if this is a 'Rate'type charge code). If pricing is set up as standard in the Charge Code master or if contract pricing has been set up for this customer the price will default in automatically.
The ![]() will be calculated automatically using the Quantity x Rate. If this is a 'flat' type of charge code, enter the flat price in this field.
will be calculated automatically using the Quantity x Rate. If this is a 'flat' type of charge code, enter the flat price in this field.
For the additional fields needed for disposal information, use your TAB key or scroll bar and the screen will move the fields to the right.
In the ![]() field, enter the vehicle id for the truck used for this work order. Click on the
field, enter the vehicle id for the truck used for this work order. Click on the ![]() to display your choices for this field.
to display your choices for this field.
In the ![]() field, enter the code that corresponds to the Dump/Disposal Facility used for this work order. Click on the
field, enter the code that corresponds to the Dump/Disposal Facility used for this work order. Click on the ![]() to display your choices for this field.
to display your choices for this field.
In the ![]() field, enter the ticket number for the weight slip from the disposal facility.
field, enter the ticket number for the weight slip from the disposal facility.
In the ![]() field, enter the Material code for what was disposed. Click on the
field, enter the Material code for what was disposed. Click on the ![]() to display your choices for this field.
to display your choices for this field.
In the ![]() field, enter the Unit of Measure code for the Material disposed (such as TN for tons YD for yards, etc). Click on the
field, enter the Unit of Measure code for the Material disposed (such as TN for tons YD for yards, etc). Click on the ![]() to display your choices for this field.
to display your choices for this field.
In the ![]() , enter the actual number of units (may be the same as quantity) for the material disposed.
, enter the actual number of units (may be the same as quantity) for the material disposed.
In the ![]() field, enter the cost to YOUR company to dump the load. This amount can be defaulted in from the Landfill Master if you have your material costs entered.
field, enter the cost to YOUR company to dump the load. This amount can be defaulted in from the Landfill Master if you have your material costs entered.
![]() This information will automatically be updated into the work order IF you are entering data into Driver Logs. When Driver Logs are marked 'Complete', the data is immediately populated into the work order so there is no need to enter it manually a 2nd time.
This information will automatically be updated into the work order IF you are entering data into Driver Logs. When Driver Logs are marked 'Complete', the data is immediately populated into the work order so there is no need to enter it manually a 2nd time.
Click or press ![]() to accept your line item.
to accept your line item.
Add any additional line items. When finished, click on ![]() to return to the Work Order toggle window.
to return to the Work Order toggle window.
Click or Press ![]() to change the status to POST/INVOICE PENDING. You are now ready for the next work order.
to change the status to POST/INVOICE PENDING. You are now ready for the next work order.
Some of the charge codes used in work orders can be set to assist in the entry or removal of inventory records in the Services/Bins screen, or you might just need to add information to the Service/Bins screen. This is used mainly in Roll Off so that a Container Inventory report can be used to located Roll Off boxes.
From the Work Order Toggle window - when you click or press ![]() , if your Charge Code Master has been set up with Inventory In/Out information, then you will get the following message when you press
, if your Charge Code Master has been set up with Inventory In/Out information, then you will get the following message when you press ![]() .
.

Click or press ![]() to toggle, the work order will be changed to POST/INVOICE PENDING and you will be brought into the Services Scan Screen where you can add a new Service, or select
to toggle, the work order will be changed to POST/INVOICE PENDING and you will be brought into the Services Scan Screen where you can add a new Service, or select ![]() to exit without making any changes. If you select F3 back, the following screen will be displayed:
to exit without making any changes. If you select F3 back, the following screen will be displayed:
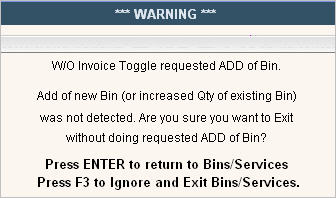
Press ![]() to return to Bins/Services or Press
to return to Bins/Services or Press ![]() to Ignore this message and Exit.
to Ignore this message and Exit.
![]() There is an additional flag, that must be activated by support, that will force the user to create the Inventory record when the work order is toggled. If this flag is activated, instead of seeing the messages above, the message
There is an additional flag, that must be activated by support, that will force the user to create the Inventory record when the work order is toggled. If this flag is activated, instead of seeing the messages above, the message ![]() will be displayed on the work order toggling screen. When the user presses
will be displayed on the work order toggling screen. When the user presses ![]() to toggle, the work order will be changed to POST/INVOICE PENDING and the Bins/Services screen will be displayed.
to toggle, the work order will be changed to POST/INVOICE PENDING and the Bins/Services screen will be displayed.

When toggling a work order that has a Sz/Cg code with an “I” in the Inventory In/Out flag in the Charge Master, if there is a corresponding Inventory In/Out Sz/Cg code for the Sz/Cg code being toggled, then the Inventory In/Out Sz/Cg code will automatically be displayed on the Services Entry/Update line ready for the user to enter other information (like routing and price). The system will then make sure the user has entered that Services record before allowing them to exit the screen. The system will also check to see if the user performed a START proration for this service. If they did not, it will warn them but will allow them to exit without requesting the proration.

When toggling a work order that has a Sz/Cg code with an “O” in the Inventory In/Out flag in the Charge Master, if there is a corresponding Inventory In/Out Sz/Cg code for the Sz/Cg code being toggled, the Services Entry/Update program will look for a service with the same Sz/Cg code as the Inventory In/Out Sz/Cg code. If found, that service line will be placed on the Services Entry/Update line ready for the user to request a STOP proration to delete this bin. If the user does not delete the bin, they will receive a warning message but will be allowed to exit the screen.
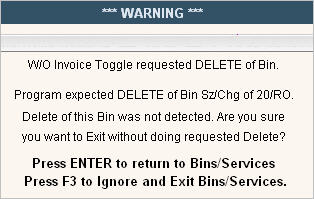
Press ![]() to return to Bins/Services or Press
to return to Bins/Services or Press ![]() to Ignore this message and Exit.
to Ignore this message and Exit.
If they just delete the bin without doing a STOP proration and that bin had a $ amount on it, they will be warned but will be allowed to exit the program.

Click on either ![]() Yes or
Yes or ![]() No to continue. If you select NO, you will be brought back to the Services Screen. When you select
No to continue. If you select NO, you will be brought back to the Services Screen. When you select ![]() , the following message will be displayed on your screen.
, the following message will be displayed on your screen.
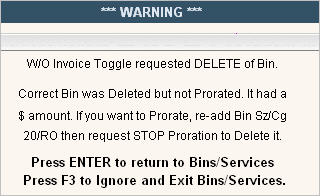
Press ![]() to return to Bins/Services or Press
to return to Bins/Services or Press ![]() to Ignore this message and Exit.
to Ignore this message and Exit.
Continue toggling work orders until you are done with your paperwork.
Continue to Posting Work Orders.