Charge Codes are used in the system for many purposes such as; entering charges and credits (Sales & Adjustments), entering line item details for Work Orders (some with charges, some without), displaying characteristics of services, etc. In addition, Charge codes point to specific General Ledger codes to streamline revenue reporting.
The Charge Code Master controls the charge code 'type' and how the code will function; therefore there are many flags that need to be defined for each charge code. Charge codes can be set up with 'standard' or 'default' pricing that can be overridden at the Customer level (Contract Pricing) or at the entry level when using the code.
![]() It is a good idea to plan out or draw a chart of possible charge codes/services in your environment - this makes the entry of the codes easier. You want to think of codes that are easy for the user to remember, are logical and provide information to the driver WITHOUT having the user key additional information.
It is a good idea to plan out or draw a chart of possible charge codes/services in your environment - this makes the entry of the codes easier. You want to think of codes that are easy for the user to remember, are logical and provide information to the driver WITHOUT having the user key additional information.
![]() When planning a naming convention it is always best to group together similar codes or services.
When planning a naming convention it is always best to group together similar codes or services.
For example, have all your commercial containers have the size field consistent - so that all codes having to do with a 6yard front load container start with '6F', all adjustment codes start with 'AJ', etc. This makes searching and reporting easier.
Then for each size you will need a code for the following types of service
Normal weekly service for the Services/Bins screen (TW = trash weekly)
A delivery code (TD = trash delivery)
An extra pick up code (TX = trash extra pick up)
An on call pick up code (TO = trash on call)
Your codes would look something like this: 6F TW, 6F TD, 6F TX, 6F TO, etc.
![]() Once you have at least 1 Charge Code record established, it is EXTREMELY helpful and saves time to use the Copy feature to copy the information from one code in to the new one - see the Copy feature in the 'add new' section below.
Once you have at least 1 Charge Code record established, it is EXTREMELY helpful and saves time to use the Copy feature to copy the information from one code in to the new one - see the Copy feature in the 'add new' section below.
A charge code can consist of up to 4 components:
SZ - the 'Size' portion - this is a 2 character field. In many cases, for non roll off charge codes, the first character is the size and a type of container.
A 6yd front load container may have a size of 6F
A 4yd rear load container may have a size of 4R.
This section can be left blank if needed for services and miscellaneous charge codes used on the Services screen.
CG - the 'Charge' portion - this is a 2 character field. In many cases, these 2 characters describe the type of commodity and the service provided.
A trash container pickup may have a charge of 'TP'
An extra pick up for a trash container may have a charge of 'TX'.
Curbside service for residential may have a charge of 'CS'.
PLST - the 'Price List' portion - this is a 4 character field that can add flexibility in pricing, while keeping charge code entry easy to remember for your users. For example: I have residential customers in 3 different towns: Denville, Mt Tabor, and Mountain Lakes. I provide curbside service for all towns, but the price is different for each. I want to make charge code entry easiest for my users to remember, so I will have one charge code called 'CS' for curbside service, and 3 price lists. Click here for additional information on the Price List. Price lists must be defined in the Price List Master before they can be used in the Charge Code Master.
Material - the 'Material' portion - this gets updated within the individual sz/cg/plst record and adds one more level of flexibility to GL posting. You can update each sz/cg/plst record with different GL codes based on the material that is processed in the transaction.
A 20 yard Roll-Off box can carry Trash, Green Waste or Recycling. Based on the material in the transaction (work order, S&A, auto charge, or proration) the revenue can be posted to a different GL code. This allows for easy reporting of revenue based on waste stream.
Services/Bin screen
Residential billing rates (36 gal trash cart, 95 gal commingle cart, cart rental, etc).
Container billing rates (3 yard container picked up 3 times a week).
Permanent / temporary roll-off container rental.
Inventory tracking (cart serial numbers, roll off inventory).
Miscellaneous charges used for automatic work order generation, locking lids, or informational only to describe the container such as 'OC' for on call, 'CO' for customer owned, etc.
Work order charges / actions
Residential cart delivery, exchanges, removals
Commercial container delivery, exchange, removal
Extra pickups, Bulky pick ups, Missed pick ups.
Instructions to drivers, route supervisors, etc.
Roll-off delivery, pulls, exchanges, removals, etc.
Sales & Adjustments:
Loose bag / yardage cleanup charges.
NSF and bank charges.
Finance charge adjustments.
Misapplied payments.
Refunds and bad debit write-offs.
From the System Administration menu, select Master Files.
From the Master Files menu, select Charge Code Master. Either the Charge Code search screen or scan screen will be displayed depending on the settings in the system master record. We will begin with the search screen.
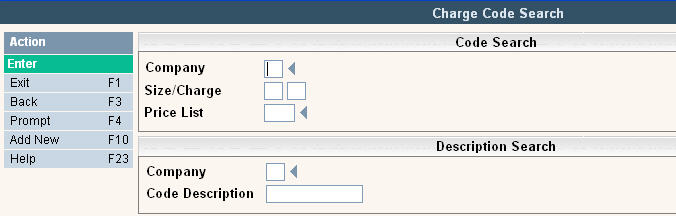
To search, use either the code search or description search. You can type in just a company id and press enter and the system will display the Charge Code Scan screen. Select the one you want to view by double clicking on the line item.
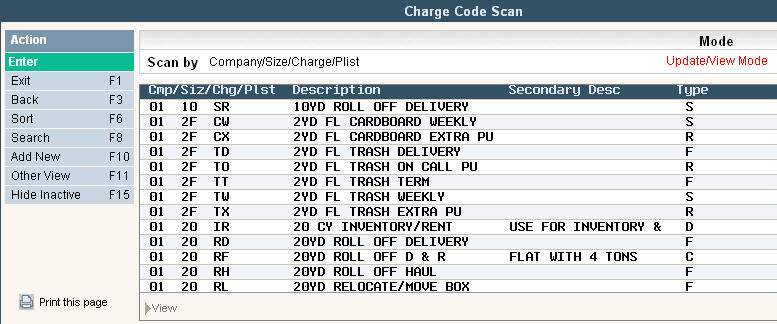
To change the sort option of the screen - press F6 or click ![]() . This will 'toggle' between sorting by the company/size/charge code (displayed above) and company/price list. Sorting by company and price list is helpful when wanting to view all charge codes for a specific price list. The 'Scan by' field will display which sort option is being used:
. This will 'toggle' between sorting by the company/size/charge code (displayed above) and company/price list. Sorting by company and price list is helpful when wanting to view all charge codes for a specific price list. The 'Scan by' field will display which sort option is being used:
![]() or
or ![]()
Scan by Company/Plist:

To make changes select the code you want to update by double clicking on the line item. Click or press the ![]() button to make changes.
button to make changes.
Once you have made any changes click or press ![]() to accept. The system will display the message:
to accept. The system will display the message:
![]() . Click or press
. Click or press ![]() to accept the changes and return to the Charge Code Scan screen.
to accept the changes and return to the Charge Code Scan screen.
To delete a code: from the Charge Code Scan screen select the code by double clicking on the line. Once in the Entry/Update screen click or press ![]() .
.
The system will display a confirmation message on the bottom of the screen: ![]() .
.
![]() The system will check if the charge code is being used BEFORE allowing it to be deleted. The following will prevent a charge code from being deleted...
The system will check if the charge code is being used BEFORE allowing it to be deleted. The following will prevent a charge code from being deleted...
If found in the address master
If found in the collections setup master
If found in any contract pricing record
If found in any bins (services) record
If found in any open work orders or in any closed/invoiced work orders from the previous 3 months.
If found in any open purchase orders, in a purchase order with no expiration date, or in a purchase order with an expiration date within the previous 3 months.
If found in a sale record with a post date within the previous 3 months.
![]() There is NO UNDO button, once a code is deleted it is gone.
There is NO UNDO button, once a code is deleted it is gone.
Click or press ![]() to confirm deletion.
to confirm deletion.
Instead of deleting your Charge Codes, you can now opt to mark them inactive. This is useful when you don't want to delete a code, but wish to stop your users from updating any accounts with these records.
To mark a Charge Code Inactive, click or press ![]() while in update mode. You should then get a message
while in update mode. You should then get a message ![]() . Once you press
. Once you press ![]() again to confirm, the record will be marked with the word
again to confirm, the record will be marked with the word ![]() and it can no longer be used when updating an account.
and it can no longer be used when updating an account.
![]() The system will check if the charge code is being used BEFORE allowing it to be marked inactive. The following will prevent a charge code from being marked inactive...
The system will check if the charge code is being used BEFORE allowing it to be marked inactive. The following will prevent a charge code from being marked inactive...
If found in the address master
If found in the collections setup master
If found in any contract pricing record
If found in any bins (services) record
If found in any open work orders or in any closed/invoiced work orders from the previous 3 months.
If found in any open purchase orders, in a purchase order with no expiration date, or in a purchase order with an expiration date within the previous 3 months.
If found in a sale record with a post date within the previous 3 months.
If found in a custom charge code that is marked active.
If billing is in process.
To mark a Charge Code Active, click or press ![]() while in update mode. You will then get the message
while in update mode. You will then get the message ![]() . Once you press
. Once you press ![]() again to confirm, the record will be marked with the word
again to confirm, the record will be marked with the word ![]() and it will be available for use when updating accounts.
and it will be available for use when updating accounts.
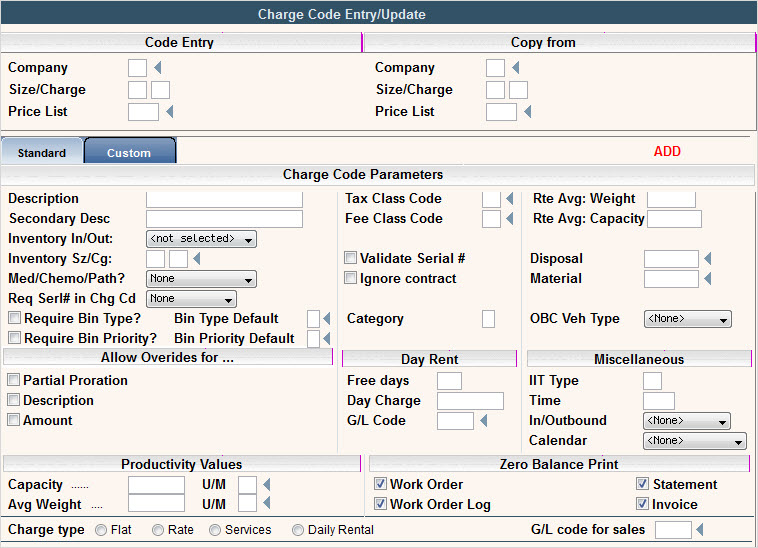
To add a new code click or press ![]() and the Charge Code Entry/Update screen will be displayed.
and the Charge Code Entry/Update screen will be displayed.
In the Company field enter your company ID.
In the Size/Charge field enter your size and charge code - the size field can be left blank.
In the Price List field - enter the price list for this charge code or leave blank. Click on the ![]() to display a list of choices for Price list.
to display a list of choices for Price list.
![]() Once you have at least 1 Charge Code record established, it is EXTREMELY helpful and saves time to use the Copy feature. To copy from an existing code, in the Copy From fields enter the Company ID and Size/Charge code to copy from. Click or press
Once you have at least 1 Charge Code record established, it is EXTREMELY helpful and saves time to use the Copy feature. To copy from an existing code, in the Copy From fields enter the Company ID and Size/Charge code to copy from. Click or press ![]() and the 'from' codes fields will be filled in
and the 'from' codes fields will be filled in
Charge codes can either be 'standard' or 'custom' - a standard charge code is a single unique charge code and a custom charge code is a combination of more than 1 'standard' charge code.
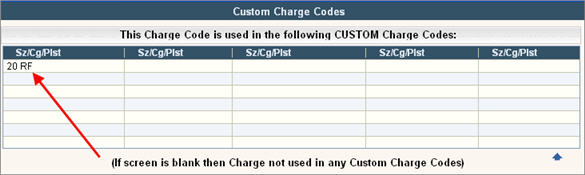
To see where a standard charge code is used in a custom charge code press or click ![]()
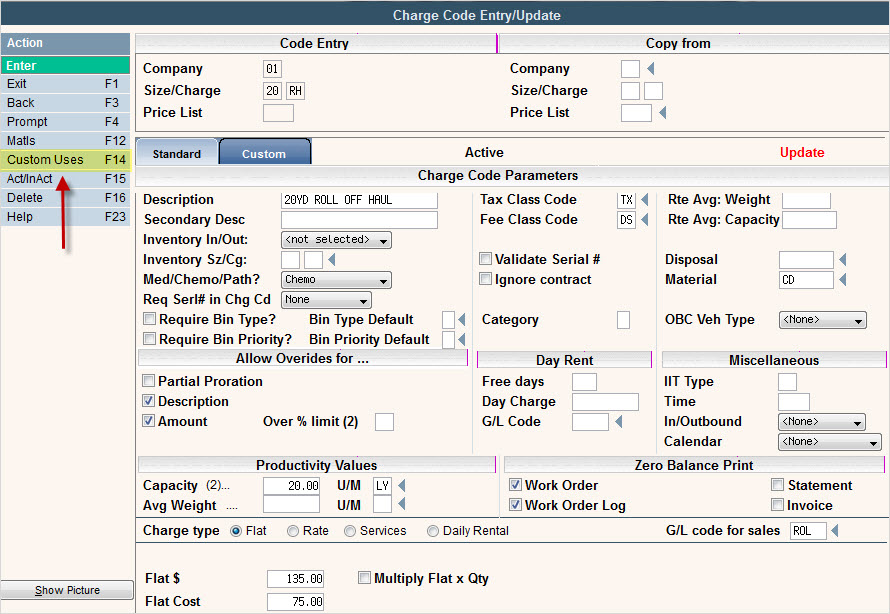
The system will display a list of all custom charge codes that use the displayed standard charge code:
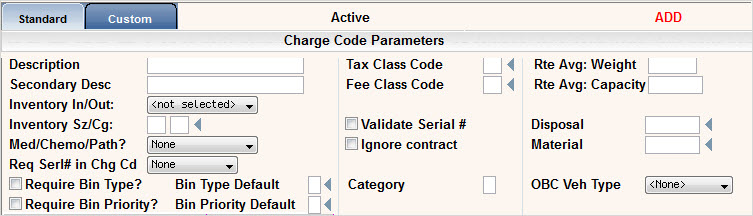
Description: enter a description for the Charge Code, this description will be the default description whenever the charge code is used or printed.
Secondary Desc: enter a second description to provide additional information to your users. The secondary description is only used as a Display on the Charge Code master search screen. For example, you can add the dimensions of the container, special characteristics, or where the charge code can be entered (contract pricing vs services).
Inventory In/Out - this field is used to assist in the addition or removal of inventory items in the services screen as well as suggest the creation of a proration during Work Order toggling and Driver's log. Enter an I for an 'in' type of code such as a delivery and enter an O for an 'out' type of code such as a removal. Leave this field blank if you do NOT want to see this message when toggling work orders or processing driver's logs.

![]() There is an additional flag, that must be activated by support, that will force the user to create the Inventory record when the work order is toggled. If this flag is activated, instead of seeing the message above, the user will immediately be brought into the services update/entry screen with a new bin line (on deliveries) or existing bin line (for removals).
There is an additional flag, that must be activated by support, that will force the user to create the Inventory record when the work order is toggled. If this flag is activated, instead of seeing the message above, the user will immediately be brought into the services update/entry screen with a new bin line (on deliveries) or existing bin line (for removals).
If this flag is NOT activated, the user can choose to hit ![]() from the message above and then
from the message above and then ![]() to exit the screen without entering a new service. If this is done, the user will receive a warning message on their screen.
to exit the screen without entering a new service. If this is done, the user will receive a warning message on their screen.
Inventory SZ/CG: when using inventory in/out, if you have the additional "Force" option set up by support that will automatically create the bin (on deliveries) or select a bin to be cancelled (on removals),then what size and charge code should be used on the services screen to automatically be populated or removed. If this flag is NOT activated, then these fields will not be displayed for update.
![]() Once the bin has been added, either automatically by the system or manually by the user, a message will be displayed to suggest the user create a proration. This is a warning message only.
Once the bin has been added, either automatically by the system or manually by the user, a message will be displayed to suggest the user create a proration. This is a warning message only.
See Work Order Toggling for more information on how this process works.
Med/Chemo/Path? - is this a special Medical Waste, Chemotherapy or Pathology type of charge code? This is used with the medical waste options in the contract pricing screen. Click on the ![]() for choices. Select one or leave as none.
for choices. Select one or leave as none.
![]() Monthly Minimums: You may also use the Med/Chemo/Path field for monthly minimums by selecting the monthly min option in the
Monthly Minimums: You may also use the Med/Chemo/Path field for monthly minimums by selecting the monthly min option in the ![]() drop down list. This option can be used for accounts that have a monthly minimum amount that has to be met each month - such as a minimum of 2 loads (that might total $750 for example) if the account does not have enough loads in the month to make up the minimum then the system will charge the difference during auto charges. This requires that the charge codes counted toward the 'minimum' be set up as such using this flag. In addition, the customer's contract pricing has to be set up with a minimum amount for the month (see the contract pricing section under customer service for specifics).
drop down list. This option can be used for accounts that have a monthly minimum amount that has to be met each month - such as a minimum of 2 loads (that might total $750 for example) if the account does not have enough loads in the month to make up the minimum then the system will charge the difference during auto charges. This requires that the charge codes counted toward the 'minimum' be set up as such using this flag. In addition, the customer's contract pricing has to be set up with a minimum amount for the month (see the contract pricing section under customer service for specifics).
Req Serl# in Chg Cd: works with the 'Res' flag in the services screen and is used to determine if serial numbers are required. Click ![]() for options. Select residential to require serial numbers for this specific charge code when the service line says Resi=Yes, select commercial when Resi=No, select both if serial numbers should always be required when this charge code is used, or select none if serial numbers are not require with this charge code.
for options. Select residential to require serial numbers for this specific charge code when the service line says Resi=Yes, select commercial when Resi=No, select both if serial numbers should always be required when this charge code is used, or select none if serial numbers are not require with this charge code.
Require Bin Type?: If using this charge code, do you want to require the entry of a Bin Type? If you select ![]() yes, then when you enter or update Services, Work Orders, Contract Pricing and/or Sales & Adjustments, you will be required to enter a Bin Type on that line as well.
yes, then when you enter or update Services, Work Orders, Contract Pricing and/or Sales & Adjustments, you will be required to enter a Bin Type on that line as well.
Bin Type Default: This option will default in a Bin Type whenever a new record is added to the Services screen.
Require Bin Priority?: If using this charge code, do you want to require the entry of a Priority Code when entering Services?
Bin Priority Default: This option will default in a Bin Priority code whenever a new record is added to the Services screen. The Bin Priority field from services is used to updated the priority field in work orders when they are Auto Generated.
Tax Class code - enter the tax class code appropriate for this charge code/service item. Click on the ![]() to display a list of choices from the Tax Body Master.
to display a list of choices from the Tax Body Master.
Fee Class code - enter the fee class code appropriate for this charge code/service item. Click on the ![]() to display a list of choices from the Fuel/Fee Surcharge Master.
to display a list of choices from the Fuel/Fee Surcharge Master.
Validate Serial#: Select ![]() for yes leave blank for no, to check if the serial number entered in the Bins/Services screen is valid in container inventory - the serial number master.
for yes leave blank for no, to check if the serial number entered in the Bins/Services screen is valid in container inventory - the serial number master.
Ignore contract - Select ![]() for yes leave blank for no. If answered yes, and Contract Mandatory is turned on for the customer, this charge code does NOT have to be entered in the contract pricing screen in order for the user to use it. If answered no and contract mandatory is turned on for the customer, this sz/cg code has to be entered in the customer's contract pricing screen.
for yes leave blank for no. If answered yes, and Contract Mandatory is turned on for the customer, this charge code does NOT have to be entered in the contract pricing screen in order for the user to use it. If answered no and contract mandatory is turned on for the customer, this sz/cg code has to be entered in the customer's contract pricing screen.
Category: This is a generic field that can be used for anything in reporting. The default field name is Category, but you can contact support to have the field heading changed to something different. Example: Commission Class. Limit 17 Characters.
Route Avg: these two fields are used in the Route allocation calculations if Material Allocation is turned on in the Company Master. Click here for additional information.
Wgt - enter the average weight for this type of charge code based on the Unit of Measure in the Company Master Route/File tab.
Capacity - enter the average capacity based on the Unit of Measure in the Company Master Route/File tab.
Disposal: this field is used in the Scale House Management system for default disposal site.
Material: this field is used in the Scale House Management system for default material type. It is also used in i-Pak, along with the ![]() option to determine which SALE General Ledger code to post the transaction to. If the material in this field matches the material in the transaction, then the programs use the G/L code for Sales listed next to the charge type. If the material in the transaction does not match this field, then it looks to the Matls/F12 screen to determine what G/L code to post to. If there is no match, then the G/L code for Sales (listed next to the charge type) is used.
option to determine which SALE General Ledger code to post the transaction to. If the material in this field matches the material in the transaction, then the programs use the G/L code for Sales listed next to the charge type. If the material in the transaction does not match this field, then it looks to the Matls/F12 screen to determine what G/L code to post to. If there is no match, then the G/L code for Sales (listed next to the charge type) is used.
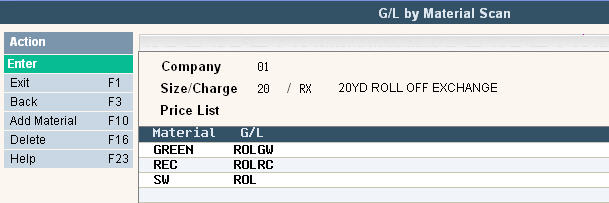
Click ![]() to add a new Material and G/L combination to this screen.
to add a new Material and G/L combination to this screen.
OBC Veh Type: used with an on board computer in the vehicle. Enter the selection to determine if the charge code will be downloaded to a residential truck, a commercial truck, a roll off truck, all or none.
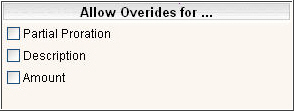
Partial Proration: can this charge code be partially prorated? Select ![]() for yes leave blank for no. If answered no, then when prorations are done, the FULL auto charge amount will be billed.
for yes leave blank for no. If answered no, then when prorations are done, the FULL auto charge amount will be billed.
Description: can the description be changed when used in work orders or Sales & Adjustments? Select ![]() for yes leave blank for no.
for yes leave blank for no.
Amount: can the default amount for this charge code be changed? Select ![]() for yes leave blank for no.
for yes leave blank for no.
![]()
Over % limit - this field is displayed when override amount = ![]() . If the user can override the amount of the charge code, then by what % can they override? Either enter a % amount to limit the override or leave blank for no limit. If the override pricing authority is active, a user can override an amount by more than the percentage. They can do this if they are a supervisor (indicated in the user security file, system admin=Y) or if they have price override authority (indicated in the user security file). If the user does not have authority, they can have a supervisor approve the overridden percentage with the supervisor's user id and special password (set up in the user security file).
. If the user can override the amount of the charge code, then by what % can they override? Either enter a % amount to limit the override or leave blank for no limit. If the override pricing authority is active, a user can override an amount by more than the percentage. They can do this if they are a supervisor (indicated in the user security file, system admin=Y) or if they have price override authority (indicated in the user security file). If the user does not have authority, they can have a supervisor approve the overridden percentage with the supervisor's user id and special password (set up in the user security file).
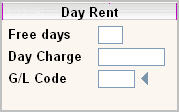
Free days - if using this charge code for Daily Rent, how many free days does the customer get. This field must be entered as a whole number. Leave blank if Day Rent is not applicable to this charge code.
Day Charge - Enter the daily charge if using Day Rent on a work order. If Daily Rental is entered on the Services screen the Daily charge will be entered under the Charge Type. Leave blank if Day Rent is not applicable to this charge code.
G/L code - Enter the general ledger abbreviated code for Day Rent. Leave blank if Day Rent is not applicable to this charge code. Click on the ![]() to display a list of choices for G/L code.
to display a list of choices for G/L code.

IIT Type: this field is used in the IIT module interface, contact Support Services for additional information.
Time: this field is used in the IIT module interface, contact Support Services for additional information.
In/Outbound: this field is used for special waste & materials management inventory.
Calendar: this field is used in the Auto Generation of Work Orders based on a pre-set calendar. Your options are:
![]()
Click here for a detailed description of how the Calendar File option works.

The productivity value fields are used in calculating Route Totals (total yards, total weight) and used in Route Costing and Driver's Log files.
Capacity - enter the capacity of the charge code, such as 6.00 for a 6yd front load container. For a compactor or VIP, you might want to convert from compacted yards to loose yards so reporting is consistent. Enter this field with a decimal point.
U/M - enter the unit of measure for the capacity field. Click on the ![]() to display a list of choices for the Unit of Measure code.
to display a list of choices for the Unit of Measure code.
Avg Weight - enter the average weight for this type of charge code. Enter this amount with a decimal point.
U/M - enter the unit of measure for the average weight field. Click on the ![]() to display a list of choices for the Unit of Measure code
to display a list of choices for the Unit of Measure code

When the charge code is posted and the charge amount is zero, you can control whether that line item will print on a bill or work order.
Work Order - If answered yes ![]() then the charge code and description will print on a Work Order, if left blank then it will NOT print.
then the charge code and description will print on a Work Order, if left blank then it will NOT print.
Statement - If answered yes ![]() then the description entered (in the work order or sales/adjs) will print on a Statement, if left blank then it will NOT print.
then the description entered (in the work order or sales/adjs) will print on a Statement, if left blank then it will NOT print.
Work Order Log - If answered yes ![]() then the charge code and description will print on a Work Order Log, if left blank then it will NOT print.
then the charge code and description will print on a Work Order Log, if left blank then it will NOT print.
Invoice - If answered yes ![]() then the description entered (in the work order or sales/adjs) will print on an Invoice, if left blank then it will NOT print.
then the description entered (in the work order or sales/adjs) will print on an Invoice, if left blank then it will NOT print.
![]() These options are helpful when you have charge codes for deliveries, removals, work order comments, etc. that do NOT have a charge. You can keep the customer's bill easier to read by choosing NOT to have them print.
These options are helpful when you have charge codes for deliveries, removals, work order comments, etc. that do NOT have a charge. You can keep the customer's bill easier to read by choosing NOT to have them print.
![]()
![]()
There are 5 types of charge codes: Flat, Rate, Services, Daily Rental, and Custom. You will need to select one of the options, or click on the custom tab to create a custom charge code.
When you click on an option, an additional field, fields, or screen will be displayed.
Types:
Flat - a flat charge code is generally used for a one time fee.
Examples of flat charge codes:
Roll off actions: deliveries, pulls, exchanges, removals, relocates, etc.
Residential services that are not dependent on quantity.
Miscellaneous charges entered on the Services screen.
Adjustment codes for finance charges, refunds, misapplied payments, or NSF fee's.
Click on the Flat option to put a ![]() next to Flat. The following fields will be displayed.
next to Flat. The following fields will be displayed.

G/L code for sales - enter the abbreviated general ledger code for this charge code. Click on the ![]() to display a list of choices for G/L code.
to display a list of choices for G/L code.
Flat $ - enter the flat amount for the charge code with a decimal point.
Flat Cost - will only be displayed if 'charge code costing' is activated in the system master. This can be used to enter a company's cost for the product or service and then compare to the price being charged to the customers in customized reports (there are no standard reports for this field)
Multiply Flat x Qty - this option allows you to have a flat type of charge code that is multiplied by the Quantity entered into the transaction. If this field is blank (No) then the charge will be $5.00 regardless of the quantity entered in the transaction. If this field is ![]() (Yes) then the $5.00 will be multiplied by the quantity field when billed.
(Yes) then the $5.00 will be multiplied by the quantity field when billed.
Rate - a rate charge code requires a quantity and uses the quantity in the calculation of the total. Examples of rate charge codes:
Disposal charges (per ton, per yard, etc).
Recycling bag charges (per bag).
Tires (each).
Click on the Rate option to put a ![]() next to Rate. The following fields will be displayed.
next to Rate. The following fields will be displayed.
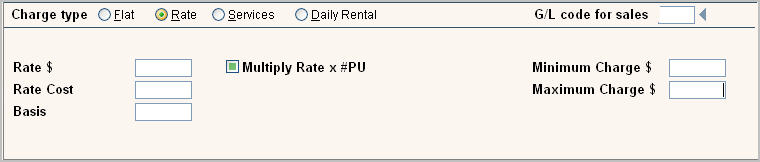
G/L code for sales - enter the abbreviated general ledger code for this charge code. Click on the ![]() to display a list of choices for G/L code.
to display a list of choices for G/L code.
Rate $ - enter the rate amount for the charge code with a decimal point.
Multiply Rate x #PU - this option allows you to multiply the rate (x quantity) X the #PU (number of pickups) on the services screen. For example: If you have a Rate$ of 10.00 on a service line with quantity of 5 and #PU of 2 and this field is blank (No), the charge will be $50.00 (rate x quantity). However, if this field is ![]() (Yes) the charge will be $100.00 (rate x quantity x #PU).
(Yes) the charge will be $100.00 (rate x quantity x #PU).
Rate Cost - will only be displayed if 'charge code costing' is activated in the system master. This can be used to enter a company's cost for the product or service and then compare to the price being charged to the customers in customized reports (there are no standard reports for this field)
Basis: used in conjunction with the quantity on the charge code entry. The basis will be subtracted from the quantity entered and the remaining quantity will be used to calculate the charge. This is often used for tonnage caps: up to 4 tons free, anything after 4 tons is billed at $65/ton. The basis is set up as 4.00 and the rate amount is 65.000.
Minimum Charge $: if using minimums, enter the flat minimum charge amount. If the calculated total of the rate amount times the quantity on the charge line does not meet the minimum amount, the minimum amount will be charged. Enter this amount with a decimal point. This does not work with negative amounts and is also not used in auto charges.
![]() You cannot have both a Minimum and a Basis. If both are entered on an account, the minimum amount will be ignored and only the Basis will be used.
You cannot have both a Minimum and a Basis. If both are entered on an account, the minimum amount will be ignored and only the Basis will be used.
Maximum Charge $: if using maximums, enter the flat maximum charge amount. If the calculated total of the rate amount times the quantity on the charge line is greater than the maximum charge $, then only the maximum will be charged. This does not work with negative amounts and is also not used in auto charges.
A service type of charge code is reserved for use on the Services/Bins screen only, and allows for the entry of a 'per pick up' standard/default amount. The system will then calculate the charge based on the number of pick ups. Examples of services types of charge codes:
2yd trash container picked up 2x/week.
4yd cardboard container picked up 1x/week.
Rental for a 42yd trash packer.
An inventory record for a 20yd open top roll off box.
Click on the Services option to put a ![]() next to Services. The following fields will be displayed.
next to Services. The following fields will be displayed.
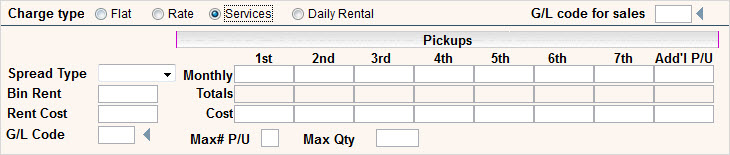
G/L code for sales - enter the abbreviated general ledger code for this charge code. Click on the ![]() to display a list of choices for G/L code.
to display a list of choices for G/L code.
Spread Type - There are 3 ways to enter a Spread Type of charge code.
Click here for detailed examples of each spread type.
Bin Rent - if you want to charge rent in addition to pick up amounts (for example $10 rent plus $25 per pick up), enter the rent portion in this field. However, this field will print separately as 'Container Rental' on a bill.
Rent Cost - will only be displayed if 'charge code costing' is activated in the system master. This can be used to enter a company's cost for the product or service and then compare to the price being charged to the customers in customized reports (there are no standard reports for this field).
G/L code - if using Bin Rent, enter the abbreviated general ledger code to use. Click on the ![]() to display a list of choices for G/L code.
to display a list of choices for G/L code.
Monthly - Enter the monthly amount for each pick up based on the Spread Type that you have selected above.
Totals - this is a display only field. The system will calculate the totals for each # of pick ups.
Cost - these fields are for costing each spread amount. They will only be displayed if 'charge code costing' is activated in the system master. This can be used to enter a company's cost for the product or service and then compare to the price being charged to the customers in customized reports (there are no standard reports for this field).
Max# P/U - This option is used with Pick-up Spread or Both Pick-up and Qty Type Spread codes. This will limit the number of pick-up days that can be entered into the Services screen in the ![]() field.
field.
Max Qty - This option is used with Quantity Spread or Both Pick-up and Qty Type Spread codes. This will limit the Quantity that can be entered into the Services screen in the ![]() field.
field.
Click on the Daily Rental option to put a ![]() next to Daily Rental. The following fields will be displayed.
next to Daily Rental. The following fields will be displayed.

G/L code for sales - if using Bin Rent, enter the abbreviated general ledger code for the rental portion of the charge$ amount only. Click on the ![]() to display a list of choices for G/L code.
to display a list of choices for G/L code.
Bin Rent - enter the daily charge to be used in calculating rent amount.
Cost - will only be displayed if 'charge code costing' is activated in the system master. This can be used to enter a company's cost for the product or service and then compare to the price being charged to the customers in customized reports (there are no standard reports for this field).
Daily rental amounts are calculated based on the following:
Delivery Date in the Services screen is compared to the # of days/months in the billing cycle to get the number of days.
The number of free days allowed in the Day Rent section in the middle of the Charge Code screen is subtracted from the # of days above.
The number of days remaining (after free days) are multiplied by the Bin Rent amount entered in the Charge code (or the override amount in the Services screen).
Click here for a complete description of how Daily Rental works.
A custom charge code is a combination of different "sub-charge" codes. This allows the entry of one charge code, but the system can separate it out to components for revenue tracking, taxes, etc.
Click on the Custom tab next to the standard tab on the top of the screen, ![]() the Custom Charge Code screen will be displayed.
the Custom Charge Code screen will be displayed.
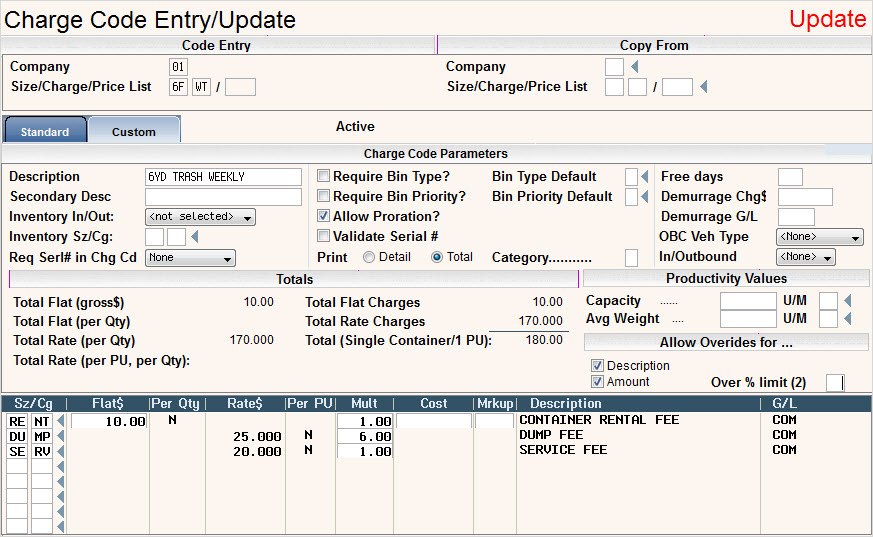
The Charge Code Parameters shown are the same as in a Standard charge Code except for the Print option in the center column.
In the Print Detail/Total section select one:
if Total, only one line item will print with the total of the charges. The custom code Description will be used when printed.
If Detail - all of the individual charge codes that make up the custom code will print.
On the bottom of the screen, enter charge codes to make up the Custom Charge Code. You can enter an unlimited amount. Once you fill in the screen with charge codes, you can page down (arrows will display) for another screen to fill in.
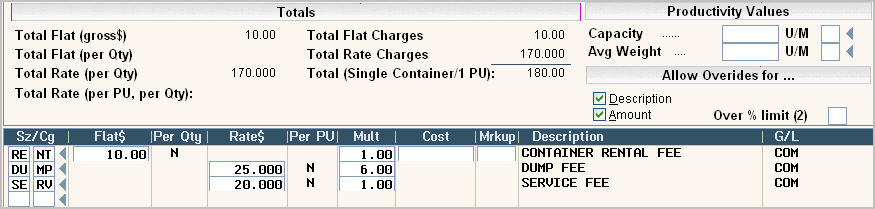
If the charge codes can be overridden, the amount entered for the charge will be divided out based on the proportions of the charge codes and their amounts entered.
Sz/Cg - Enter the Size/Charge code that you want to include in this custom code.
Flat$ - This is the price associated with any FLAT type Sz/Cg entered into the custom code. If the Sz/Cg entered is set to "Allow Override Amount = Yes", then you can enter an overridden $ amount into this field. If it's set to "Allow Override Amount = No", then the standard master file amount will default in and the field will not be accessible for update.
Per Qty - This field tells whether the FLAT type Sz/Cg is set to Multiply by Quantity. This data is defaulted in from the Sz/Cg entered and cannot be changed.
Rate$ - This is the price associated with any RATE type Sz/Cg entered into the custom code. If the Sz/Cg entered is set to "Allow Override Amount = Yes", then you can enter an overridden $ amount into this field. If it's set to "Allow Override Amount = No", then the standard master file amount will default in and the field will not be accessible for update.
A Custom Sz/Cg cannot include a RATE that is set up to use a basis.
Per PU - This field tells whether the RATE type Sz/Cg is set to Multiply by # of Pick Ups. This data is defaulted in from the Sz/Cg entered and cannot be changed.
Mult - This field allows you to set a quantity to multiply the amount by. This can be helpful when you have a fee that is billable by container size. Ex: You need to bill a special "waste permit fee" based on the size (in yards) of the container. You can create one Sz/Cg that you include in each custom code and just update the MULT field with the container size. 6 = 6 yard, 20 = 20 yards, 1.5 = 1.5 yard, etc.
Cost and Mrkup - these fields are used in conjunction with each other and can only be set up on a FLAT type Sz/Cg that is set as "Allow Override Amount = Yes". You can set up a cost, such as a special disposal fee, and designate a markup % to add to the cost. This will automatically calculate the FLAT$ for this Sz/Cg.
Once you have filled out the appropriate fields, click or press ![]() to accept. The system will display the message:
to accept. The system will display the message:
![]() . Click or press
. Click or press ![]() to accept the changes and return to the Charge Code Scan screen.
to accept the changes and return to the Charge Code Scan screen.