The Address Master is a feature that enables the user to type in an address, have it verified as a valid address in your service area (an option); then, based on the address, have information such as city, state, tax body, price list, charge codes and routing automatically filled in on the Customer's Profile.
![]() To activate this feature, you will need to define some settings in the Account Class Master.
To activate this feature, you will need to define some settings in the Account Class Master.
Address records are set up based on the account class (residential, commercial, etc), street name, street number range, odd/even/both sides of the street, city, zip code, etc. Addresses can either be entered one record at a time (which can be VERY time consuming) or you can have the system automatically create the address master records based on what currently exists in the Customer Profile screen. This is the 'Build New Addr Mstr from Cust File' (click to display documentation for this feature) option on the Operations Master Files menu.
From the System Administration menu, select the Master Files menu option.
From the Master Files menu, select the Operations Master Files menu (this can also be access from the Operations menu).
From the Operations Master Files menu, select the Address Master Entry/Update option. The Address Master Search or scan screen will be displayed depending on the settings in the system master record. We will begin with the search screen.
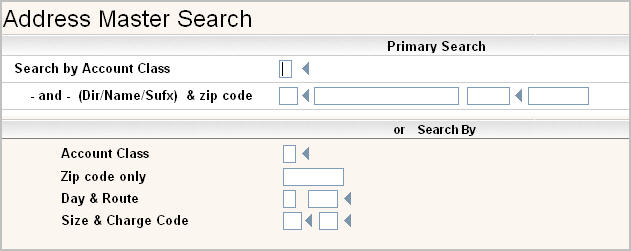
Enter a search option and click or press ![]() to continue and the Address Master Scan screen will be displayed. You MUST enter a valid Account Class on the search screen. The other search selections are optional but will help narrow down the results listed in the scan below.
to continue and the Address Master Scan screen will be displayed. You MUST enter a valid Account Class on the search screen. The other search selections are optional but will help narrow down the results listed in the scan below.
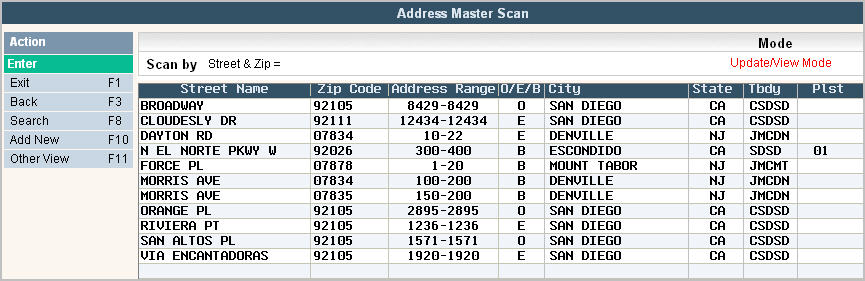
To make changes select the address range you want to update by double clicking on the line item, this will display the address in 'Inquiry' mode. In order to make any changes to the information, you must go in to 'update' mode by clicking ![]() or pressing F13 (shift + F1).
or pressing F13 (shift + F1).
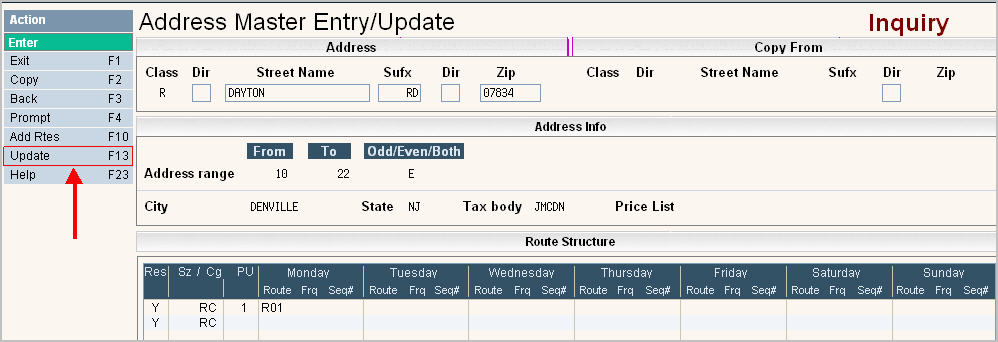
To modify any information in the 'Address Info' section, simply go to the field and make your changes. To modify any information in the 'Route Structure' section you will need to either highlight the line (with a single click and click the ![]() button on the bottom of the scree), or simply double click on the line you want to change. The services entry/update screen will be displayed (see below).
button on the bottom of the scree), or simply double click on the line you want to change. The services entry/update screen will be displayed (see below).
To add a service line/routing click ![]() or press F10. A blank services entry/update screen will be displayed.
or press F10. A blank services entry/update screen will be displayed.

Once you have made any changes click or press ![]() to accept.
to accept.
The system will give you a message ![]() . Click or press
. Click or press ![]() to accept the changes and return to the Address Master scan screen.
to accept the changes and return to the Address Master scan screen.
To delete a code: from the Address Master Scan screen select the code to update by double clicking on the line.
Once in the Entry/Update screen click or press ![]() . The system will display a confirmation message on the bottom of the screen:
. The system will display a confirmation message on the bottom of the screen: ![]() .
.
![]() There is NO UNDO button, once a code is deleted it is gone.
There is NO UNDO button, once a code is deleted it is gone.
Click or press ![]() to confirm deletion.
to confirm deletion.
To add a new code click or press ![]() and the Address Master Entry/Update screen will be displayed.
and the Address Master Entry/Update screen will be displayed.
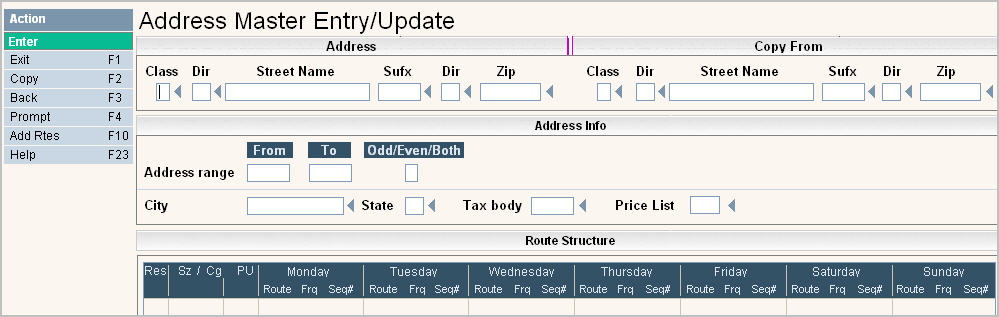
![]() Once you have at least 1 Address Master record, it is EXTREMELY helpful and saves time to use the Copy feature. To copy from an existing address, in the Copy From fields enter the Address fields to copy from. Click or press
Once you have at least 1 Address Master record, it is EXTREMELY helpful and saves time to use the Copy feature. To copy from an existing address, in the Copy From fields enter the Address fields to copy from. Click or press ![]() and the 'from' codes fields will be filled in. Make any changes necessary and click or press
and the 'from' codes fields will be filled in. Make any changes necessary and click or press ![]() to accept your entry.
to accept your entry.
You can use some or all of the fields for the street address - use the fields that apply to the address.
Class - enter the appropriate account class. Since routing for a residential customer might be different than for a commercial customer, even with the same address range, the account class MUST be specified. You can prompt on this field (press F4) to access the list of Account Classes.
Dir - enter the directional for the street if applicable (N, S, E, W, NE, NW, SE, SW).
Street Name - enter the name of the street.
Sufx - enter the suffix for the Street (ie: RD, ST, CIR, AVE, etc.)
Dir - enter a 2nd directional for the street if applicable (N, S, E, W, NE, NW, SE, SW). In some parts of the country street addresses have 2 directionals such as 1 N Main St SW.
Zip - enter the zip code for the address range.
Address Info:
Address range From_To_ - enter the street # range for the street and applicable routing.
Odd/Even/Both - enter O for odd side of the street, E for even side of the street, B for both sides.
City - enter the default City for the addresses
State - enter the default State for the addresses
Tax body - enter the tax body you want defaulted into the customers in this address range if applicable.
Price list - enter a price list you want to be defaulted into the customers in this city/address range if applicable.
Route Structure

Res - if this is considered a 'residential' type of service (sz/cg code) answer yes by clicking in the box ![]() , if not leave blank.
, if not leave blank.
Sz/Cg - if a size/charge code should be automatically defaulted, fill in with appropriate code. If services are different depending on what the customer selects (i.e. 36 gal, 64 gal, 95 gal, etc) leave these fields blank.
PU - the number of pick ups (corresponds to the number of routes entered). So if the address range for residential customers is only serviced on Tuesdays, the route would be entered on Tuesday and the PU field would = 1. The system will verify that the number entered in the PU field matches the number of routes entered.
Monday - Sunday
Go to the appropriate day (s) the addresses are pick up on and fill in the following information:
Route - enter the Route ID that services the area on that day (s). Click on the ![]() to display choices for this field.
to display choices for this field.
Frq - the pickup frequency field for the specific service/route for that day. Leave blank for a regular weekly pick up, cllick on the ![]() to display choices for this field. For example you might have a trash route that is picked up every week, a commingle (recycling) route that is picked up every other week (pay day weeks) and a yard waste (green waste) route that is also picked up every other week but on the NON pay day week. The FRQ field for the trash service line would be left blank, the FRQ field for the commingle service line could be a P (these codes are up to you) for 'pay day' and the FRQ field for the yard waste service line would be an 'N' for 'non pay day' week. These codes are created in the Route Pickup Frequency file and determined by your System Administrator.
to display choices for this field. For example you might have a trash route that is picked up every week, a commingle (recycling) route that is picked up every other week (pay day weeks) and a yard waste (green waste) route that is also picked up every other week but on the NON pay day week. The FRQ field for the trash service line would be left blank, the FRQ field for the commingle service line could be a P (these codes are up to you) for 'pay day' and the FRQ field for the yard waste service line would be an 'N' for 'non pay day' week. These codes are created in the Route Pickup Frequency file and determined by your System Administrator.
Seq# - the sequence number field. Since each stop/customer/service can have a unique sequence number, you would typically enter that in the Customer's Services screen and would leave this field blank. However, if you are in an area that is NOT competitive (you service everyone in a particular town or city for example) and pick up every stop, it is not efficient to assign a sequence # to each customer on that route for that day. In this case you can use 'block' sequencing so that 'section' of the route is assigned a sequence #. For example the driver services all stops on Maple Ave from 100-500 odd side of the road, then makes a right and services all stops on Elm St (100-300) odd side of the road; you could assign 100-500 'O' for odd side of the street with a sequence # of 10, then for 100-300 'O' odd side assign a sequence # of 20. All new stops/customers would then get the appropriate sequence # automatically. This helps make routing changes A LOT easier and quicker, since you can 'move' a whole section of a route by sequence number. It also gives the driver a guide as to what order the route should be completed.
Make your entries for the screen and click or press ![]() to continue.
to continue.
The system will give you a message ![]() . Click or press
. Click or press ![]() to accept the changes and return to the Address Master scan screen.
to accept the changes and return to the Address Master scan screen.
When completed with all addresses, click or press ![]() to exit and return to the Operations Master Files menu.
to exit and return to the Operations Master Files menu.