The Accounts Receivable (A/R) history screen provides an 'at a glance' summary of the receivables history for a Customer. From the Customer Profile screen, click on the ![]() or press F2.
or press F2.
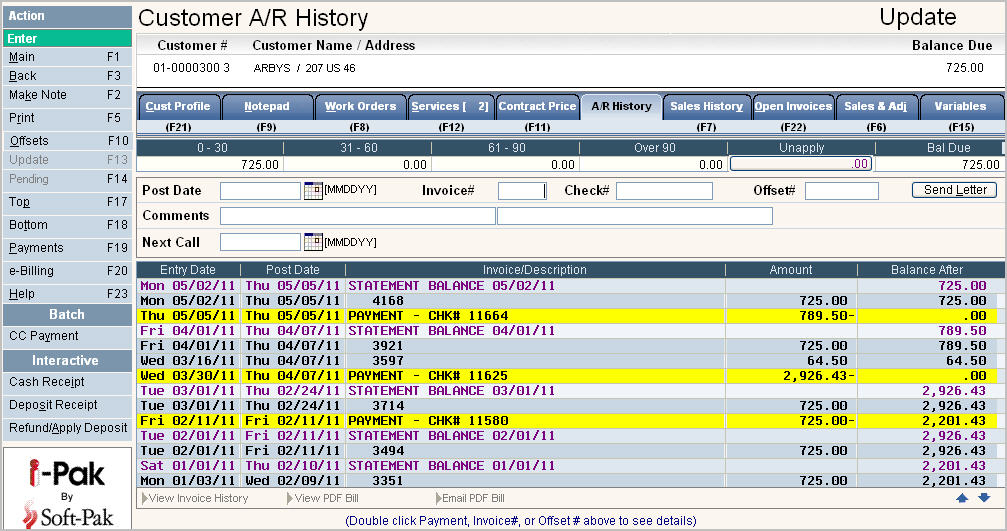
A summary review of activity for an account:
Payments are displayed in Yellow
Statements are displayed in Purple
Charges, Credits and Invoices are displayed in black
Activity is displayed from newest, to oldest, activity date. You can position the scan to a specific POST date by entering the Post Date into the Post Date field ![]() at the top of the screen.
at the top of the screen.
Displays Aging Bucket amounts to show how much is current verses past due.
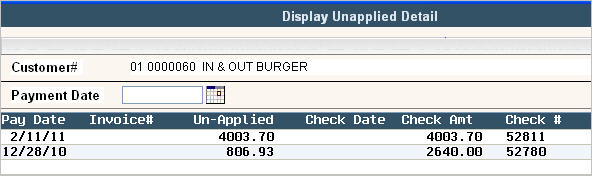
It also displays how much is currently in Unapplied (for any O/I and O/S accounts) and allows you to quickly view what payments make up the Unapplied amount.
Click on the unapplied bucket ![]() and the Display Unapplied Detail screen will appear.
and the Display Unapplied Detail screen will appear.
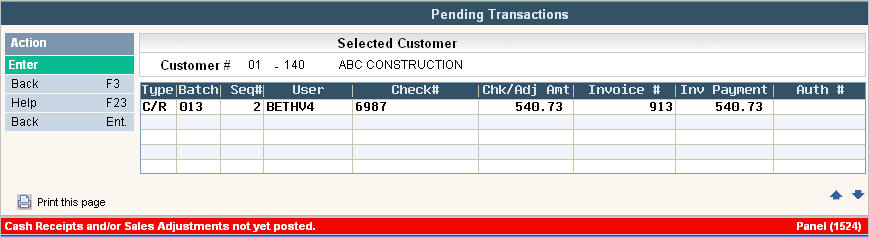
Displays ![]() at the top of the screen if there are financial transaction pending. Click on
at the top of the screen if there are financial transaction pending. Click on ![]() or
or ![]() , or press F14 (shift + F2) to display the pending screen - this is very helpful to see if a payment is 'in process' or when reviewing credit limits and balances to see what charges may be 'in process'.
, or press F14 (shift + F2) to display the pending screen - this is very helpful to see if a payment is 'in process' or when reviewing credit limits and balances to see what charges may be 'in process'.
Display payments in detail on one screen.
Look up check history - to see what invoices were paid with a certain check number (not available for Balance Forward Customers).
Look up Invoice history - what check or checks were applied.
Email a PDF Bill (Statement or Invoice)
See Offset Sale records that have been marked to not print on a bill.
Enter a Call back for follow up at a future date.
Process 'batch' credit card payments via the internet (using the Authorize.net interface - please call Support Services for additional information on how to activate this feature).
Process 'interactive' payments (customer walk ins) for immediate processing and receipts for customers.
Display 'e-Billing' notification information.
The system can display a screen listing payments only. This is extremely helpful when assisting a customer find a missed payment. Click or press ![]() . The Display Payments screen will be displayed.
. The Display Payments screen will be displayed.

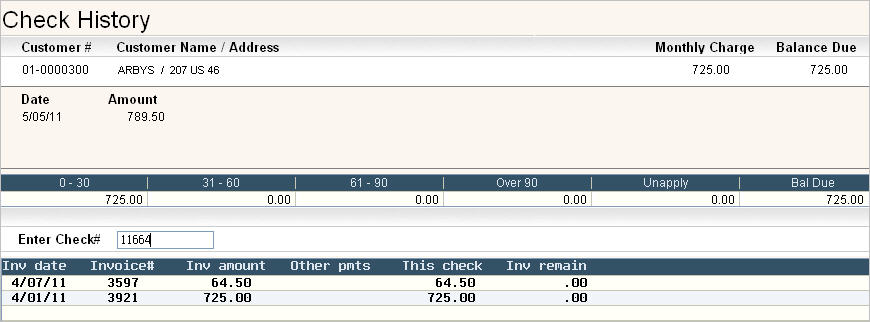
To display the Invoices a specific check paid, you can double click on the check number -

OR
Go to the Check# ![]() field and type the check # (the check # may be the word 'CASH', VISA, etc - whatever you see in the A/R History screen), Click or press
field and type the check # (the check # may be the word 'CASH', VISA, etc - whatever you see in the A/R History screen), Click or press ![]() , the Check History screen will be displayed.
, the Check History screen will be displayed.
![]() The Check # field will NOT be displayed if the customer is Balance Forward since Check History is only available for Open Item (O/I), Open Statement (O/S) and Open Accounting (O/A) type customers.
The Check # field will NOT be displayed if the customer is Balance Forward since Check History is only available for Open Item (O/I), Open Statement (O/S) and Open Accounting (O/A) type customers.
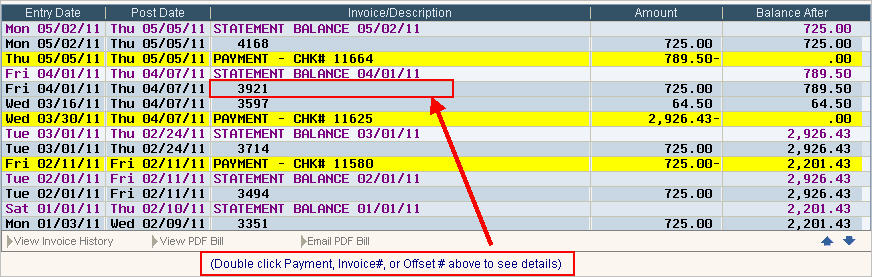
To determine what checks paid a particular invoice you can double click on the invoice number -
OR
Go to the Invoice # ![]() field and type in the invoice number and click or press
field and type in the invoice number and click or press ![]() OR highlight the line and click on
OR highlight the line and click on ![]() and the Invoice History screen will be displayed.
and the Invoice History screen will be displayed.
![]() The Invoice # field will NOT be displayed if the customer is Balance Forward since Invoice History is only available for Open Item (O/I), Open Statement (O/S) and Open Accounting (O/A) type customers..
The Invoice # field will NOT be displayed if the customer is Balance Forward since Invoice History is only available for Open Item (O/I), Open Statement (O/S) and Open Accounting (O/A) type customers..
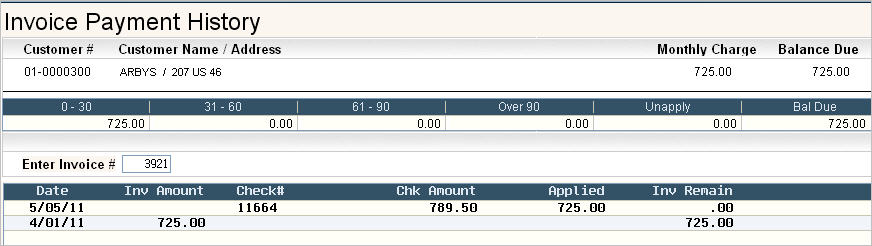
From the Invoice Payment History screen (above), click or press ![]() to Display the Invoice.
to Display the Invoice.
From the A/R History screen, you can highlight an invoice line and click on ![]() to see an actual Invoice in PDF format.
to see an actual Invoice in PDF format.
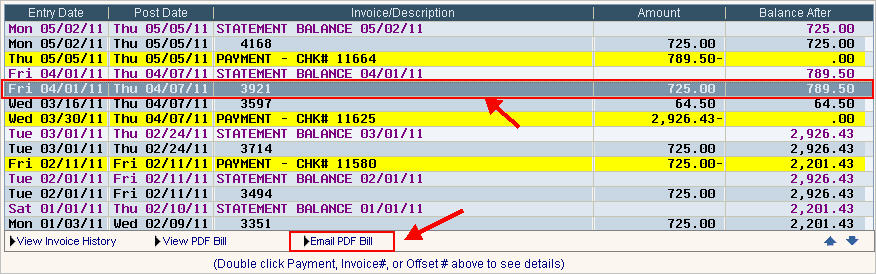
From the A/R History screen, you can highlight an invoice or statement line and click on ![]() to email an actual bill (Statement or Invoice) in PDF format.
to email an actual bill (Statement or Invoice) in PDF format.
![]() This is an add on module. Please contact our sales department at 888-763-8725 for more information. If you do not have this activated, then the option below would display as
This is an add on module. Please contact our sales department at 888-763-8725 for more information. If you do not have this activated, then the option below would display as ![]() .
.
When you select the line and click on ![]() the following screen will appear asking for the email address to send the bill to.
the following screen will appear asking for the email address to send the bill to.
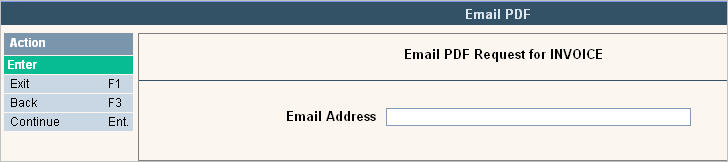
Enter the email address and select ![]() or
or ![]() . The following message should appear:
. The following message should appear:

You can press ![]() to clear this screen. An internet browser should be open with the following message:
to clear this screen. An internet browser should be open with the following message:
![]()
The customer will get an email with the PDF bill attached. The "from" email address, subject line and body of the email are all configured when you set up PDF billing on your system.
From the Sales History screen you have the option to Mark Offset sale records that you don't want to appear on the customers bill. These are sale records that you may have billed incorrectly and created a reversing S&A to offset the incorrect charge. When you process a Mark Offset transaction, the system will mark each record with an Offset Control # that can be referenced from the A/R history screen. This will show you exactly what was included in the Mark Offset transaction.
From the A/R History screen, select ![]() . A screen will be displayed that shows all of the Offset Transactions that have been posted to the account.
. A screen will be displayed that shows all of the Offset Transactions that have been posted to the account.
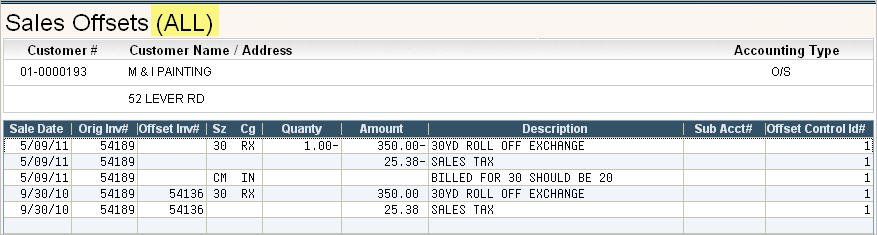
It includes the Offset Control # so you can see which records were grouped together in each Offset transaction.
If you want to view a single Offset transaction, enter the Offset Control # into the ![]() field and hit
field and hit ![]() and the Sales Offset screen will be displayed for just that Control #.
and the Sales Offset screen will be displayed for just that Control #.

Used as a reminder to call a customer in the future (corresponds to the Call Back Report).

In the Comments section, type in a comment that helps you identify what the follow up call needs to reference.
In the Next Call field enter the date you want to follow up on.
Click or press ![]() to accept.
to accept.
Click or press ![]() to add the comment to the Notepad (for tracking purposes). You will get a message on the bottom of the screen:
to add the comment to the Notepad (for tracking purposes). You will get a message on the bottom of the screen: ![]() Be careful not to click on
Be careful not to click on ![]() multiple times because a note will be added each time you click on the option. The default notepad code for the note is A/R.
multiple times because a note will be added each time you click on the option. The default notepad code for the note is A/R.
Click or press the ![]() button, the print request screen will be displayed.
button, the print request screen will be displayed.
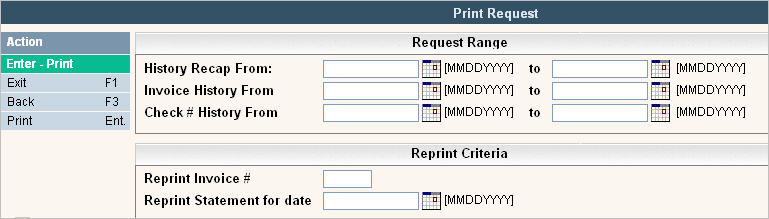
To print a History recap - enter the date range you want: ![]()
To print a Invoice History - enter the date range you want: ![]()
To print a Check # History - enter the date range you want: ![]()
![]() Invoice and Check History reports cannot be generated on Balance Forward (B/F) type customers. It is intended for Open Item (O/I), Open Statement (O/S) and Open Accounting (O/A) type customers only.
Invoice and Check History reports cannot be generated on Balance Forward (B/F) type customers. It is intended for Open Item (O/I), Open Statement (O/S) and Open Accounting (O/A) type customers only.
To reprint an Invoice # - type in the Invoice number: ![]()
To reprint a Statement - enter the date for the Statement: ![]()
Once one of the options has been filled out, click or press ![]() and the system will print your selection.
and the system will print your selection.
![]()
![]() - If your company accepts credit cards and you are authorized to take on-line credit card payments, then you should see this option on your screen. When selected, you will be brought into the charge card processing screen.
- If your company accepts credit cards and you are authorized to take on-line credit card payments, then you should see this option on your screen. When selected, you will be brought into the charge card processing screen.
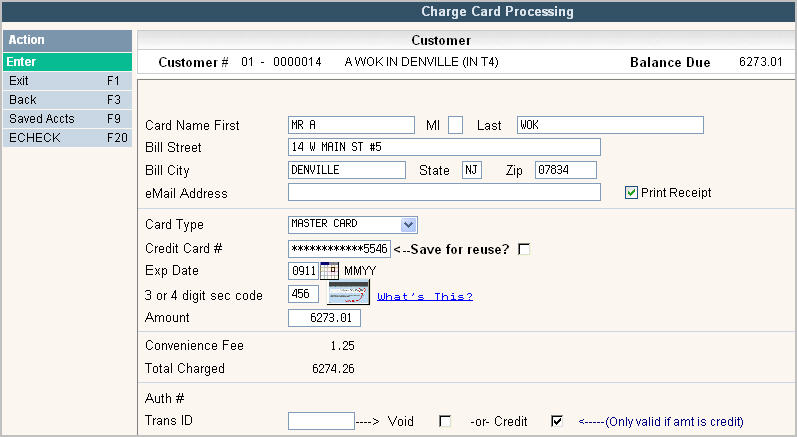
The Card Name and Address will default into the name and address fields from the Secure Information tab but can be overridden if necessary.
The receipt can be emailed if you enter an email address into the eMail address field when processing the payment.
Check ![]() Print Receipt if you want a printed receipt to be generated when the payment is processed.
Print Receipt if you want a printed receipt to be generated when the payment is processed.
The card type, credit card #, exp date can be manually entered, or can be set up to automatically default in from the Secured Information screen. Contact support at [email protected] if you would like the credit card information to default in. i-Pak will display the valid card types based on the entries in the Credit Card Master file.
The 3 or 4 digit security code must always be manually entered for PCI Compliance.
The Amount field is where you enter the total amount the customer is authorizing you to deduct from his credit card to be applied to his account.
The Convenience Fee and Total Charged fields are displayed if your company master has an amount and GL code set up in the Payment Fee's section. Click here to see the credit card set up information from the accounting tab in the company master. The Convenience Fee is a fee you determine that can be automatically applied to each credit card transaction you perform. The amount is posted to the GL code found in the company master and entered as a Miscellaneous Cash Receipt on your Cash Batch. The Total Charged is the total of the Amount plus the Convenience Fee.
The Auth # is the authorization # that the credit card company will send back to you once the credit card has been approved.
The Trans ID is a number attached to the credit card payment that must be entered if you need to Void (remove a charge to the credit card that has not been processed by your credit card company) or Credit (put a negative charge on the credit card to offset the amount that was previously posted.) The Transaction ID can be found in the A/R history screen if posted.
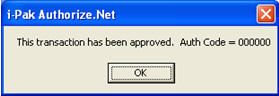
After entering all the correct information, press ![]() and the icon for the credit card agency you are using will display. Here is an example if you are using Authorize.net:
and the icon for the credit card agency you are using will display. Here is an example if you are using Authorize.net:
![]()
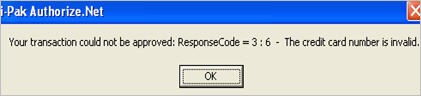
Click on the icon to validate. If approved, an authorization number will be sent back letting i-Pak know that the transaction was successful. ***Note: Depending on how your Company Authorize.Net record is setup, you will either get this pop up showing the Authorization Code, or it will just print on the receipt.
If there was a problem, the interface will prompt you with a message describing the problem.
Example Error Message:
If you do get an authorization number, i-Pak will store the Authorization number and transaction Id. If this is a B/F customer, after the payment is authorized, you will be brought back into the A/R history screen. If this is an O/I or O/S customer, you will be brought into the Open Item Batch Entry screen where you can select which invoices to apply the payment to. For all accounting types, the payment will remain in the Batch until posted by an authorized user. The Batch id will start with an * and created with the User ID set up in the Company Master Credit Card Batch User Id field.
![]() A User must have Cash Receipt (on-line) security of 2 or 4 as well as Charge Card Option = Active-Get Auth#, or Manual Auth# in order to see this option.
A User must have Cash Receipt (on-line) security of 2 or 4 as well as Charge Card Option = Active-Get Auth#, or Manual Auth# in order to see this option.
![]()
When you click on the Cash Receipt ![]() option under the Interactive section, the On-Line Cash Receipt Entry/Post screen will appear.
option under the Interactive section, the On-Line Cash Receipt Entry/Post screen will appear.
![]() A User must have Cash Receipt (on-line) security of 3 or 4 to see this option.
A User must have Cash Receipt (on-line) security of 3 or 4 to see this option.
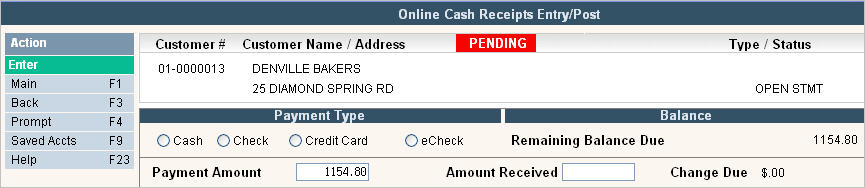
From this screen you can post an interactive payment directly onto the customers accounts. The screen will display the Customer #, Customer/Billing Name and Service Address, and what Accounting Type this account is listed as. The ![]() icon will display if any pending Cash Receipts or Sales & Adjustement batches exist for this customer.
icon will display if any pending Cash Receipts or Sales & Adjustement batches exist for this customer.
The customers Remaining Balance Due (including any unposted PENDING transactions) is displayed for reference and is defaulted into the Payment Amount field. The Payment Amount can be changed if the customer chooses to pay a different amount.
Payment Type:
Cash: If accepting a CASH transaction, this is the only information you will see on the screen.
Check: If accepting a CHECK transaction, the following additional fields will appear on your screen:
Credit Card: If accepting a CREDIT CARD transaction, the process will work just like the BATCH CC PAYMENT option described above. The only difference is that the payment will be posted immediately instead of being entered into a Batch to Post at a later time.
![]() The Convenience Fee (aka Payment Fee) is only shown and posted during BATCH credit card transactions. It will not get processed when using Interactive Credit Card payments.
The Convenience Fee (aka Payment Fee) is only shown and posted during BATCH credit card transactions. It will not get processed when using Interactive Credit Card payments.
E-Check: If accepting an eCHECK transaction, the following additional fields will appear on your screen:

Check Name First, MI, Last - will default in from the Customer Billing Name information.
eMail Address - enter an email address you want the receipt to be sent to. Leave blank for no email.
Print Receipt - if ![]() then you will get a printed receipt in your spool file.
then you will get a printed receipt in your spool file.
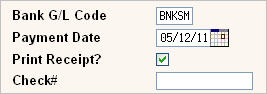
Bank Name - Enter the Bank Name from which funds will be drawn from.
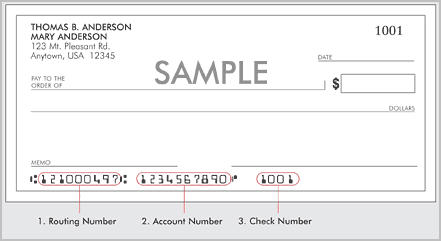
Routing Number - Enter the Routing Number for the bank.
Account# - Enter the Customers Bank Account #.
Check Type - Select either "checking" or "savings" for the type.
Bank G/L Code - this will default in from the Company master (or System Master if you allow Multiple Companies in one batch) but can be overridden if needed.
Check# - leave the Check# field blank for eChecks.
Payment Date - will default to today's date, but can also be overridden if needed.
Amount - Enter the Amount the Customer wants applied to his account at this time. This is the same as the Payment Amount. When you update one field, the other will automatically be updated to match it.
When you press ![]() you should see the authorization icon from the company you process eChecks with. Click on the icon to verify.
you should see the authorization icon from the company you process eChecks with. Click on the icon to verify.
If this is a B/F customer, when you press ![]() you will immediately get the message:
you will immediately get the message:![]() . If this is an O/I or O/S account, when you press
. If this is an O/I or O/S account, when you press ![]() you will be brought into the Open Item Batch Entry screen where you can select which invoices to apply the payment to. When finished applying the payment, press
you will be brought into the Open Item Batch Entry screen where you can select which invoices to apply the payment to. When finished applying the payment, press ![]() and you will be brought back into the On-Line Cash Receipt Entry/Post screen get the message:
and you will be brought back into the On-Line Cash Receipt Entry/Post screen get the message: ![]() . Click or press
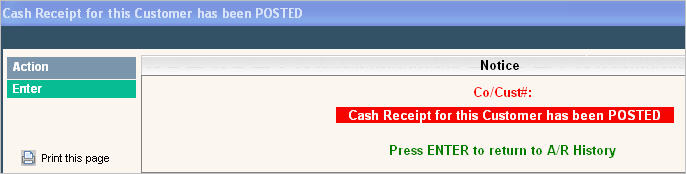
. Click or press ![]() to Post the payment to the customers account. You will receive the following message on your screen once the Post is successful.
to Post the payment to the customers account. You will receive the following message on your screen once the Post is successful.
Refundable deposits are deposits received that do NOT affect accounts receivable – they are not ‘pre pays’ or ‘cod payments’ or payments for roll carts. They are similar to security deposits and may be refunded or applied to a customers balance at a future point in time (i.e. when they cancel, if there is damage to a cart/container, or if the skip without paying).
The Interactive Deposit Receipt screen looks very similar to the screens documented above for Interactive Cash Receipts.
When you click on the Deposit Receipt ![]() option under the Interactive section, the On-Line Deposit Entry/Post screen will appear.
option under the Interactive section, the On-Line Deposit Entry/Post screen will appear.
![]() A User must have Deposit Receipts security of 3 or 4 to see this option.
A User must have Deposit Receipts security of 3 or 4 to see this option.
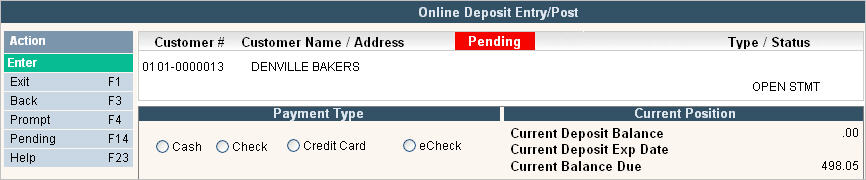
The Customers Current Deposit Information will be displayed on the screen. This information comes from the Additional Information Tab.
Payment Types
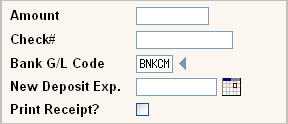
Cash: If accepting a CASH transaction, the following information will be displayed on your screen:
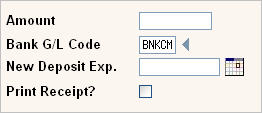
Amount - enter the amount to be deposited.
Bank G/L Code - this will default in from the Company master (or System Master if you allow Multiple Companies in one batch) but can be overridden if needed.
New Deposit Exp. - enter an expiration date if applicable. This is not a mandatory field.
Print Receipt? - if ![]() then you will get a printed receipt in your spool file.
then you will get a printed receipt in your spool file.
When you fill in the correct information and hit ![]() , you will get the message
, you will get the message ![]() . Click or press
. Click or press ![]() and the Deposit will be posted to the account. You will see the message
and the Deposit will be posted to the account. You will see the message ![]() at the bottom of your screen and there should be a new A/R history record showing the Deposit Amount. The Deposit amount, Date received and Expiration Date are held in the Additional Information tab.
at the bottom of your screen and there should be a new A/R history record showing the Deposit Amount. The Deposit amount, Date received and Expiration Date are held in the Additional Information tab.
Check: If accepting a Check transaction, the following information will be displayed on your screen:
Amount - enter the amount to be deposited.
Check# - enter the check # associated with the deposit received.
Bank G/L Code - this will default in from the Company master (or System Master if you allow Multiple Companies in one batch) but can be overridden if needed.
New Deposit Exp. - enter an expiration date if applicable. This is not a mandatory field.
Print Receipt? - if ![]() then you will get a printed receipt in your spool file.
then you will get a printed receipt in your spool file.
When you fill in the correct information and hit ![]() , you will get the message
, you will get the message ![]() . Click or press
. Click or press ![]() and the Deposit will be posted to the account. You will see the message
and the Deposit will be posted to the account. You will see the message ![]() at the bottom of your screen and there should be a new A/R history record showing the Deposit Amount. The Deposit amount, Date received and Expiration Date are held in the Additional Information tab.
at the bottom of your screen and there should be a new A/R history record showing the Deposit Amount. The Deposit amount, Date received and Expiration Date are held in the Additional Information tab.
Credit Card: See CC Payments above
ECheck: See EChecks above
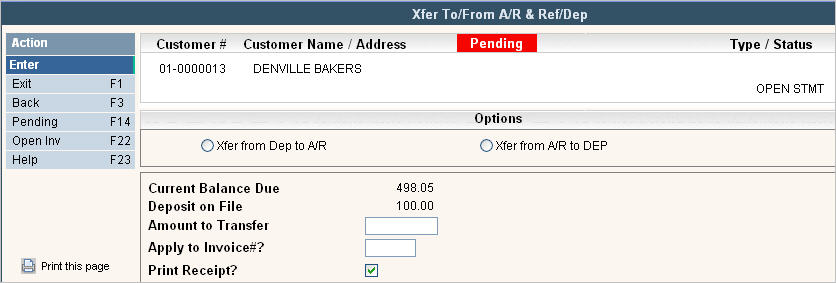
This option allows you to either Transfer (Xfer) a Current Deposit into A/R or Transfer Money from A/R into a Deposit. The screen will tell you the Current Balance Due for this customer as well as how much they have in their Additional Information tab as a Deposit Balance.
Xfer from Dep to A/R:
Amount to Transfer: Enter the amount of the Deposit you want to transfer.
Apply to Invoice#: You can select to apply the deposit directly to an invoice #. Click on ![]() to see a list of Open Invoices for this customer if they are an O/S or O/I customer. If they are B/F then this field will not display.
to see a list of Open Invoices for this customer if they are an O/S or O/I customer. If they are B/F then this field will not display.
Print Receipt? if ![]() then you will get a printed receipt in your spool file.
then you will get a printed receipt in your spool file.
Click ![]() and you will get the message
and you will get the message ![]() . Click or press
. Click or press ![]() to Post. You should see the message
to Post. You should see the message ![]() on the bottom of your screen and an additional A/R history record should be created with the description "Refundable Deposit TRF". The Deposit amount should be removed from the Additional Information tab as well and a Sales & Adjustment will have posted using the Size/Chg & GL codes set up in the Company Master.
on the bottom of your screen and an additional A/R history record should be created with the description "Refundable Deposit TRF". The Deposit amount should be removed from the Additional Information tab as well and a Sales & Adjustment will have posted using the Size/Chg & GL codes set up in the Company Master.
![]() If this is an O/S customer and you left the invoice# field blank, then you will get the message
If this is an O/S customer and you left the invoice# field blank, then you will get the message ![]() and you won't see the additional A/R history record. You can view the data in the Sales History screen.
and you won't see the additional A/R history record. You can view the data in the Sales History screen.
Xfer from A/R to Dep:
Amount to Transfer: Enter the amount you want to transfer from A/R into a Deposit.
Apply to Invoice#: You can select to take the deposit directly from an invoice #. Click on ![]() to see a list of Open Invoices for this customer if they are an O/S or O/I customer. If they are B/F then this field will not display.
to see a list of Open Invoices for this customer if they are an O/S or O/I customer. If they are B/F then this field will not display.
Print Receipt? if ![]() then you will get a printed receipt in your spool file.
then you will get a printed receipt in your spool file.
Click ![]() and you will get the message
and you will get the message ![]() . Click or press
. Click or press ![]() to Post. You should see the message
to Post. You should see the message ![]() and the deposit will be updated with the new amount. The A/R history screen will have a new record showing "Refundable Deposit TRF" and a Sales & Adjustment will have posted using the Size/Chg & GL codes set up in the Company Master.
and the deposit will be updated with the new amount. The A/R history screen will have a new record showing "Refundable Deposit TRF" and a Sales & Adjustment will have posted using the Size/Chg & GL codes set up in the Company Master.
![]() If this is an O/S customer and you left the invoice# field blank, then you will get the message
If this is an O/S customer and you left the invoice# field blank, then you will get the message ![]() and you won't see the additional A/R history record. You can view the data in the Sales History screen.
and you won't see the additional A/R history record. You can view the data in the Sales History screen.