The Tax Body Master is used by the system to generate taxes and fees (county, state, federal, etc) on all transactions involving the use of charge codes (such as Sales & Adjustments, Work Orders, Auto Charges and Prorations).
If you do not tax your customers, the Tax Body can be used to identify a geographic location for reporting purposes. The benefit here is that the tax body is recorded in all transactions (sales & receipts), therefore you can report information such as Total sales, Gross Receipts, Total number and type of container by area for property tax, etc.
The Tax Body Master file is actually composed of 2 components. A Tax Body which is entered on each Customer Profile, and the Tax Class which is required in all charge codes. 'Taxation' takes place when these 2 components are combined. A customer may be Taxable or Tax Exempt, and services (charge codes) can be taxable or non taxable (or other combinations). A customer is tax exempt when they are in an area that is normally taxable, but their type of business is considered tax exempt (such as Churches, Government agencies, Brokers, etc). In your area, certain services might be taxable (trash pick up, recycling pick up, etc) where other services are not (Insufficient funds charges, disposal, etc). The Tax Body Master provides for flexibility - it can be set up very simply or it can be set up a little more complicated, it all depends on your environment.
![]() Before a combined Tax Body/Tax Class record can be created, the 2 master components MUST be created.
Before a combined Tax Body/Tax Class record can be created, the 2 master components MUST be created.
![]() If you want the system to require that all customers have a valid Tax Body (a good idea to ensure accurate and consistent data entry), be sure to answer Yes (
If you want the system to require that all customers have a valid Tax Body (a good idea to ensure accurate and consistent data entry), be sure to answer Yes (![]() ) to
'Force Tax Body' in the Company Master File.
) to
'Force Tax Body' in the Company Master File.
![]() It is a good idea to plan out or draw a chart of tax possibilities that will help make the entry of the Tax Bodies and Tax Classes easier.
It is a good idea to plan out or draw a chart of tax possibilities that will help make the entry of the Tax Bodies and Tax Classes easier.
For example:
Your company is located in New Jersey and you provide service in both New Jersey and Pennsylvania. New Jersey charges tax on service, but Pennsylvania does not. However, you DO need to pay a property tax on your containers located in Pennsylvania. Taxes in both states have to be reported by county and by city.
There are 6 characters in the Tax Body field, so we will set up the Tax Bodies as follows:
|
1st Character |
State ID |
J = New Jersey P = Pennsylvania |
|
2nd & 3rd Character |
County ID |
MC = Morris County (NJ) WC = Warren County (NJ) LC = Lehigh County (PA) |
|
4th & 5th Character |
City or Town |
DN = Denville (Morris County) BT = Blairstown (Warren County) BH = Bethlehem (Lehigh County) |
|
6th Character |
Taxable or Exempt |
Blank = taxable X = exempt |
This naming convention provides an easy way to report on in the future.
For the Tax Class - some services are taxable and others are non-taxable, so we will set up the Tax Classes as follows:
NT = non taxable
TX = taxable
Combination records - for each Tax Body I create I should have 2 combination records - 1 with a class of NT (which will be blank) and 1 with a class of TX which will be taxable.
From the System Administration menu, select Master Files.
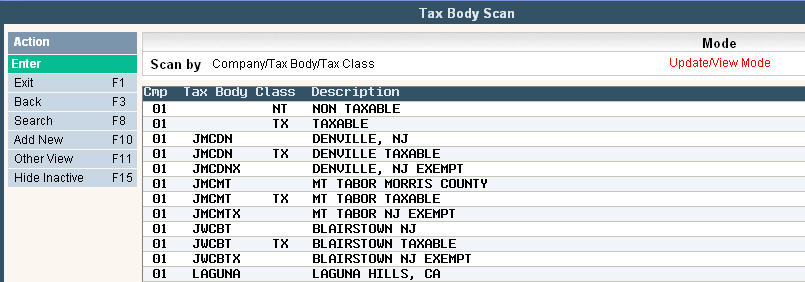
From the Master Files menu, select Tax Body. Either the Tax Body search screen or scan screen will be displayed depending on the settings in the system master record. We will begin with the search screen.
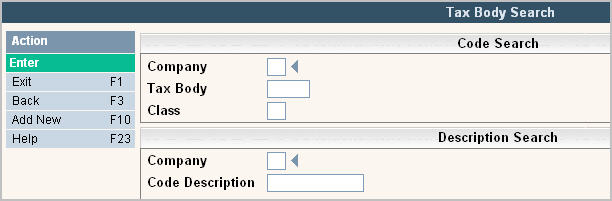
To search, use either the code search or description search. You can type in just a company id and press enter and the system will display the Tax Body scan screen.
![]() Before making changes or deleting any codes, you may want to print screen your codes or print a listing using the Master File Listing option. Since the Tax Body file affects financial information, you might want to have a copy of your codes 'before' any changes.
Before making changes or deleting any codes, you may want to print screen your codes or print a listing using the Master File Listing option. Since the Tax Body file affects financial information, you might want to have a copy of your codes 'before' any changes.
To make changes select the one you want to update by double clicking on the line item. Click or press ![]() to make any necessary changes.
to make any necessary changes.
Once you have made any changes click or press ![]() to accept. The system will display the following message:
to accept. The system will display the following message:
![]() . Click or press
. Click or press ![]() to accept the changes and return to the Tax Body Scan screen.
to accept the changes and return to the Tax Body Scan screen.
![]() If you need to delete a code, verify that the code is NO LONGER USED anywhere in the system. Check your charge codes to ensure tax classes are no longer used, and run a Variable Customer report to ensure the tax body is no longer used.
If you need to delete a code, verify that the code is NO LONGER USED anywhere in the system. Check your charge codes to ensure tax classes are no longer used, and run a Variable Customer report to ensure the tax body is no longer used.
Instead of deleting your Tax Body codes or Classes, you can now opt to mark them inactive. This is useful when you don't want to delete a code, but wish to stop your users from updating any accounts with these records.
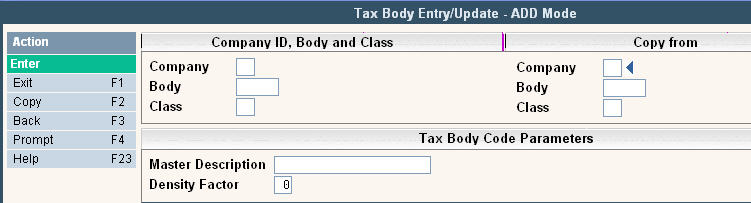
To add a new code click or press ![]() and the Tax Body Entry/Update screen will be displayed.
and the Tax Body Entry/Update screen will be displayed.
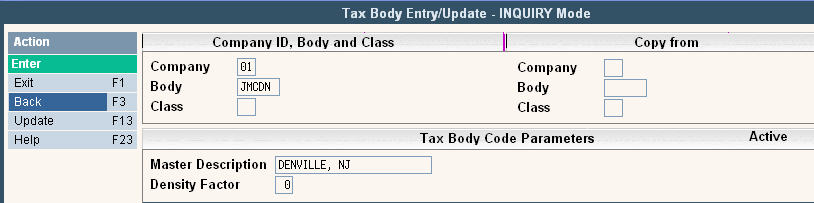
In the Company field enter your company ID.
In the Body field enter the Tax Body code.
In the Class field, leave blank when entering the Tax Body only.
In the Master Description, enter the description for the Tax Body.
![]() It is easiest for users to search with the City in the first section of the Description since some users may not know which county a city or town is located in.
It is easiest for users to search with the City in the first section of the Description since some users may not know which county a city or town is located in.
The Density Factor field is used in Route Costing and Route Allocation (if Material Allocation is set to Yes ![]() in the Company Master), when Routes are more dense in certain areas (Tax Bodies). For example, a City Tax Body would have more stops than a Rural Tax Body, but the City is more dense and takes less time & mileage between stops than the Rural area. So the City Tax Body might be 5 times more dense than the Rural Tax Body; therefore the City density factor would be 1 and the Rural density factor would be 5. The Density Factor helps to 'even the field' when allocating time and mileage to the tax bodies. This number is determined by your company's Operations Manager.
in the Company Master), when Routes are more dense in certain areas (Tax Bodies). For example, a City Tax Body would have more stops than a Rural Tax Body, but the City is more dense and takes less time & mileage between stops than the Rural area. So the City Tax Body might be 5 times more dense than the Rural Tax Body; therefore the City density factor would be 1 and the Rural density factor would be 5. The Density Factor helps to 'even the field' when allocating time and mileage to the tax bodies. This number is determined by your company's Operations Manager.
If this situation does not apply, leave this field 0.
Once you have filled out the appropriate fields, click or press ![]() to accept. The system will display the following message:
to accept. The system will display the following message:
![]() . Click or press
. Click or press ![]() to accept the changes and return to the Tax Body Scan screen.
to accept the changes and return to the Tax Body Scan screen.
Once you have created all your Tax Body records, you can create the Tax Class records.
To add a new code click or press ![]() and the Tax Body Entry/Update screen will be displayed.
and the Tax Body Entry/Update screen will be displayed.
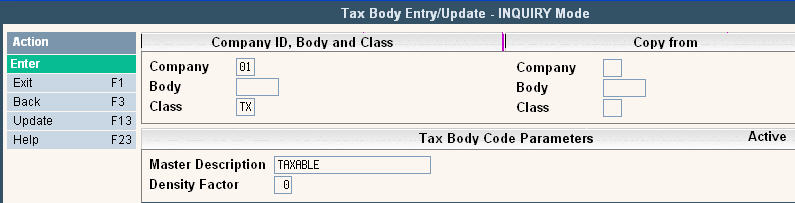
In the Company field enter your company ID.
In the Body field, leave blank when entering the Tax Class only.
In the Class field enter the 2 character tax class code.
In the Master Description, enter the description for the Tax Class.
In the Density Factor field, leave blank as this pertains to the Tax Body not the Tax Class.
Once you have filled out the appropriate fields, click or press ![]() to accept. The system will display the following message:
to accept. The system will display the following message:
![]() . Click or press
. Click or press ![]() to accept the changes and return to the Tax Body scan screen.
to accept the changes and return to the Tax Body scan screen.
Once you have created all your Tax Body and Tax Class records, you can create your Combined Tax Body/Tax Class records.
To add a new code click or press ![]() and the Tax Body Entry/Update screen will be displayed.
and the Tax Body Entry/Update screen will be displayed.
In the Company field enter your company ID.
In the Body field, enter a tax body that has already been created.
In the Class field enter the 2 character tax class code that has already been created.
![]() Once you have at least 1 combined Tax Body/Tax Class record, it is EXTREMELY helpful and saves time to use the Copy feature. To copy from an existing code, in the Copy From fields enter the Company ID, Tax Body and Tax Class to copy from. Click or press
Once you have at least 1 combined Tax Body/Tax Class record, it is EXTREMELY helpful and saves time to use the Copy feature. To copy from an existing code, in the Copy From fields enter the Company ID, Tax Body and Tax Class to copy from. Click or press ![]() and the 'from' codes fields will be filled in. Make any changes necessary and click or press
and the 'from' codes fields will be filled in. Make any changes necessary and click or press ![]() to accept your entry, the screen will then display 5 lines for taxation details (see below).
to accept your entry, the screen will then display 5 lines for taxation details (see below).
In the Master Description, enter the description for the combined Tax Body/Tax Class record. Typically this will be the name of the town with the tax class. For example Tax Body = Denville, Tax Class = TX: the combined record description will be Denville NJ TX. This is the description that prints on the Tax Reports during the Month End.
In the Density Factor field, leave blank as this pertains to the Tax Body not the combined records.
Once you have filled out the above fields, click or press ![]() to accept. The system will display 5 lines for taxation details.
to accept. The system will display 5 lines for taxation details.
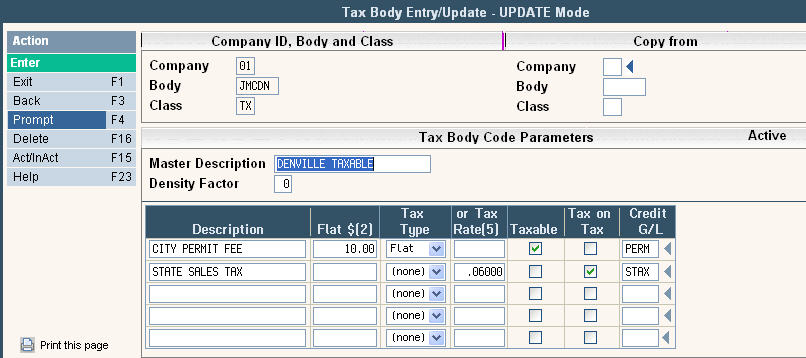
You can have up to 5 different tax lines for each tax body/tax class combined record, and they can be a combination of types. For example, you might have a $10 flat fee to have a container in a city. In addition, there can be a 6% sales tax on both the $10 fee and the actual charge.
Description - enter the description for each line of taxes/fees. This is the description that will be printed on a customers bill. For tax printing options, please contact Support Services at 800-860-4327.
Flat - A flat tax is not a percentage, it is a flat amount that can be set up 3 different ways based on the Tax Type. Type the flat amount in this field with a decimal point and select the appropriate Tax Type. If the tax is a percentage of the charge amount, use the Tax Rate field.
Tax Type - Click on the ![]() for choices of
for choices of ![]() .
.
Flat:a flat type amount is billed along with each taxable charge code. It is not multiplied by anything else. It can also NOT be partially prorated. If prorations are done, the full flat tax will be assessed.
Qty: a quantity type amount will get multiplied by the quantity field. For charge codes entered in the Services/Bin screen, the quantity is equal to the number of pickups multiplied by the quantity on the services/bin line - that amount is then multiplied by the amount entered in the Flat amount field in the Tax Body/Class.
Rate: a rate type amount is similar to a Quantity except for spread (services/bin) type charge codes. The rate amount will only be multiplied by the quantity on the services/bin line and not the number of pickups.
Weight: this field is not used.
Tax Rate - enter the percentage amount to multiply by the charge amount. Enter the number with a decimal point. For example, a 6% tax is entered as .06000. If the charge amount is $100 the tax calculated will be $6.00.
Taxable - click in the box for yes ![]() leave blank for no. This field determines which taxes listed are also taxable. For example: if you have a City Permit Fee entered in the Tax Body/Tax Class and it is taxable, this field should be yes
leave blank for no. This field determines which taxes listed are also taxable. For example: if you have a City Permit Fee entered in the Tax Body/Tax Class and it is taxable, this field should be yes ![]() .
.
Tax on Tax - click in the box for yes ![]() leave blank for no. This field determines which taxes to assess to the taxes checked yes
leave blank for no. This field determines which taxes to assess to the taxes checked yes ![]() in the taxable column.
in the taxable column.
![]() Taxable is not taxable on itself and only applies to taxes listed below it; therefore ORDER of taxes is important if doing 'tax on tax'.
Taxable is not taxable on itself and only applies to taxes listed below it; therefore ORDER of taxes is important if doing 'tax on tax'.
![]() Line 1 does not matter whether it is tax on tax yes or no because there is nothing else to tax on above it.
Line 1 does not matter whether it is tax on tax yes or no because there is nothing else to tax on above it.
Click here for samples of how Taxable and Tax on Tax work.
Credit G/L - This is the general ledger code the tax line should be posted to. This can be different for each tax line.
Once you have filled out the appropriate fields, click or press ![]() to accept. The system will give you a message
to accept. The system will give you a message ![]() . Click or press
. Click or press ![]() to accept the changes and return to the Tax Body scan screen.
to accept the changes and return to the Tax Body scan screen.