The Route Master contains the Route ID's for your company. Customers and services are 'routed' using a Route ID and route lists are generated based on the Route ID. All stops with the same day and route will print on the same 'Route List'. In addition, the description of the route that prints on top of the Route list is defined in the Route Master.
The Route Master also controls whether or not a Driver's Log file is created for the Route when work orders are 'dispatched' on the On Line Dispatching screen or Work Order Entry/Update Screen.
![]() It is a good idea to plan out or draw a chart of possible route codes so that the entry of Routes is easier and quicker.
It is a good idea to plan out or draw a chart of possible route codes so that the entry of Routes is easier and quicker.
Routes can be a section of town picked up by one truck, a couple of towns picked up by one truck, a Roll Off Truck or a default or generic code. Sometimes companies will use the Vehicle ID as the Route ID for Roll Off Routes where Front Load or Residential routes are a letter and number. It is important however to enter some type of Route Code instead of leaving the Route field blank - in many cases the Route Code can not be left blank. In addition, it is Not necessary to imbed the Day in the Route ID as this is a separate field in the i-Pak system (Vehicle ID and Driver ID are separate fields as well).
Examples of Routes:
F01 - front load trash route 01
R02 - rear load trash route 02
Y01 - recycling route 01
C01 - container delivery route 01
501 - Roll off route 501
Z1 - Roll off generic Zone 1 (West of the City)
![]() When creating your routes, it is best to keep the same first character the same for similar routes. This makes reporting and user searching quick and easy.
When creating your routes, it is best to keep the same first character the same for similar routes. This makes reporting and user searching quick and easy.
From the System Administration menu, select the Master Files option.
From the Master Files menu, select the Operations Master Files Menu (this option can also be accessed from the Operations Menu).
From the Operations Master Files Menu select Route. Either the Route Code search screen or scan screen will be displayed depending on the settings in the system master record. We will begin with the search screen.
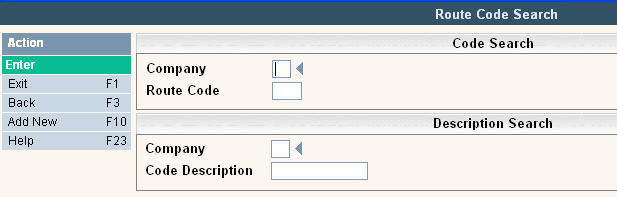
To search, use either the Code search or Description search. You can type in just a company id and press enter and the system will display the Route Code Scan screen. Select the one you want to view by double clicking on the line item.

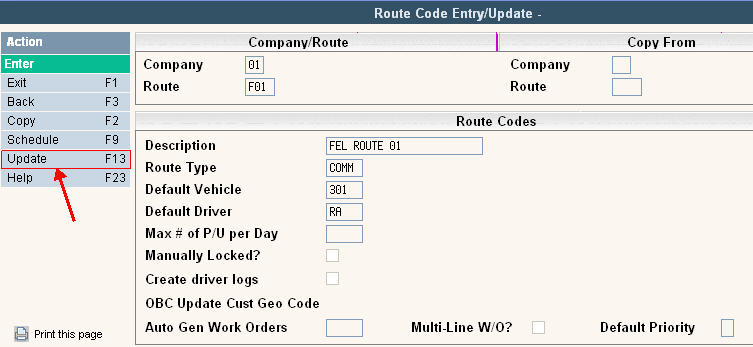
To make changes select the one you want to update by double clicking on the line item. This will display the code in 'Inquiry' mode. In order to make any changes to the information, you must go into 'update' mode by clicking ![]() or pressing F13 (shift + F1).
or pressing F13 (shift + F1).
Once you have made any changes click or press ![]() to accept. The system will give you a message
to accept. The system will give you a message ![]() . Click or press
. Click or press ![]() to accept the changes and return to the Route Code Scan screen.
to accept the changes and return to the Route Code Scan screen.
To delete a code: from the Route Code Scan screen select the code to update by double clicking on the line.
Once in the Entry/Update screen click or press ![]() . The system will display a confirmation message on the bottom of the screen:
. The system will display a confirmation message on the bottom of the screen: ![]() .
.
![]() There is NO UNDO button, once a code is deleted it is gone. Click or press
There is NO UNDO button, once a code is deleted it is gone. Click or press ![]() to confirm deletion.
to confirm deletion.
Instead of deleting your Route Codes, you can now opt to mark them inactive. This is useful when you don't want to delete a code, but wish to stop your users from updating any accounts with these records.
![]() You cannot delete or mark a Route inactive if any of the following are true:
You cannot delete or mark a Route inactive if any of the following are true:
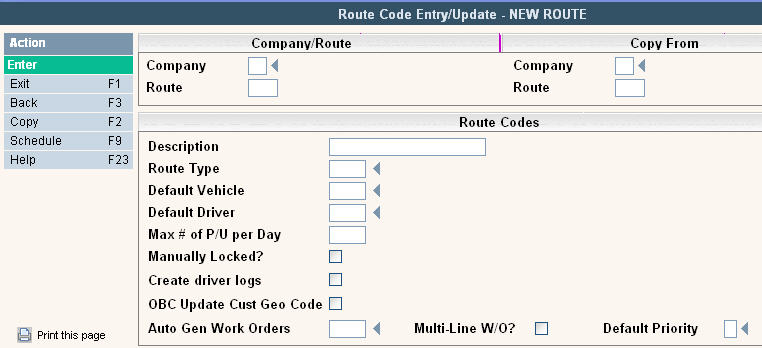
To add a new Route Code click or press ![]() and the Route Code Entry/Update screen will be displayed.
and the Route Code Entry/Update screen will be displayed.
In the Company field enter your company ID.
In the Route enter the Route Id (up to 4 characters)
In the Description enter the description for the Route.
In the Route Type field, type the appropriate route type to group the route code in with other similar routes. You can click on the ![]() or press F4 to display your choices. Many reports and route list selection screens can utilize the route type to make selection of routes easier and quicker.
or press F4 to display your choices. Many reports and route list selection screens can utilize the route type to make selection of routes easier and quicker.
Default Vehicle - this field can be used to automatically fill in a 'default' vehicle that is typically used for this Route. This makes data entry quicker when entering Route Costing and Driver's Logs. This field can be overridden. If you wan to use a Default Vehicle, enter the Vehicle ID (from the Vehicle Master) or click on the ![]() to display your choices. In order to use a Vehicle ID, it has to be defined in the Vehicle Master.
to display your choices. In order to use a Vehicle ID, it has to be defined in the Vehicle Master.
Default Driver - this field can be used to automatically fill in a 'default' driver that is typically used for this Route. This makes data entry quicker when entering Route Costing and Driver's Logs. This field can be overridden. If you wan to use a Default Driver, enter the Driver ID (from the Driver Master) or click on the ![]() to display your choices. In order to use a Driver ID, it has to be defined in the Driver Master.
to display your choices. In order to use a Driver ID, it has to be defined in the Driver Master.
![]() If your routes have different drivers or vehicles depending on the day, you can use the 'schedule' feature and set up multiple defaults. Simply click the
If your routes have different drivers or vehicles depending on the day, you can use the 'schedule' feature and set up multiple defaults. Simply click the ![]() button or press F9 to display the schedule window.
button or press F9 to display the schedule window.
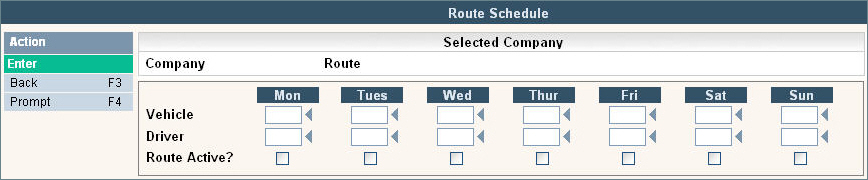
For each day of the week (or selected days of the week) enter the appropriate default vehicle and driver code, and indicate if the route is active ![]() or inactive
or inactive ![]() . If a route is not active on that particular day, a customer cannot be routed for that route list or work order for that day.
. If a route is not active on that particular day, a customer cannot be routed for that route list or work order for that day.
Max # of P/U per Day - this field is used with the 'Route Locking' feature. This feature allows you to set the maximum number of pickups per Day for this Route (for areas where # of stops must be limited for city, or union regulations). Please Contact Support Services at 1-800-860-4327 to activate this feature.
Manually Locked? - this field is used with the 'Route Locking' feature. This feature allows you to manually lock the route so that no more stops can be added (for areas where # of stops must be limited for city or union regulations). Please Contact Support Services at 1-800-860-4327 to activate this feature.
Create drivers logs - Do you want to be able to create Driver's logs for this Route (typically set to Y for Roll off Routes). Answer Yes ![]() or leave blank
or leave blank ![]() for no.
for no.
OBC Update Cust Geo Code - This field will only display if you have Mobile-Pak installed on your system. It allows you to select whether you want the customers Geo Code information to be updated by the OBC for this route. Answer Yes ![]() or leave blank
or leave blank ![]() for no.
for no.
Automatic (scheduled or calendar) work orders
The system has the ability to automatically generate work orders for a specific day and specific route, IF the route is set up to do so AND the customer's services screen is set up appropriately. This is extremely helpful when scheduling roll off loads that occur at a particular frequency, and you NEED to have a work order (to be signed, to bill, to have weights, to go through Scale-Pak, etc.). For example, a grocery store that has a compactor and has to be picked up every Wed, or every Monday and Friday, or every 4 days, or once a month on Saturday, etc.).
In addition, this feature can be used for 'commercial' type stops (front load, rear load, etc) where the customer requires a work order (or is billed by actual number of pick-ups or yards entered on the work order), but is part of a 'regularly scheduled route' on a route list.
Click here to see how to set up automatic scheduled work order generation (aka - set day/route).
Click here to see how to set up automatic calendar work order generation (aka - every x number of days).
The following three fields all pertain to automatically generated work orders:
Auto Gen Work Orders - enter the appropriate code (listed below) for if and how work orders will be automatically generated for this route. ![]() These are Route Type codes and must be set up in the Route Type master in order to be selected.
These are Route Type codes and must be set up in the Route Type master in order to be selected.
|
Code |
What it Does |
|
WONOR |
Creates a work order with a status of 'New'. Does not print a Route List. Requires the entry of 3rd miscellaneous charge code so ALL customers & services with this code will generate a work order (or work orders if the quantity is greater than 1). |
|
WONOP |
Creates a work order with a status of 'Work Order Printed'. Does not print a Route List. Requires the entry of 3rd miscellaneous charge code so ALL customers & services with this code will generate a work order (or work orders if the quantity is greater than 1). |
|
WOPRT |
Creates a work order with a status of 'New' AND. Prints a Route List. Requires the entry of 3rd miscellaneous charge code so ALL customers & services with this code will generate a work order (or work orders if the quantity is greater than 1). |
|
WORTE |
Creates a work order with a status of 'New' AND. Prints on a Route List. Does NOT require the entry of a 3rd miscellaneous charge code; if one exists a work order is generated, if one does not exist the stop will only print on a route list. If the quantity on the services/bin line is greater than 1, you have the option of generating ONLY 1 work order. This option must be activated by the support department. This allows the user to then manually enter the number of containers/cans/yards picked up at the site when closing the work order. |
Multi-Line W/O? - This field is used in conjunction with 'auto gen work orders' and allows for the automatic entry of multiple detail lines in a work orders. For example, a roll off container that when exchanged needs to also have an additional handling fee (or driver instructions) added to the work order - like a tarp added, or liner added, or compactor pull out fee, etc.
Enter Yes ![]() to create multiple lines in the work order.
to create multiple lines in the work order.
Leave blank ![]() for 'no' do not create multiple (additional) lines in the work order.
for 'no' do not create multiple (additional) lines in the work order.
Up to 3 lines can be created on a work order. The first is the original 'action' line - 30 RX=30yd exchange or 42 TH=42yd trash packer haul. The other 2 are determined by the other miscellaneous charge codes from the services screen bin line.
The sz portion of the sz/cg code on the services bin line is ALWAYS used as the sz portion of the sz/cg code in the detail line of the work order. For the cg portion of the sz/cg code for the work order, the system works from 'right to left'.
The 3rd miscellaneous charge code is always used for the 1st detail line in auto gen work orders (regardless of the multi-line w/o field).
The 2nd miscellaneous charge code is used for the 2nd detail line on the work order (if multi-line w/o = yes)
The 1st miscellaneous charge code is used for the 1st detail line on the work order (if multi-line w/o = yes and the 2nd miscellaneous charge code has been filled in).
Default Priority - This field is used in conjunction with 'auto gen work orders'. If you want to have a priority code automatically defaulted in to the work order when it is generated, enter the code here (you can click on the ![]() to see your options for priority codes). For example, you may want to have an 'A' entered because the customer needs an 'am' pick up, or a '1' if they always have to be serviced first.
to see your options for priority codes). For example, you may want to have an 'A' entered because the customer needs an 'am' pick up, or a '1' if they always have to be serviced first.
![]() When using Auto Generation of work orders, the priority code can default in from 3 different places.
When using Auto Generation of work orders, the priority code can default in from 3 different places.
If the Services screen has a priority code, it will be defaulted in.
If no priority on Services, then the priority code from the route master will default into work orders.
If no priority in the route master, then we use the Cycle Code to default in a priority.
Once you have filled out the appropriate fields, click or press ![]() to accept. The system will give you a message
to accept. The system will give you a message ![]() . Click or press
. Click or press ![]() to accept the changes and return to the Route Code Scan screen.
to accept the changes and return to the Route Code Scan screen.