Work orders take the place of writing a 'service ticket' for a customer. They are action items that are given to the driver in addition to a normal scheduled route list (for residential and commercial) or in place of a route list (for roll off). They are entered on the Customer's account, dated for the day the service is to take place, and may be set up with an amount to charge the customer for the service (these amounts do not have to print on a physical work order to the driver).
Once created, work orders can then be printed for the driver as individual tickets or as a list of work orders for that route for that day called a log. They may also be displayed in On Line Dispatching and called out to the driver. When the Work Orders come back from the drivers and noted as 'done', they are completed through Toggling or Driver's Logs. Once the work orders are posted, the charges appear on the customer's' accounts.
From the Customer Profile screen, click on the ![]() (this will display in red if there are active work orders - work orders that have not been posted yet). The Work Order scan will be displayed.
(this will display in red if there are active work orders - work orders that have not been posted yet). The Work Order scan will be displayed.
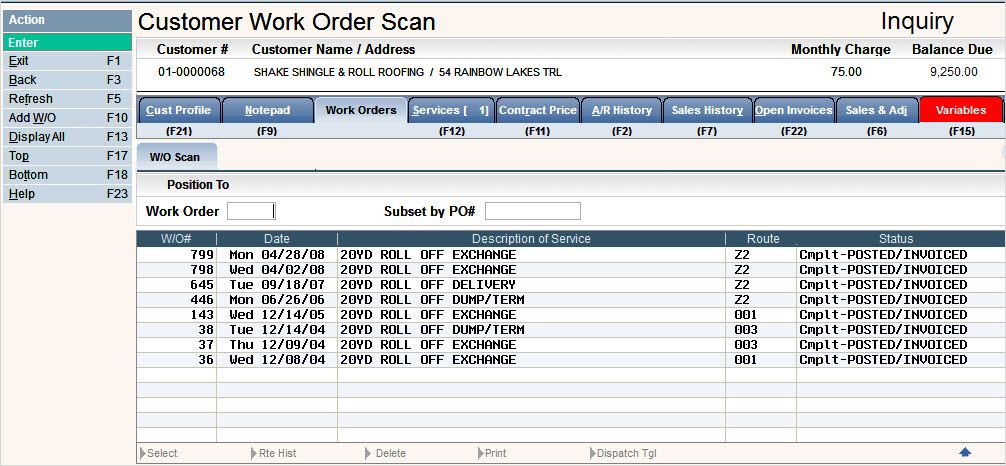
The Work Order Scan screen is designed as an overview of work orders that are on the customer's account. The screen displays the work orders in date order with the most current on the top. Each work order is displayed with the Work Order number (W/O#), the action Date of the work order, the first line item description from the work order, the work order Route and the Status.
|
Status of Work Orders |
|
New - work order has not been printed yet |
|
W/O Printed - the work order has been printed |
|
Post/Invoice Pending - the work order has been 'toggled' |
|
Complete--Posted/Invoiced - the work order has been posted |
|
Complete--Printed - the work order was printed and marked complete right away. This happens when the work order is printed without a sz/cg entered. It's a way to print work order notes for drivers and not have to toggle/post them for invoicing. |
To access an existing or past work order, simply double click the line of the work order and the Work Order Entry/Update screen will be displayed.
 If you have several pages of work orders, but know the work order #, you can enter it in to the Position To Work order field and that work order will be put at the top of the scan list.
![]() If you only want to display work orders associated with a certain PO#, you can enter the purchase order number into the Subset by PO# field. Only the work orders that have that matching PO# entered in to the work order header will be displayed in the work order scan.
If you only want to display work orders associated with a certain PO#, you can enter the purchase order number into the Subset by PO# field. Only the work orders that have that matching PO# entered in to the work order header will be displayed in the work order scan.
To create a New work order, click on the ![]() button or press F10. The Work Order Entry/Update screen will be displayed.
button or press F10. The Work Order Entry/Update screen will be displayed.
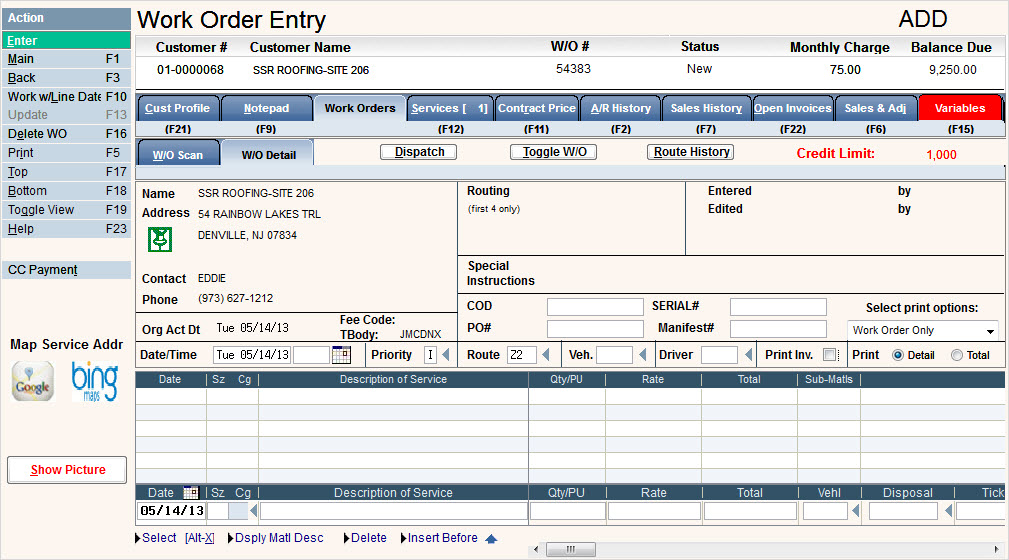
Your cursor will begin at the field that is set up in your user id in i-Pak Security. This is called the Work Order default cursor position. Depending on the fields you fill in, you might want you cursor to start at Action Date, User 1, etc. (these are most common). See your System Administrator to change.
If the customer requires purchase order numbers PER work order, enter the number in the ![]() field. This can be a required field if set to yes on the Additional Information tab in the Customer Profile screen.
field. This can be a required field if set to yes on the Additional Information tab in the Customer Profile screen.
The ![]() is used for a manifest number when doing an 'outbound' or hazardous material work order.
is used for a manifest number when doing an 'outbound' or hazardous material work order.
The ![]() fields are set up in the Cycle Master. They are called User1 and User2 and you can define them as whatever field name fits your companies needs. You can use these fields for additional information such as 'caller, cod?, serial #, etc'. If filled in, they will print on the Work Order. In addition, if User 1 is set up as COD and COD or C.O.D. is typed in the field, the work order pricing will print on the work order, even if the User is set to Print $ on WO = No in User Security. This is useful when the driver needs to pick up a payment.
fields are set up in the Cycle Master. They are called User1 and User2 and you can define them as whatever field name fits your companies needs. You can use these fields for additional information such as 'caller, cod?, serial #, etc'. If filled in, they will print on the Work Order. In addition, if User 1 is set up as COD and COD or C.O.D. is typed in the field, the work order pricing will print on the work order, even if the User is set to Print $ on WO = No in User Security. This is useful when the driver needs to pick up a payment.
![]() You can define a customer as C.O.D. in the Additional Information tab. If that field is checked Yes
You can define a customer as C.O.D. in the Additional Information tab. If that field is checked Yes ![]() , then C.O.D will automatically be populated into the User1 field of any work order that is created for that account. This happens regardless of what you define User1 to be in the Cycle master.
, then C.O.D will automatically be populated into the User1 field of any work order that is created for that account. This happens regardless of what you define User1 to be in the Cycle master.
The Org Act Date (Original Action Date) ![]() will default to whatever action date the work order is originally created for. It can be updated by changing the Action Date field before you hit enter to save the new work order. Once you hit enter, and your User ID is updated in the Entered By field, the Org Act Date cannot be changed.
will default to whatever action date the work order is originally created for. It can be updated by changing the Action Date field before you hit enter to save the new work order. Once you hit enter, and your User ID is updated in the Entered By field, the Org Act Date cannot be changed.
The Fee Code: will default from the customer profile and print on the work order header.
The TBody: will also default from the customer profile and print on the work order header.
The Action Date or date the service is to take place is entered in the ![]() field. You can enter the date as a number without the '/' or use the calendar icon to select the date. If this is a residential customer, the date will be defaulted to their next normal day of service (pulled from the first line service on their Services tab).
field. You can enter the date as a number without the '/' or use the calendar icon to select the date. If this is a residential customer, the date will be defaulted to their next normal day of service (pulled from the first line service on their Services tab).
![]() All work order printing is based on the Action Date.
All work order printing is based on the Action Date.
The second box is for the Action Time. If a specific time was promised to the customer, you can enter that here (in military time). This field can also be used in On Line Dispatching to sequence the work orders in the order they should be done. Only numbers 1-59 are allowed in this field for sequencing.
The Priority field ![]() is use for specific user define priority codes. You can click on the
is use for specific user define priority codes. You can click on the ![]() to display a list of options for your environment. Examples include 'A' for am, 'P' for pm, 1 for high priority, etc. Many times the priority codes are used more in On Line Dispatching (to indicate a carry over from the previous day, a COD work order, etc).
to display a list of options for your environment. Examples include 'A' for am, 'P' for pm, 1 for high priority, etc. Many times the priority codes are used more in On Line Dispatching (to indicate a carry over from the previous day, a COD work order, etc).
The Route field ![]() is used to assign the work order to a particular route. This field can be defaulted from the Customer Profile W/O Route. Click on the
is used to assign the work order to a particular route. This field can be defaulted from the Customer Profile W/O Route. Click on the ![]() to display a list of options. If this is a residential customer, the route will be defaulted to the 1st Route on the Services tab. It is Important to put something in this field - even if it is 'generic' route code (since the actual route may be unknown at the time the Work Order is created). Leaving this field blank may cause the work order to be missed in the Printing selection.
to display a list of options. If this is a residential customer, the route will be defaulted to the 1st Route on the Services tab. It is Important to put something in this field - even if it is 'generic' route code (since the actual route may be unknown at the time the Work Order is created). Leaving this field blank may cause the work order to be missed in the Printing selection.
The Vehicle ![]() and Driver
and Driver ![]() fields may default in based on the Route entered (if the route is set up with default vehicle and driver); however, you may not know what vehicle and driver are going to be used - you can leave these fields blank. Type in a Vehicle and Driver for the work order if known. Click on the
fields may default in based on the Route entered (if the route is set up with default vehicle and driver); however, you may not know what vehicle and driver are going to be used - you can leave these fields blank. Type in a Vehicle and Driver for the work order if known. Click on the ![]() to display a list of options for your environment.
to display a list of options for your environment.
The Print Invoice field ![]() is used for Balance Forward and Open Item customers only and is defaulted based on settings in the Cycle Master. If answered Yes
is used for Balance Forward and Open Item customers only and is defaulted based on settings in the Cycle Master. If answered Yes ![]() , an Invoice will be generated when the work orders are posted. If left blank, the work order will be posted and show on the statement at the end of the month. For Summary Invoice (O/S) customers, this field must be left blank.
, an Invoice will be generated when the work orders are posted. If left blank, the work order will be posted and show on the statement at the end of the month. For Summary Invoice (O/S) customers, this field must be left blank.
The Print Detail or Total field ![]() refers to pricing on the work order. If you have multiple lines entered in the work order, do you want the price to print in detail for each line, or summarized as a total at the bottom of the work order?
refers to pricing on the work order. If you have multiple lines entered in the work order, do you want the price to print in detail for each line, or summarized as a total at the bottom of the work order?
Once the 'header' fields are filled in, click or press ![]() , and your cursor will be positioned on the first line item - in the Size and Charge code field. If the Action Date above was changed, the first line item Date will change to match the Action Date.
, and your cursor will be positioned on the first line item - in the Size and Charge code field. If the Action Date above was changed, the first line item Date will change to match the Action Date.
The line item Date field ![]() should typically match the Action Date field. This is the field that will be printed on the customer's bill for each line item. The Company Master, Customer Service tab, W/O line date option determines whether this field defaults in the action date or system (current) date on each line.
should typically match the Action Date field. This is the field that will be printed on the customer's bill for each line item. The Company Master, Customer Service tab, W/O line date option determines whether this field defaults in the action date or system (current) date on each line.
In the Size and Charge code field ![]() enter the charge code for the service to be performed (30yd haul and return, new start, etc). Click on the
enter the charge code for the service to be performed (30yd haul and return, new start, etc). Click on the ![]() to display a list of options for your environment.
to display a list of options for your environment.
In the Description field ![]() , you can type a specific description for the line item, or use the default description from the Charge Code Master. The default description is filled in when you click or press
, you can type a specific description for the line item, or use the default description from the Charge Code Master. The default description is filled in when you click or press ![]() , or if you select the Sz/Cg code from the pop up selection list.
, or if you select the Sz/Cg code from the pop up selection list.
In the Quantity field ![]() enter the quantity for this service or leave it blank. If the charge code is defined as a 'rate' or 'flat multiplied by qty' charge code, the quantity will multiply by the rate or flat to calculate the total. If the charge code is defined as a 'flat' only, the quantity will have no effect on the total.
enter the quantity for this service or leave it blank. If the charge code is defined as a 'rate' or 'flat multiplied by qty' charge code, the quantity will multiply by the rate or flat to calculate the total. If the charge code is defined as a 'flat' only, the quantity will have no effect on the total.
In the Rate field ![]() , enter the rate amount if the charge code is defined as a 'rate' charge code. If the charge code is defined as a 'flat' charge code, leave this field blank (the charge amount for the service is entered in the total field).
, enter the rate amount if the charge code is defined as a 'rate' charge code. If the charge code is defined as a 'flat' charge code, leave this field blank (the charge amount for the service is entered in the total field).
In the Total field ![]() , enter the charge amount for the service if the charge code is defined as a 'flat'. If the charge code is a 'flat multiplied by qty', then leave this field blank to default in the master file price x qty. If the charge code is defined as a 'rate', the system will calculate the total (quantity x rate).
, enter the charge amount for the service if the charge code is defined as a 'flat'. If the charge code is a 'flat multiplied by qty', then leave this field blank to default in the master file price x qty. If the charge code is defined as a 'rate', the system will calculate the total (quantity x rate).
Click or press ![]() to accept and the line you just keyed will be displayed above. You can key in additional lines (up to 9999) as needed. If there are instructions or additional notes pertaining to just this work order, you can skip the Sz/Cg code field and go right to the Description and key in the information (such as placement instructions, etc).
to accept and the line you just keyed will be displayed above. You can key in additional lines (up to 9999) as needed. If there are instructions or additional notes pertaining to just this work order, you can skip the Sz/Cg code field and go right to the Description and key in the information (such as placement instructions, etc).
Once a work order is entered, it can be seen by everyone and displayed on the On Line Dispatching screen.
Additional Fields that are usually updated AFTER the work order is complete. This can be done manually through customer service or on-line dispatching or will be done automatically via Drivers Logs or Scale-Pak.
The Vehl field ![]() is where you enter the vehicle that performed the service listed on the work order.
is where you enter the vehicle that performed the service listed on the work order.
The Disposal field ![]() is where you enter the disposal code associated with this work order if applicable.
is where you enter the disposal code associated with this work order if applicable.
The Ticket field ![]() is where you enter the disposal ticket number associated with this work order if applicable. This field can print on Statements and Invoices if the flag in the Cycle Master is set to Yes.
is where you enter the disposal ticket number associated with this work order if applicable. This field can print on Statements and Invoices if the flag in the Cycle Master is set to Yes.
The Material field ![]() is where you enter the material that was disposed of. The material description will display under the code once it is entered and selected on the line. You will need to use the scroll bar to display the fields.
is where you enter the material that was disposed of. The material description will display under the code once it is entered and selected on the line. You will need to use the scroll bar to display the fields.

The U/M field ![]() is where you enter the Unit of Measure associated with the weight of the disposal ticket entered.
is where you enter the Unit of Measure associated with the weight of the disposal ticket entered.
The Units field ![]() is where you enter the quantity or weight associated with the disposal ticket entered. The Unit of Measure master determines the decimal position of the Units entered, therefore you may be required to enter 3 decimal positions for U/M = TN but only 2 decimal positions for U/M = LB. Talk to your system administrator if you think this needs to be changed in your master files.
is where you enter the quantity or weight associated with the disposal ticket entered. The Unit of Measure master determines the decimal position of the Units entered, therefore you may be required to enter 3 decimal positions for U/M = TN but only 2 decimal positions for U/M = LB. Talk to your system administrator if you think this needs to be changed in your master files.
The Prim Cost field ![]() is where you enter the cost associated with the disposal. This is the Cost to your company and not the amount you are charging your customer. If using LEEDS, then this is the Primary Cost verses the Component Cost (or Sub-Material Cost). This cost can be defaulted in from your Disposal Master if the Material entered is found in that master file.
is where you enter the cost associated with the disposal. This is the Cost to your company and not the amount you are charging your customer. If using LEEDS, then this is the Primary Cost verses the Component Cost (or Sub-Material Cost). This cost can be defaulted in from your Disposal Master if the Material entered is found in that master file.
The Comp Cost field ![]() is a display only field used with LEEDS reporting to show the Component Cost. A value will only display in this field if the Disposal code is set to Cost by Components and the Sub-Materials have been entered with costs.
is a display only field used with LEEDS reporting to show the Component Cost. A value will only display in this field if the Disposal code is set to Cost by Components and the Sub-Materials have been entered with costs.
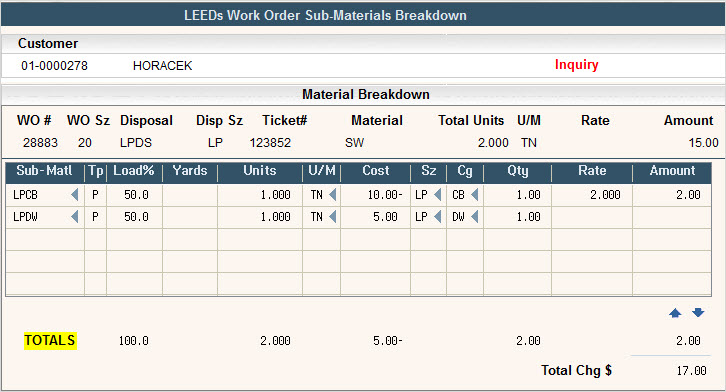
The Sub-Mtrl field ![]() is also a display only field used with LEEDS reporting to show the Sub Materials Flag. If the Work Order detail line does NOT have any sub-materials entered, then this field will remain blank. If the Work Order detail line has sub-materials but none of them have a charge, then the flag will be a #. If the Work Order detail line has sub-materials entered and at least one of them has size/chg code with a dollar amount, then this flag will be a $. Prompting on this field will display the LEEDS Work Order Sub-Materials Breakdown window.
is also a display only field used with LEEDS reporting to show the Sub Materials Flag. If the Work Order detail line does NOT have any sub-materials entered, then this field will remain blank. If the Work Order detail line has sub-materials but none of them have a charge, then the flag will be a #. If the Work Order detail line has sub-materials entered and at least one of them has size/chg code with a dollar amount, then this flag will be a $. Prompting on this field will display the LEEDS Work Order Sub-Materials Breakdown window.
The To Date field ![]() is used as a way to bill the customer daily rental through work orders. The To Date is used as the ending date to bill rental through. The Line date becomes the From date and when work orders are posted, the customers is automatically billed for the number of days they had the container. Click here to see details on Day Rent from Work Orders.
is used as a way to bill the customer daily rental through work orders. The To Date is used as the ending date to bill rental through. The Line date becomes the From date and when work orders are posted, the customers is automatically billed for the number of days they had the container. Click here to see details on Day Rent from Work Orders.
The BnTp field ![]() stands for the Bin Type. If Bin Type is required for the size/chg code entered on the work order line, then you will be required to enter a Bin Type on that line.
stands for the Bin Type. If Bin Type is required for the size/chg code entered on the work order line, then you will be required to enter a Bin Type on that line.
The Sales ID field ![]() is used to identify the sales person associated with this charge. If the Sales ID is required at the Cycle level, then it will be required in this field. The Sales ID will default in from Contract Pricing if the size/chg code used in the work order is in contract pricing with a Sales ID. If not found in contract pricing, then the Sales ID will default in from the Customer Profile.
is used to identify the sales person associated with this charge. If the Sales ID is required at the Cycle level, then it will be required in this field. The Sales ID will default in from Contract Pricing if the size/chg code used in the work order is in contract pricing with a Sales ID. If not found in contract pricing, then the Sales ID will default in from the Customer Profile.
![]() A User Warning message can appear in red at the bottom of the screen when the Sales ID defaults into a work order. This will alert the customer service rep that a Sales ID has been defaulted and they can change it if necessary. Contact support services if you would like this feature activated on your system.
A User Warning message can appear in red at the bottom of the screen when the Sales ID defaults into a work order. This will alert the customer service rep that a Sales ID has been defaulted and they can change it if necessary. Contact support services if you would like this feature activated on your system.
Printing a work order can be done either in Batch or Interactively (on line).
Click on the ![]() button or press F5 and you will get a message on the bottom of the screen:
button or press F5 and you will get a message on the bottom of the screen:![]() . (If reprinting the work order the message will say Reprint instead of Print).
. (If reprinting the work order the message will say Reprint instead of Print).
You also have the ability to send the work order to a printer that is different from the normal default printer for work orders. If this feature is turned on in the Report Form Printer Set up, then when the ![]() is pressed the following screen will be displayed.
is pressed the following screen will be displayed.

Type in the printer ID to send the work order to and click or press ![]() . The work order will be sent to the specified printer and you will return to the Work Order Entry/Update screen.
Click here to see how to turn this feature on.
. The work order will be sent to the specified printer and you will return to the Work Order Entry/Update screen.
Click here to see how to turn this feature on.
The work order will be printed based on the set up in the Report Form Printer Set up (long, short, pre-printed). Click here to display a Work Order Sample.
To print work orders or logs in batch, please see the Work Order Processing section.
To make changes to an existing work order, you must be in Update mode. Click on the ![]() button or press F13 (shift F1).
button or press F13 (shift F1).
Select the work order line to be changed by double clicking on it to bring it up to the 'Entry' section.
![]()
Make the necessary changes and click or press ![]() to accept changes.
to accept changes.
To Insert a Line
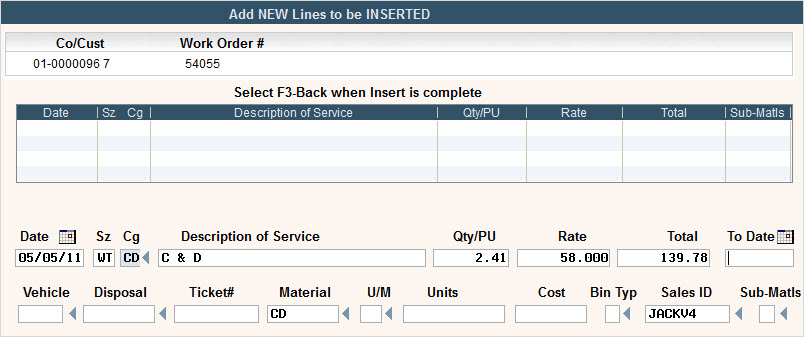
If you have work orders with multiple lines keyed in, you can insert a line before an existing line so the data is displayed in the order that makes the most sense.


Display Material Description
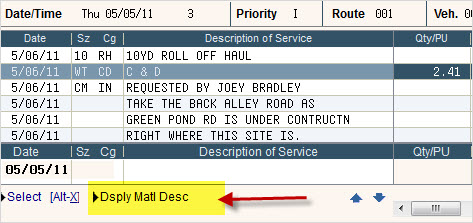
If you highlight a line that has a material code entered, you can click on Dsply Matl Desc and a window will display showing the code and the material description that is entered into the Material Master file.

From inside a work order, there is an option in the Action/Function key section that allows you to Work with Line Dates. If you select this option, the following screen will appear:
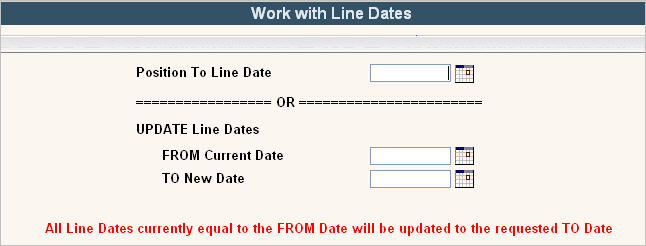
The first option is Position To Line Date. This allows you to key in a line date to position the work order to. This is extremely helpful in work orders where many lines are entered with different dates. Just key in the Line Date you wish to view and when you select ![]() the work order entry/update screen will be displayed with that Line Date at the top.
the work order entry/update screen will be displayed with that Line Date at the top.
The second option is UPDATE Line Dates FROM Current Date TO New Date. This allows you to quickly and easily change all the lines dates in your work order from one date to another. So, if the work order with several lines of information was created on 5/5/11, and the customers calls and says they want to change the date to 5/6/11, all you do is enter 5/5/11 (or select from the calendar) into the FROM date and 5/6/11 (or select from the calendar) into the TO date.

When the user clicks or presses ![]() all of the line dates previously marked as 5/5/11 will be instantly changed to 5/6/11.
all of the line dates previously marked as 5/5/11 will be instantly changed to 5/6/11.
![]() This does NOT change the Action Date field.
This does NOT change the Action Date field.
A work order can be dispatched (marked as sent to a driver) from inside the work order entry/update screen by selecting ![]() which is found at the top of the screen. You should see a red message appear at the bottom of your screen that says:
which is found at the top of the screen. You should see a red message appear at the bottom of your screen that says: ![]() Once a work order is Dispatched, the Action Date, Route, Vehicle and Driver fields are no longer accessible. This also puts the work order into the Drivers Log of the Route/Vehicle/Driver for the matching action date. To "undispatch" a work order (which must be done in order to change those fields) just click on
Once a work order is Dispatched, the Action Date, Route, Vehicle and Driver fields are no longer accessible. This also puts the work order into the Drivers Log of the Route/Vehicle/Driver for the matching action date. To "undispatch" a work order (which must be done in order to change those fields) just click on ![]() and those fields will be accessible again and the work order will automatically be removed from the drivers log. You should see a red message appear at the bottom of your screen that says:
and those fields will be accessible again and the work order will automatically be removed from the drivers log. You should see a red message appear at the bottom of your screen that says: ![]()
![]() The Route Code Master must be set as Create Driver Logs = Yes in order for the work order to be uploaded into the drivers log automatically when dispatched.
The Route Code Master must be set as Create Driver Logs = Yes in order for the work order to be uploaded into the drivers log automatically when dispatched.
![]() The user must have a Dispatch level of 4 under the Operations tab of User Security in order to Dispatch a work order.
The user must have a Dispatch level of 4 under the Operations tab of User Security in order to Dispatch a work order.
A work order can be toggled (marked as post-invoice pending and ready to be invoiced) from inside the work order entry/update screen by selecting ![]() which is found at the top of the screen. When that option is selected, a toggle window will appear.
which is found at the top of the screen. When that option is selected, a toggle window will appear.

The system will display information about the work order such as the Customer (billing) Name, the Service Address, Action Date and Description of Service (description entered in line 1 of the work order).
It will display the Current status, and Press Enter to change status to _________.
At this point, if there are no changes to be made to the work order (add disposal, or update inventory/prorate from the Services/Bins screen) you can click or Press ![]() to change the status to POST/INVOICE PENDING (Toggle the work order).
to change the status to POST/INVOICE PENDING (Toggle the work order).
![]() The user must have a W/O & Invoices level of 3 or higher under the Customer Service tab of User Security in order to Toggle an individual work order.
The user must have a W/O & Invoices level of 3 or higher under the Customer Service tab of User Security in order to Toggle an individual work order.
Click here to see more information on Work Order Toggling.
This option will display any route changes that have occurred on this work order. Any time a route is updated, either from the work order or on-line dispatching, a record will be added showing the FROM Route Code, the TO Route Code, the Action Date for both the From & To, the date the route code was changed, the time the route code was changed, User Id that made the change, and the Program Id where the change was made (from Work Order entry/update or from On-Line Dispatching).

The ability to delete one line or an entire Work Order is controlled by your Security set up in the User security file.
To delete a line item, click ONCE on the work order line to highlight the line (it can not be in the 'entry' section of the screen). Select the ![]() option on the bottom of the screen. You can also right click on the line.
option on the bottom of the screen. You can also right click on the line.
To select multiple lines in a row to delete, hold down your shift key and single click.
To select multiple lines that are not next to each other, hold down your ctrl key and single click.
The confirm delete screen will be displayed.
![]() Once you confirm deletion, there is NO Undo button.
Once you confirm deletion, there is NO Undo button.
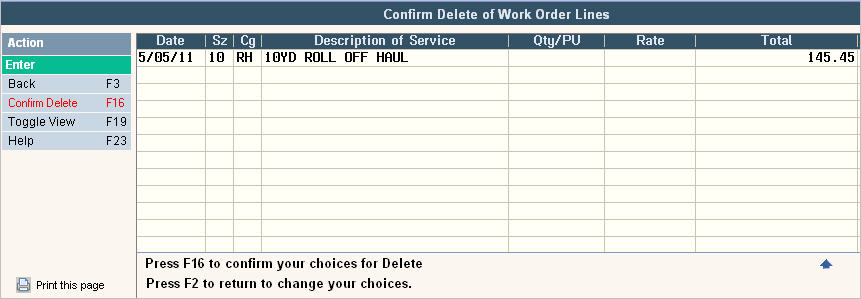
Click or press ![]() or
or ![]() to cancel.
to cancel.
To delete the entire work order, click on the ![]() button or press F16 (shift F4)and you will get a message
button or press F16 (shift F4)and you will get a message ![]() .
.
![]() Once you confirm deletion, there is NO Undo button.
Once you confirm deletion, there is NO Undo button.
Click or press ![]() or
or ![]() to cancel.
to cancel.
Use the Work Order list to verify that all work orders are getting toggled and posted and nothing is 'getting missed'. Click here for the Work Order List section.