This procedure is known as Cash Receipts in the i-Pak system. Any type of payment that needs to be entered against a customer's account is entered via Cash Receipts. In addition, miscellaneous payments such as bid refunds, insurance payments, metal rebates, etc. can also be entered in to i-Pak's Cash Receipts program. This way the whole deposit for the bank is entered in one place and will be included on the Month End reports for Bank Reconciliation.
Before getting started entering a payment batch, you may want to 'run a tape' of all payments to be entered. The system will ask for the total for the batch and verify that amount against a calculated running total of what is actually entered to ensure correct entry of payments. You may also decide to 'run your tape' after you enter the batch. Whichever you prefer is fine; however, we recommend that the batch amount be verified to the deposit amount.
Payments are entered using a company and customer number (account number), or invoice number. For balance forward customers, a 'check digit' is also required - this is the extra number to the right of the customer # after the space. For all other types of the customers the 'check digit' is not required. If the customer # is not available with the payment (ie: the customer did not send back the billing stub), there are search options available in the Cash Receipts Entry program that can assist with customer look up.
Payments for Balance Forward customers are applied against the Customer's balance, all other payments (Open Invoice and Summary Invoice customers) are applied against a Customer's Invoice or if there are no Open Invoices, to the Customer's Unapplied Bucket. Amounts from Unapplied can later be applied to an Invoice, once one is generated on the Customer's account.
If you have multiple companies, you can either key all companies in to the same batch, or separate the payments into their respective companies. This will depend on whether the bank accounts are the same for all, some or any of the companies. The System Administrator can turn on the feature that allows multiple companies in the same batch, by updating the Systems Control Master in the Company Master file. Click here for additional options available in Cash Receipts.
The steps involved in entering payments are :
Cash Receipts Entry/Update - this is the procedure used to actually enter each payment or update a batch that has already been entered, but not posted.
Cash Receipts Edit Listing - this procedure is used to print an edit list of the batch entered to review for errors. This is a helpful tool when the 'tape' amount does not match the system running total, and you need to verify the entries.
Cash Receipts Post - this is the final step of the process, when the payments actually get 'posted' to the customer's account.
Additional steps that might be needed:
Making Changes/Updating a Batch
From the Master Menu, select the Accounting option. This will bring you to the i-Pak Accounting Menu.
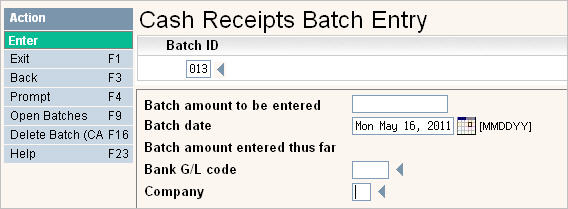
Select option #1 Cash Receipts Entry/Update. This will bring you to the Cash Receipts Batch Entry screen. This is also know as the Batch Header screen.
Fill in the screen as follows:
|
Batch ID |
Enter a 3 character identifier for the batch. If the option is turned on, this identifier can be automatically generated. The batch id helps to identify a specific batch of payments if needed in the future. Therefore, the id & batch date should be noted somewhere on the backup paperwork (such as kept check stubs, the tape for the batch, copies of checks, etc). |
|
Batch amount to be entered |
The total of the checks for this batch/deposit. This will be the 'tape' total. |
|
Batch date |
The date for the batch - The current date will default in. Typically this should be the date the batch is DEPOSITED in to the bank. This date will print on the Month End reports and can be used for bank reconciliation. |
|
Batch amount entered thus far |
This field is generated by the system and will be a running total for amounts entered in the batch. This amount and the 'Batch amount to be entered' must match after payments are entered in order for the batch to be posted. If they do NOT match, the system will NOT allow the batch to be posted. |
|
Bank G/L code |
The abbreviated bank general ledger code the batch should be assigned to. This is the Debit side of the cash receipts entry (Accounts Receivable is the Credit side). This can be left blank and will be filled in when the company ID is entered (if using multiple company cash receipts, this will be filled in when you press enter).
|
|
Company ID |
This field is not displayed if multiple company cash receipts is being used. If displayed, enter the 2 character id for the company. |
After fields have been filled in, press ![]() to continue.
to continue.
All Accounting Types Receipt Entry
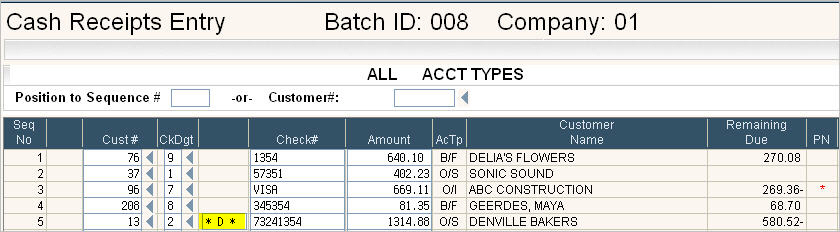
The first screen that appears is titled ALL ACCT TYPES. This screen allows you to enter a payment for any customer regardless of their accounting type (ie=Balance Forward, Open Statement or Open Item).
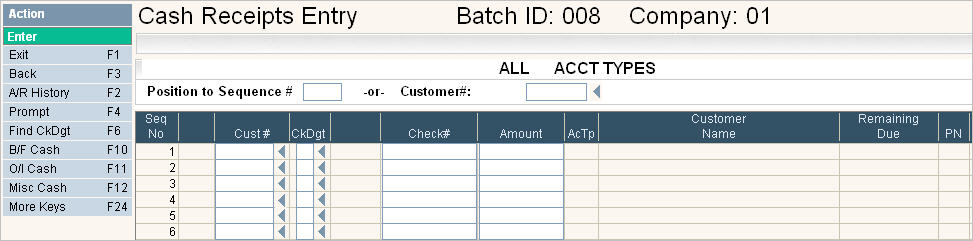
Type in the Customer # in the first box. ![]() . If you do not know the Customer # you can prompt
. If you do not know the Customer # you can prompt ![]() on the Cust# field and a search screen will be displayed.
on the Cust# field and a search screen will be displayed.
Type in the Check Digit (for Balance Forward Accounts only) in the second box ![]() . If you know the customer # but not the check digit, you can prompt
. If you know the customer # but not the check digit, you can prompt ![]() on the CkDgt field and the following screen will display:
on the CkDgt field and the following screen will display:
Click on Confirm ![]() if this is the correct customer.
if this is the correct customer.
The Check Digit will automatically be filled in for any non-balance forward type customers after the invoice application has been made.
Next type in the check number in the Check# field.  If this is something other than a check, you can type in a word to distinguish the type of payment; for example: 'CASH' for cash payments, 'MO' for money order, 'MCRD' for Master Card, 'VISA' for Visa, 'AMEX' for American Express, 'WIRE' for wire transfers, etc. This field is a 7 character field, so if the check number will not fit, we suggest using the LAST 7 characters.
![]() Keep in mind once a payment has been posted you can use the Check# to search for a customer (to look for a misapplied payment for example), so you might want to have some 'standards' in your organization to handle certain situations (like the number 0 as the first number in the check # - should you key it or not, what number to use if more than 7, what other number to use with MO for the money order, etc).
Keep in mind once a payment has been posted you can use the Check# to search for a customer (to look for a misapplied payment for example), so you might want to have some 'standards' in your organization to handle certain situations (like the number 0 as the first number in the check # - should you key it or not, what number to use if more than 7, what other number to use with MO for the money order, etc).
The blank field between the Check# and Amount is for Locked or Delinquent Customers. If you enter a Cash Receipt for an account with an L or D action code, the action code will be displayed in this field. If the Amount keyed is greater than or equal to the balance due, then you will be able to update this field and remove the action code from the account by simply deleting it from this screen.
Highlight the information in the field and delete it (hit your space bar or delete key). When you press ![]() the Change Customer Action Code confirmation screen will appear.
the Change Customer Action Code confirmation screen will appear.
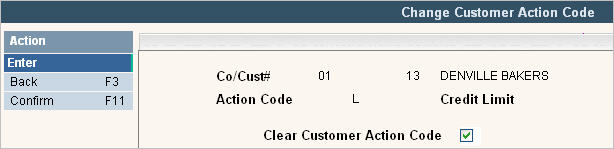
If you meant to remove the action code, press ![]() . If not, press
. If not, press ![]() and the action code will remain on the account.
and the action code will remain on the account.
![]() You must have access to update the Action Code field in User Security in order to perform this function.
You must have access to update the Action Code field in User Security in order to perform this function.
The final field to enter on this screen is the Amount. ![]() Key in the amount of the payment - include the decimal point (you do NOT need to key in a $ or any ,). If the payment is a whole dollar amount (nothing in the 'cents' - such as 100.00), you do NOT need to key in the two 0's after the decimal point.
Key in the amount of the payment - include the decimal point (you do NOT need to key in a $ or any ,). If the payment is a whole dollar amount (nothing in the 'cents' - such as 100.00), you do NOT need to key in the two 0's after the decimal point.
For Balance Forward and Open Item Customers: If the payment amount submitted equals the balance on their last statement, you can simply press Enter or tab over the Amount field and the system will fill in the payment amount and the full remaining due amount.
For Open Statement Customers: If the payment amount submitted equals the balance due on their account, you can simply press Enter or tab over the Amount field and the system will fill in the payment amount and the full remaining due amount.
For Open Item and Open Statement Customers: Once the fields have been filled in on this screen, you will be put into the Open Item Batch Entry screens to complete the transaction.
Other fields on this screen:
Customer Name  - This field is displayed automatically when Enter is pressed, or when using the Customer Search screen when the customer account is selected.
Remaining Due  - This field takes the customer's balance due and subtracts the payment amount and calculates the remaining balance due.
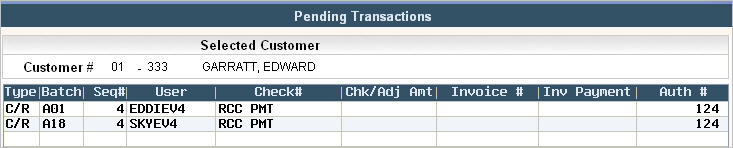
PN ![]() - This is the 'Pending' field. If there are any other 'accounting type' of transactions pending for the customer, an '*' will be displayed in this box. For example, additional payments in another batch, or the same batch, sales and adjustments, or toggled work orders. To display the items that are pending, click on the Pending button on the left tool bar
- This is the 'Pending' field. If there are any other 'accounting type' of transactions pending for the customer, an '*' will be displayed in this box. For example, additional payments in another batch, or the same batch, sales and adjustments, or toggled work orders. To display the items that are pending, click on the Pending button on the left tool bar ![]() (or press F14 - shift and F2 at the same time). This will display the 'Pending Transactions' screen.
(or press F14 - shift and F2 at the same time). This will display the 'Pending Transactions' screen.
If you are entering Cash Receipts under the All Accounting Type section, then the entries into this screen will be automatically created and you do not need to access this section at all. However, if you only enter Balance Forward type of Cash Receipts or feel more comfortable with this layout, then you can choose to manually enter them here as well.
The screen titled B/F Customer Cash Receipts Entry is for customers who are Balance Forward only.

![]() The Cash Receipts program has been designed so that you can enter all the fields using the numeric keypad of your keyboard, so that data entry is quicker. To move from field to field - use the + (or field +) key on your numeric keypad - it is typically the key above the enter key.
The Cash Receipts program has been designed so that you can enter all the fields using the numeric keypad of your keyboard, so that data entry is quicker. To move from field to field - use the + (or field +) key on your numeric keypad - it is typically the key above the enter key.
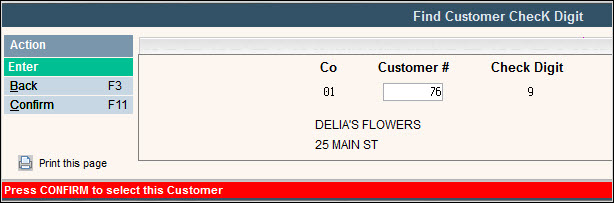
Type in the Customer # and Check Digit in the first box.  In this example, the customer number is 76 and the check digit is 9. Enter numbers in without any spaces or special characters (#, /, etc).
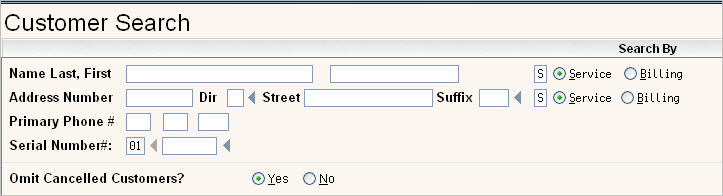
If the customer #/check digit is unavailable, click on the ![]() for search options. The system will display a Customer Search screen, and you can search by Billing or Service name, Billing or Service address, etc.
for search options. The system will display a Customer Search screen, and you can search by Billing or Service name, Billing or Service address, etc.
If you know the customer # but not the check digit, you can click on ![]() and the following screen will display:
and the following screen will display:
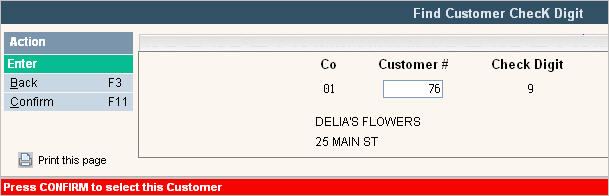
Enter the Customer# and click or press ![]() and the Check Digit, Customer Name and Address will display. If you click or press
and the Check Digit, Customer Name and Address will display. If you click or press ![]() the Customer# and Check Digit will auto populate in to the record your cursor is on. Click or press
the Customer# and Check Digit will auto populate in to the record your cursor is on. Click or press ![]() if this is the incorrect customer.
if this is the incorrect customer.
Next type in the check number in the Check# field. If this is something other than a check, you can type in a word to distinguish the type of payment; for example: 'CASH' for cash payments, 'MO' for money order, 'MCRD' for Master Card, 'VISA' for Visa, 'AMEX' for American Express, 'WIRE' for wire transfers, etc. This field is a 7 character field, so if the check number will not fit, we suggest using the LAST 7 characters.
![]() Keep in mind once a payment has been posted you can use the Check# to search for a customer (to look for a misapplied payment for example), so you might want to have some 'standards' in your organization to handle certain situations (like the number 0 as the first number in the check # - should you key it or not, what number to use if more than 7, what other number to use with MO for the money order, etc).
Keep in mind once a payment has been posted you can use the Check# to search for a customer (to look for a misapplied payment for example), so you might want to have some 'standards' in your organization to handle certain situations (like the number 0 as the first number in the check # - should you key it or not, what number to use if more than 7, what other number to use with MO for the money order, etc).
Press the +key or move to the Amount field.  Key in the amount of the payment - include the decimal point (you do NOT need to key in a $ or any ,). If the payment is a whole dollar amount (nothing in the 'cents' - such as 100.00), you do NOT need to key in the two 0's after the decimal point. If the payment amount entered equals the remaining due, you can simply press Enter to go to the next line, and the system will fill in the payment amount and the full remaining due amount.
At this point you can press Enter to go to the next line, or just press the +key to get to the next line. We suggest you press enter because pressing Enter saves the information in to the batch. If you do not see the Customer's Name next to the payment amount - that line has not yet been accepted in to the batch.
When you reach line #16 at the bottom of the screen, press Enter to go to the next screen. The system will then start at the top of the next screen, line # 17.
Once finished entering all payments for the batch, press Enter to ensure all lines have been saved in to the batch.
Press ![]() or
or ![]() to go back to the 'header' screen - the Cash Receipts Batch Entry screen. The Batch amount to be entered should match the Batch amount entered thus far. If you did not 'run a tape' prior to creating the batch, do so now and compare the total to the Batch amount entered thus far, they should match. If not, you will need to review the batch for any key errors.
to go back to the 'header' screen - the Cash Receipts Batch Entry screen. The Batch amount to be entered should match the Batch amount entered thus far. If you did not 'run a tape' prior to creating the batch, do so now and compare the total to the Batch amount entered thus far, they should match. If not, you will need to review the batch for any key errors.
If the amounts match, you can exit (click on ![]() ) and post the batch.
) and post the batch.
Locked/Delinquent customers - the field between the customer #/check digit and the check number is reserved for a letter indicating if the customer is Locked (* L *) or Delinquent (* D *).
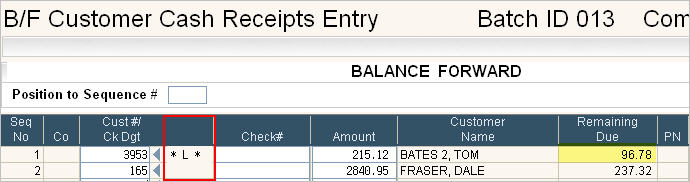
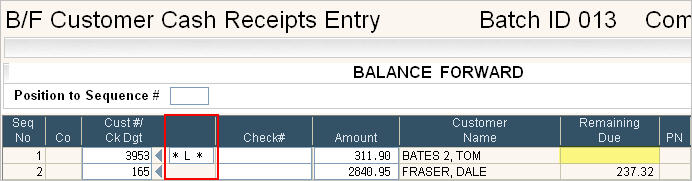
When you pay the balance in full on a customer that is Locked or Delinquent, the L or D will display in the field and can be updated. You can remove the action code which will then remove it from the customer profile so they are no longer considered Locked or Delinquent status.
Highlight the information in the field and delete it (hit your space bar or delete key). When you press ![]() the Change Customer Action Code confirmation screen will appear.
the Change Customer Action Code confirmation screen will appear.
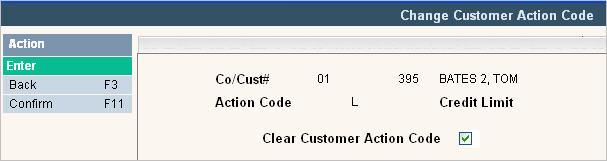
If you meant to remove the action code, press ![]() . If not, press
. If not, press ![]() and the action code will remain on the account.
and the action code will remain on the account.
Customer Name - This field is displayed automatically when Enter is pressed, or when using the Customer Search screen if used, when the customer account is selected.
Remaining Due - This field takes the customer's balance due and subtracts the payment amount and calculates the remaining balance due.
PN ![]() - This is the 'Pending' field. If there are any other 'accounting type' of transactions pending for the customer, an '*' will be displayed in this box. For example, additional payments in another batch, or the same batch, sales and adjustments, or toggled work orders. To display the items that are pending, click on the Pending button on the left tool bar
- This is the 'Pending' field. If there are any other 'accounting type' of transactions pending for the customer, an '*' will be displayed in this box. For example, additional payments in another batch, or the same batch, sales and adjustments, or toggled work orders. To display the items that are pending, click on the Pending button on the left tool bar ![]() (or press F14 - shift and F2 at the same time). This will display the 'Pending Transactions' screen.
(or press F14 - shift and F2 at the same time). This will display the 'Pending Transactions' screen.